David Chapman
Dave Parsons
Spencer Sills
It’s hard to believe that film today has become a novelty platform reserved for artists. We’ve taken film for granted and it’s served us well over the last 200 years but it’s becoming harder and harder to find. You might be scratching your head saying “so what?”. Well, let’s look at high definition television, you know all those old movies and TV series that suddenly are now available in true HD? Well, they were shot on film, either 16mm, 35mm or some other variant. Before the evolution of high definition television and the high quality video formats of the very late 90’s, video sucked. Only low end productions would use video because it was cheap. Do you think we’ll ever see The Fresh Prince of Belair in HD? No, never, it won’t happen! It was all shot on BetaCamSP which was a very good video format for the time sporting a resolution of 560 lines which is well above the standard tv resolution of 480 lines. We can make the original Betcam video look a little better with modern technology but it’ll never look great and it’ll never be HD quality. Yet we can scan 8mm film from the late 1930’s and it looks good in HD. Take that up a notch to 16mm and you’ll think it was shot yesterday. Take it a notch further to the 35mm level and suddenly the Wizard of OZ looks beautiful in 1080P, 2k, 4k and even 8k. The beauty of film is that there is so much hidden resolution! Things photographed or filmed over 100 years ago still look great today and film has visually preserved a ton of our history.
Despite a rich past, film today is a dying medium which will continue to slowly decline in use and popularity. It is my belief that every photographer should have an opportunity to experience using good high quality film at least a few times in their life. I started photographing on film but quickly moved onto digital photos. Back in the early 2000’s digital photography was like the holy grail for me. You could take many photos, reuse the same medium (at a great cost saving) and best of all, the results were instant! You knew right away whether or not you had a good photo and it helped me greatly with my ability to frame and compose photos.
I wont lie though, digital photography took a long time to catch up to film but it happened and now digital photography is surpassing film in most ways. Before I rant on about how good film is, I’ll let you know why digital as an everyday medium is better!
First off, I’m not getting into the whole debate about megapixels and ink blots, let’s just remember this, when you measure a photo, you look at the end product hanging on a wall. Whether it was from a 3 megapixel camera from 2003 or a 100 year old Burke and James 8×10 system does not matter, all that matters is what the viewer perceives. Film cameras, specifically 35mm systems are limited to 24 or 36 exposures which is nothing compared to how many hundreds of digital photos you can stuff on a 32GB memory card. Each roll of film is rated at a specific speed for light sensitivity such as ASA/ISO 100 locking you in until you switch rolls while a digital camera has a huge range of ISO and your not locked in. Film traditionally had more dynamic range until 2012 when digital sensors finally surpassed that barrier. Today many cameras embed EXIF data including GPS coordinates, date/time and specific information about the camera settings, so you’ll never really wonder when/where/how a digital photo was taken, film of course, does none of this.
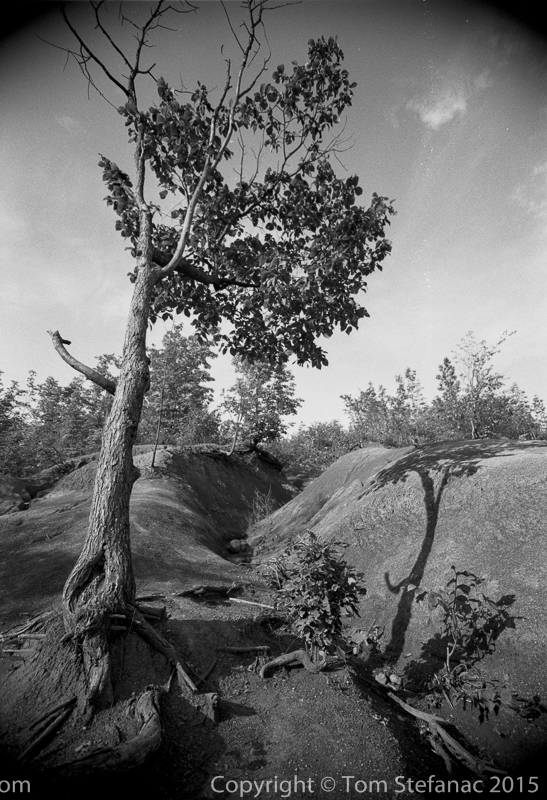
That said, film is not digital, and digital photography is not film. In order to understand the beauty of film you need to use it. I’ve found that when shooting with film I’m forced to stop and slow down. Because I have a limited number of exposures available and I want to squeeze as much out of a single roll as possible I really stop and think. I concentrate on exposure, composition, second guess myself, wait for the right moment, breathe slowly and then in a split second I have my photo. There’s no looking down at the LCD to see if I got the shot I wanted, there’s no waiting on the camera to process the photo. It’s over and done, I’m already thinking about the next photo and move on. When I’m finished with one roll I might move on to something else such as Ilford Delta-100 black and white or Kodak Ektar.
To date my favorite film by far, and I say this without any hesitation is Ilford Delta-100. It’s very sharp, clean and extremely responsive. There’s no colour information, it’s black and white, but it produces the best black and white photos period. Heck, they’re way better than anything my 5DMKIII produces. My two favourite colour films are Kodak Ektar 100 and Fujichrome Velvia 100. For someone just getting into film your going to want to stick with a C-41 process, that’s the standard and most basic chemical process for development. Most Wal-Mart’s and drug stores still have machines capable of developing this film. Kodak Ektar is a C-41 process as well as Ilford XP2 which is not true black and white but simulates the process well. If you want to spend more money, anything that’s not C-41 will do, but be warned, you’ll need to use specialty stores to develop those types of film. Fujichrome Velvia has the highest resolving power and some of the richest colours among colour 35mm films still in production but be warned, it’s an E-6 process which very few places are capable of developing/working.
 So to reiterate, C-41 is the most common film development process followed by RA-1. Next on the list is E-6. After E-6 there is a whole bunch of special and discontinued formats, bringing us to the Ilford Delta series which has its own very specific process that is for the most part completely manual.
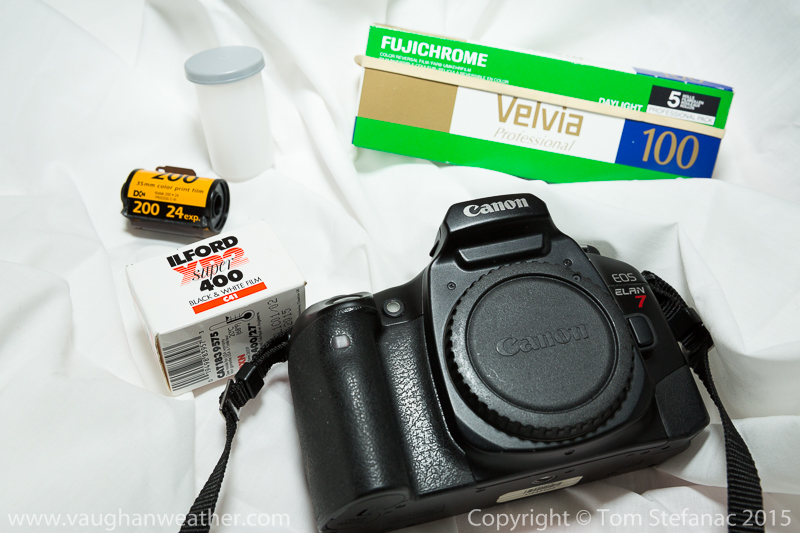
If you don’t have on old 35mm camera laying around or you want one with a good, fast and responsive auto-focus system then head over to your local camera shop and they’ll probably have a few dozen used cameras. Don’t spend a lot of money, you can probably get an old Rebel or Elan7 for $10 or $20. In fact, I’ve found an old Canon EOS-1v in a bin of SLRs and bought it for a WHOPPING $40. That’s not bad when you consider that it was Canon’s flagship camera at one point and remains their only film based camera still in production. If you do have an older 35mm camera check to see if it has a metering system that actually still works. Retro old school cameras that use the sunny-16 rule are cool but you might just take a whole bunch of under or over exposed pictures, especially if you venture into the shade. For a beginner, I definitely recommend a digital metering system so you can get a feel for what’s going on before you rewind to the days before digital meters existed.
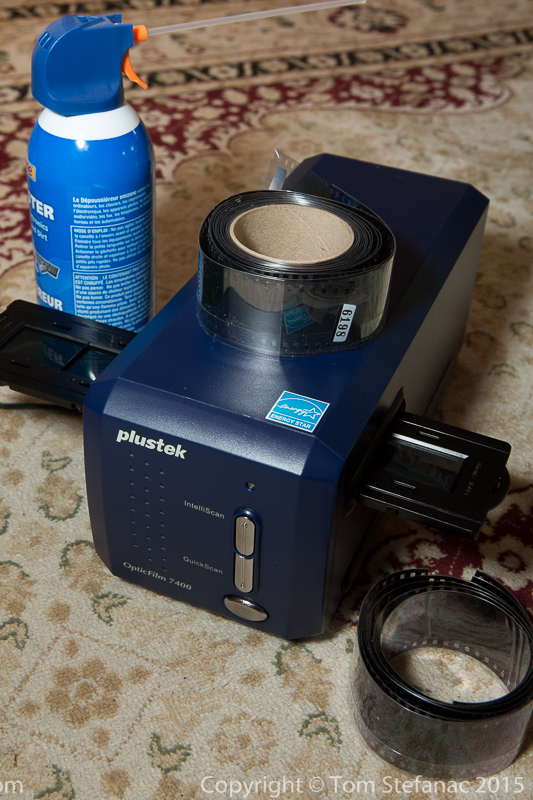 Now with all this talk about film, going out and shooting it and getting it developed are one thing. Transferring this analog medium to a digital format is a whole different ballgame. There are three basic methods to accomplish this transfer, the first is using a traditional flatbed scanner, the second revolves around the use of a specialized film scanner and the third is using a $100,000 drum scanner. The first two you can do at home, the third is something that only a professional company can do for you.
The problem with flatbed scanners is that they lack the high resolution you need for really nice prints and the colours can be flat. If you wan to spend $99 – $500 you can get a pretty good CCD/CMOS specialized film scanner that can get you upwards of 3600 to 6000 DPI of resolution. If you want to get every ounce of detail out of your film then a drum scanner will do that with resolutions surpassing 15,000 DPI and every detail coming out of any shadows, but be warned, you’ll pay $$$. I use a Plustek 7400 scanner, it’s now obsolete (go figure) and boasts 7200 DPI of resolution. The real world resolution is actually around 4000 DPI and generally speaking you only get around 30-60% of the “advertised” resolution from any scanner. Some scanners have infrared lights and silver detection tools which help detect scratches and dust to later have software remove them. Cheaper scanners use algorithm based guesses to hunt for dust and grit.

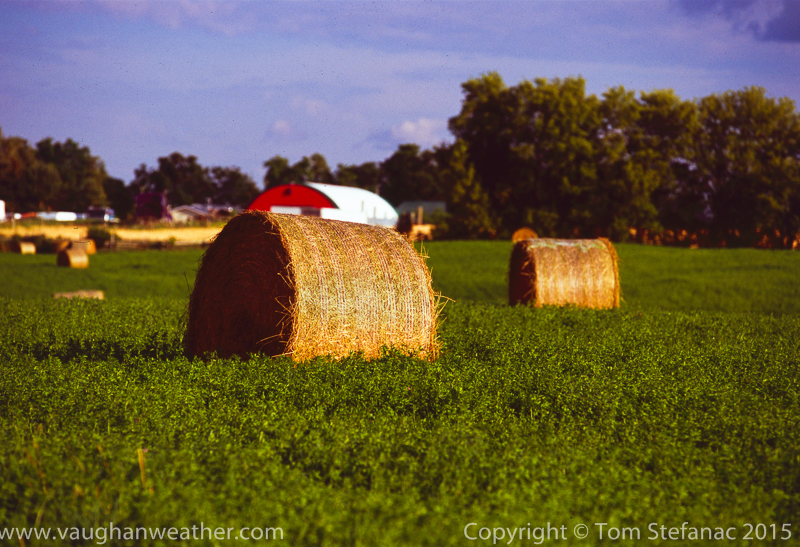
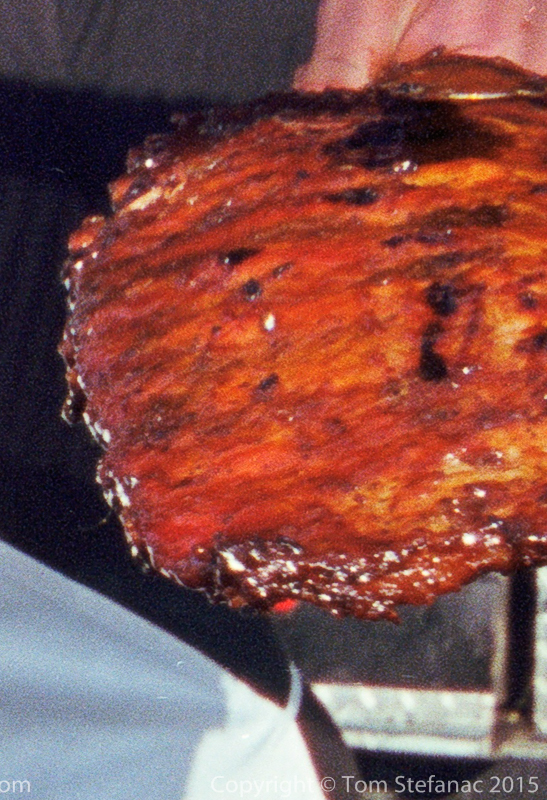
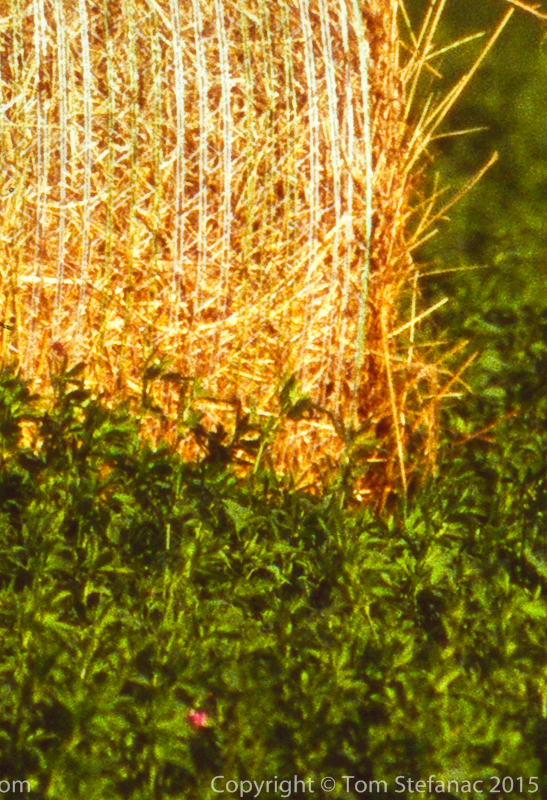
This photo was taken at the Woodbridge Ribfest using Kodak Ektar 100 in daylight. The colour detail and saturation are excellent, it was scanned using my Plustek 7400 with Silverfast 6.0 and Wal-Mart developed the photo (remember C-41 process) at a cost of around $6 plus prints. The good thing about films like Kodak Ektar is that they are very tolerant to over and under exposure whereas Fuji Velvia needs to be almost spot on or you’ll loose the highlights. The downside to more tolerant films is that they often have bigger ink blots and more grain, so none of my Ektar prints will have the same degree of detail or “resolving power” as Fuji Velvia. The other thing to remember is that as you increase a films sensitivity to light the ink blots become bigger. What I mean by that is a film which is rated at say ISO/ASA 800 will not have the same resolving power as the same film type at a rating of ISO/ASA 400 but of course only needs half as much light as the 400 film to garner the correct exposure and hence the difference between requiring a 1/60th versus 1/30th shutter speed.
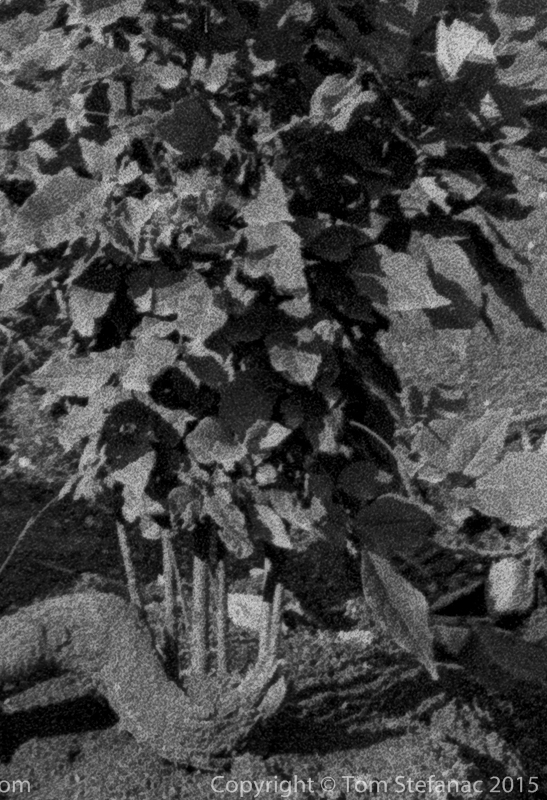
Here are a couple shots showing 100% crops where film grain is visible. Left is Ektar, center is Velvia and right is Ilford. Hands down Velvia wins for resolving power but Ektar and Delta are not far behind. These scans are also not that great compared to what a drum scanner would produce so keep that in mind too!
Well I think that closes out part one of “Shooting Film”, eventually I’ll get around to writing up Part 2. Until then, go and enjoy some good old fashioned photography.
A photo is worth a thousand words but how do you convey an abstract idea like the cold? Well it’s not easy, you could take a photo of something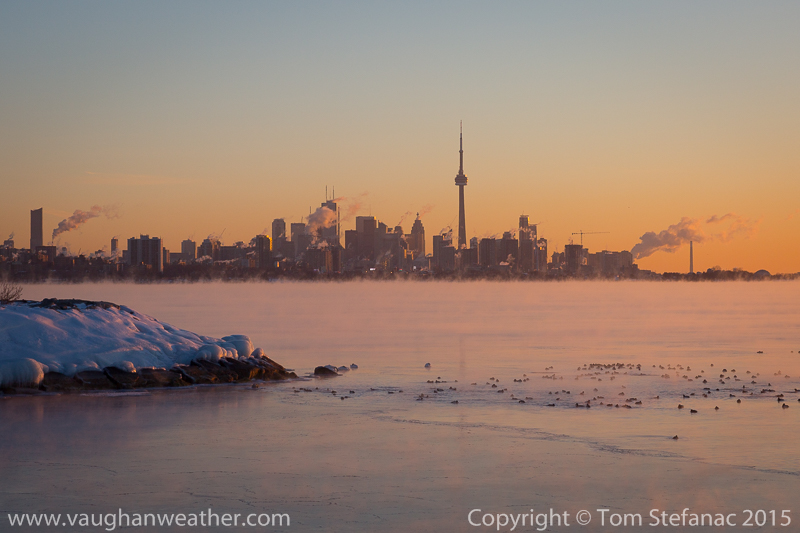 like a thermometer showing how cold it is but most photos of thermometers are boring. Now, if you had a thermometer covered in ice on what appears to be arctic tundra, well then, that’s a different story. Unfortunately ice laden thermometers and arctic tundra are often in short supply so we have to settle for other means. If you look at the photo to the right, it’s a shot of the Toronto skyline just after sunrise. It was around -23C when I took this photo and the winds were light. Needless to say, it was actually cold, but skylines on their own don’t necessarily convey that cold feeling. In order to achieve the cold look several things came together. Firstly, it was clearly sunrise in the photo and the viewer would understand that it was taken just after daybreak which is typically the coldest time. Secondly, the lake provided a natural steam covered foreground as it literally looked like it was boiling. Third, the rock outcropping to the left of the photo is ice-covered and lastly, you can see ice sheets covering the water’s surface closest to the point of the observer. Everything else, the tones in the sky, the smoke from the buildings and the ducks relaxing just help to enhance the message and convey the feeling of coldness. Capturing a photo like this requires that as a photographer you’re in the right place, at the right time, on the right day. It’s not hard, you just need to time and plan things correctly.
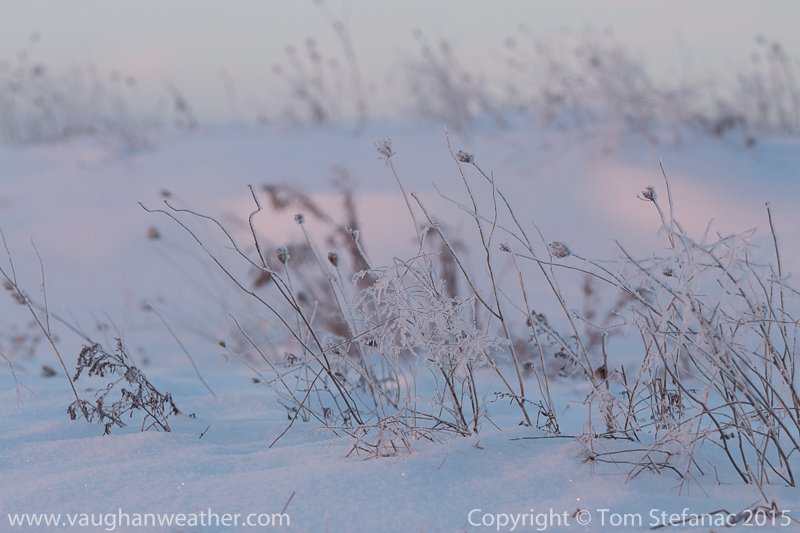
There are many other ways to convey coldness without needing a steaming lake. In the photo below to the left, there is really nothing special 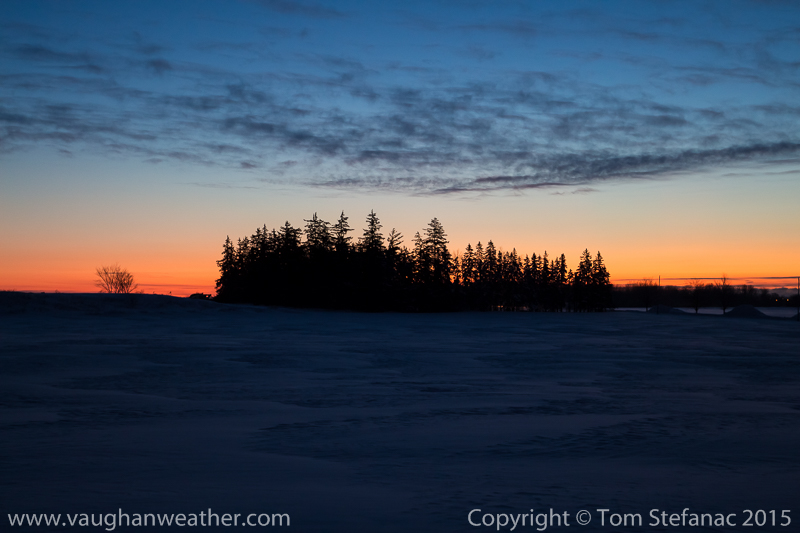 going on. No steam, no frozen lake, no smoke rising, yet it still looks very cold. Again, this photo was taken just before sunrise but for the observer this could be sunrise or sunset. It was around -22C when I snapped this near Stouffville. The overwhelming cool blue tones accented by the orange from the sunrise with the dark silhouette from the trees and snow covered foreground all just seem to scream cold. One thing I have found with cold photos is that you can fake them, but nothing seems to actually replace a photo taken on a truly cold or down right frigid day, unless of course, you remove the colour.
Subconsciously the human mind for some reason associates loneliness and desolation with cold. This photo of Woodbine beach to the right was taken on a cool -5C night which is not exactly cold by  Canadian standards, but the fresh coating of snow, the lack of colour and dark tones in the sky gave it a desolate appearance. The lack of any other structures in the photo really make it feel like this is a lonely output on some barren landscape. So while physically it was not really that cold, the photo still manages to overwhelmingly convey that feeling. Now I will stress that while it does convey a cold feeling, a steaming lake or a photo taken on a really cold day seems to still convey that message more strongly.
Here’s a great example of a frigging freezing day which looks warm! The fluffy snow, the bright  daylight, the “warm” blue sky, all the whites and the overall fluffy feel of the photo makes it feel or at least appear much warmer than it really is. When I took this photo I particularly remember thinking that I was going freeze &%^ my fingers off. There was a very light breeze but it was around -20C and I was trying to capture a snowy owl that was hidden from view in the nearby cluster of trees. So I was outside for a good 15 to 20 minutes just loosing body heat. I remember snapping this photo as part of a smaller series before giving up on the owl and heading home. You can see that it’s easy to convey different messages either intentionally or accidentally despite what the reality of the situation is depending on people’s reference points and the subject matter.
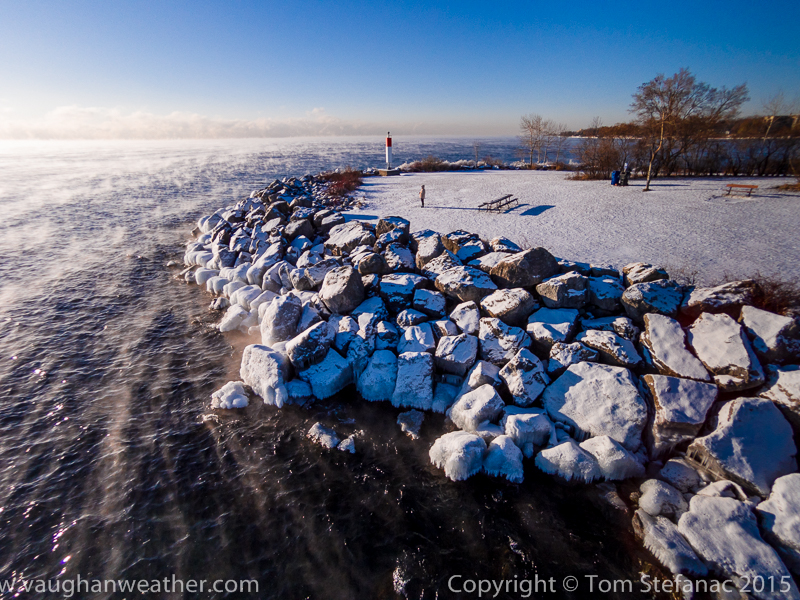 Sometimes though you can achieve more dramatic results through unique images that really reveal the environment. Here’s a photo I took from the foot of Humber Bay West Park with a small UAV flying out over the open waters of Lake Ontario. Fortunately, Lake Ontario does not really freeze and for the most part it remains open water even in the coldest of winters. On this day it was around -24C and the winds were blowing lightly from the north. The sun was still rising along the eastern horizon and the steam fog from the lake was also depositing ice along the bolder covered shoreline. It’s a photo that is unique and naturally feels cold. I took the close up image of the rocks below form the shoreline to capture some of the steam. I needed the contrast from the rocks to reveal it. This would be a more traditional photo, and while interesting it lacks the same power that the aerial image delivers just by virtue of the fact that it is more or less traditional and people have come to expect such images.
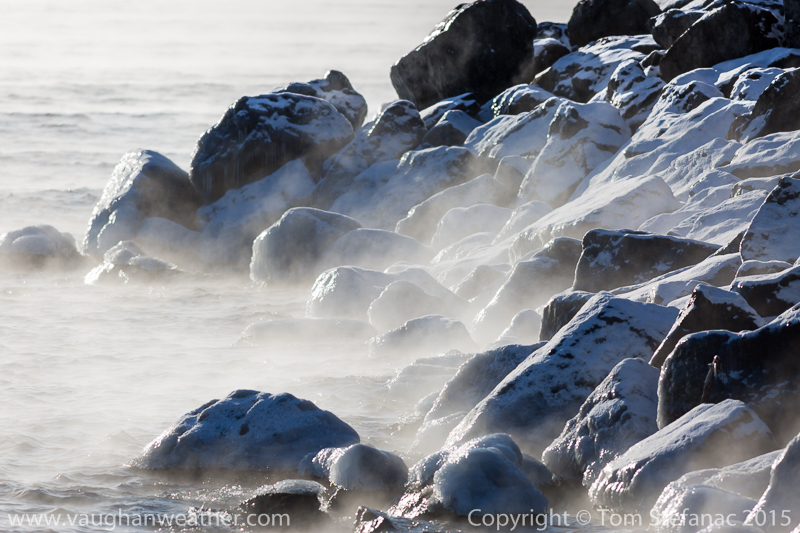 In fact I would argue that UAV based aerial images are the biggest thing to happen to photography in the last 30 years only to be outdone by the digital revolution itself. Sure, image stabilization came along, auto focus became quick and accurate and ultra-telephoto lenses got better but until now, photography and the standard SLR or DSLR have not really changed all that much. Digital photography brought us the ability to shoot almost unlimited images with instant, constant, predictable results and the freedom from being locked into a specific ISO or ASA. Film is a beautiful medium that really is different yet similar to digital photography, but at the end of the day, UAV’s have allowed cameras of any and all types to go places normally not possible and produce unseen perspectives.
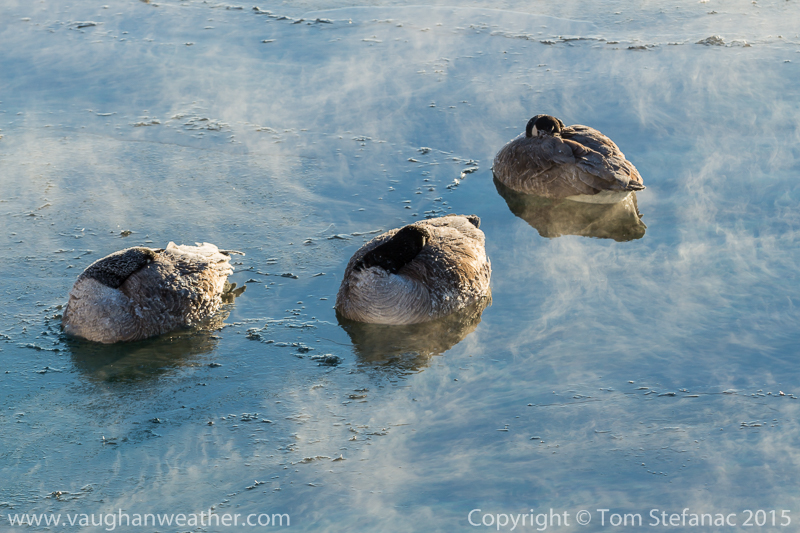 Now before I get too far off topic, let’s return to the concept of shooting the cold. As far as subject matter goes, animals are a great start. We’ve all seen photos of woolly looking cattle covered in snow during a blizzard or the warm foggy air created by their breathing hanging on a very cold day. These are the types of photos that link the physical cold to living creatures, things that actually feel and react to the environment in an immediately visible way. Here I’ve posted a photo of Canada Geese that were likely sleeping in the warm lake all night to avoid the bitterly cold air. Their feathers as a result are covered in ice crystals and they look visibly cold. But remember, you’re not just limited to images of birds or cows, humans make great subject matter too! The more layers, the better!
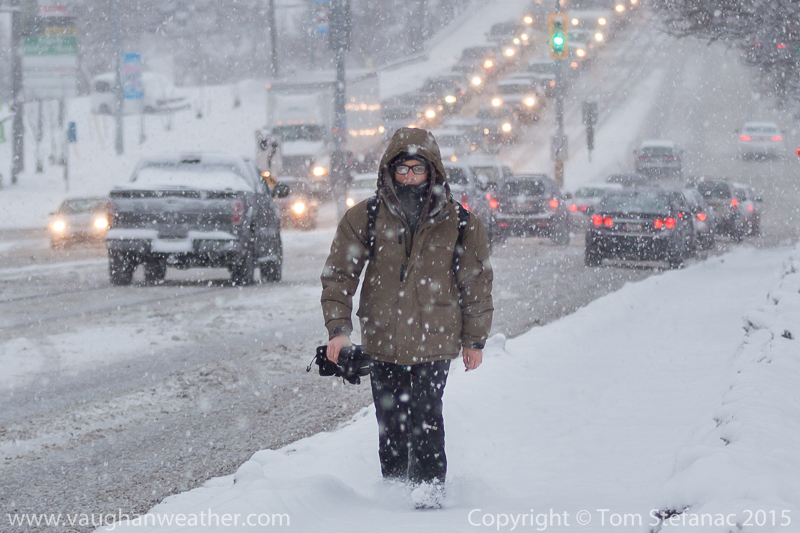 As an example here’s a man walking uphill during a cold snowy February day. He’s walking through about 15 centimeters of fluffy snow and marching along without gloves. Needless to say, it was not all that cold during this storm, but you’ll note his face is covered up and people’s eyes naturally gravitate to faces. As a result, the first thing most people will notice is that he’s bundled up and then realize that he’s not wearing gloves. It all comes together to form an interesting traditional winter photo. You know, the kind of photo that goes with the kind of story where your grandfather walked uphill both ways in 3 feet of snow with tattered shoes just to get to school and only suffered minor frost bite because that’s just how the world worked back then? Here’s another example of a really cold looking photo with some brave guy’s in a boat fishing. Fishing is great, I just prefer to do it while drinking a beer and getting a tan on a nice hot summer day!
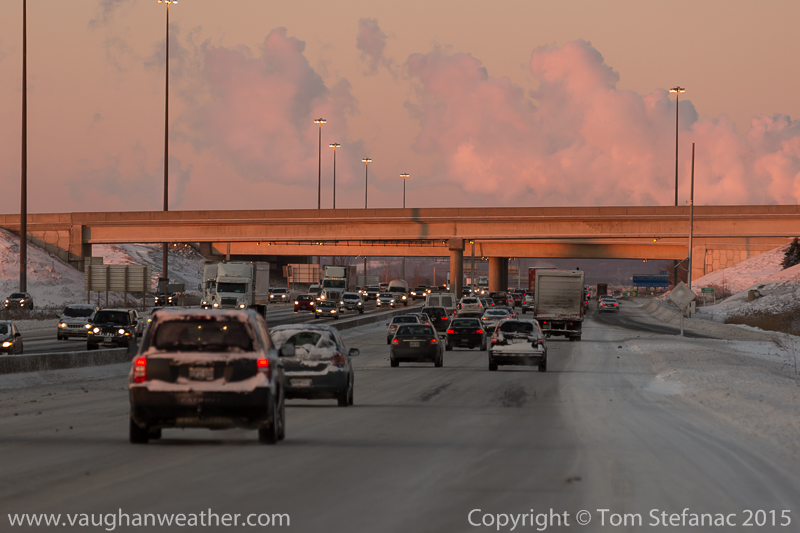 One area where I find photographers sometimes miss the cold is in the more traditional urban and suburban environments. Here’s a shot of highway 401 looking west with the rising sun to my back. This was a brutal day, there were accidents occurring every few seconds because the road was glazed with ice. It was also a bone chilling -20C at the time. If you look at this photo and have any knowledge of winter, you don’t need to be told it’s cold. The fact that the freeway is covered with ice, it’s sunrise and the smoke on the horizon is billowing, all screams cold. Plus, people can relate, if your only used to tropical weather then you’re very lucky, but for those of us who experience four seasons and know all about shivering half way to work while the car tries to warm up, this photo speaks volumes.
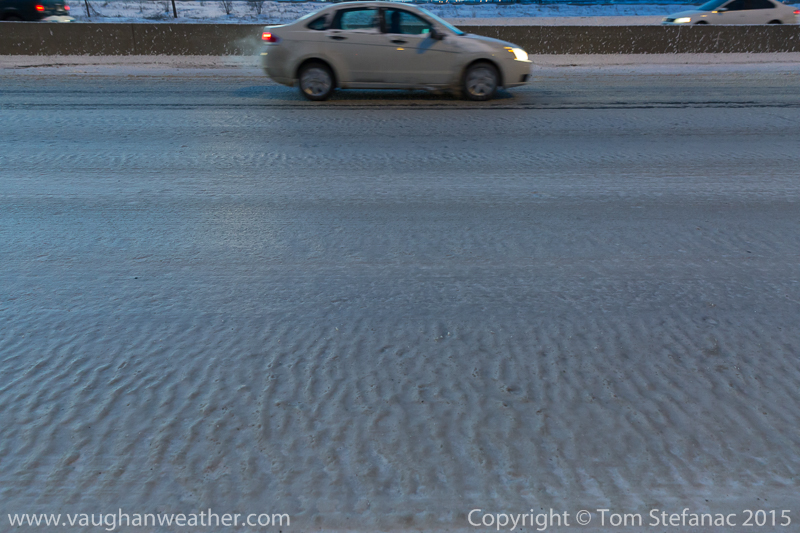 Here’s another shot from the same stretch of roadway. If you’re wondering why I’m stopped, it’s because there is a jacknifed tractor-trailer blocking three of the 4 available lanes behind me. The whole gallery is visible here within my spot news album on Flickr. This photos conveys the state of the roadway which was partly due to poor road maintenance, but greatly aggravated by extremely cold temperatures that were preventing the deicing solutions (salt in this case) from working properly.
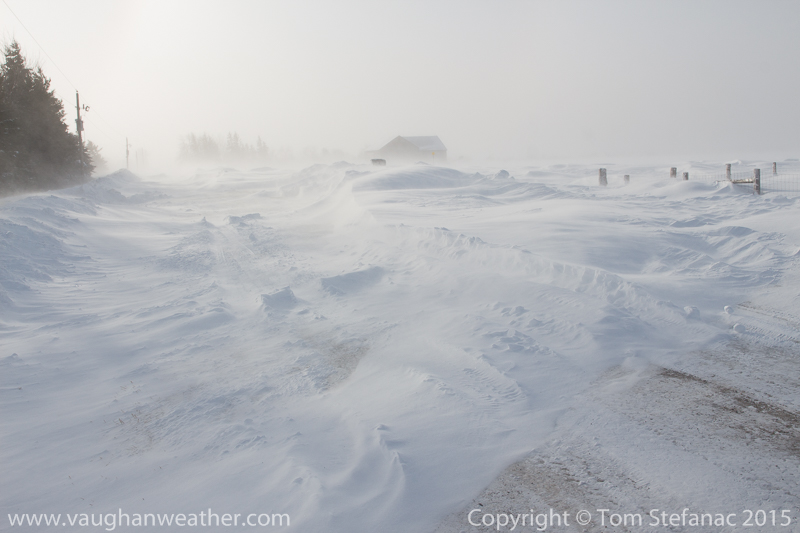 As a photographer, remember that you don’t just have to take pictures because they’re pretty, always remember in many cases there is also some journalistic value and a deeper story. In this photo I was romping around Dufferin County because many of the local roads were closed and had actually been closed for several days. Believe me, I did not choose to go out looking solely for pretty winter photos, I was there because it was a blizzard and downright dangerous! High winds and very cold temperatures basically combined to created endless snow drifts that buried roads, stranded motorists and made all the above life-threatening. If interested, I do have a storm chase account here which goes through everything about the blizzard in great detail. In fact, from this little photojournalism adventure, I acquired some impressive news worthy photos that you would not achieve any other way. Not only do the photos convey how cold it was, but they also tell the story of the what was going on and how bad it really was.
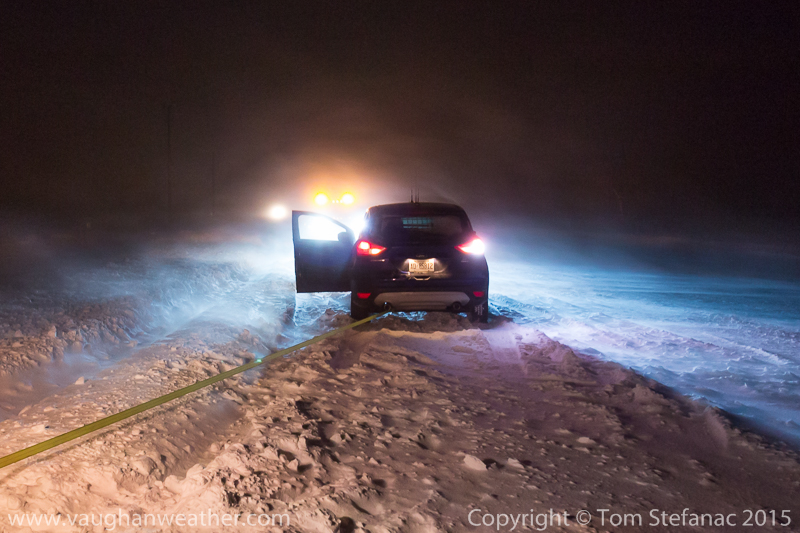 To that point, let me also include that the wind is always a great help to “lower” your photos temperature. The wind always makes the air feel cooler, so if you combine some wind, snow and cold air you will convey a much deeper effect through that imagery than you would otherwise. This photo was one of those “my bad” situations. I was driving along, going way too fast, caught a patch of ice, went sideways, corrected myself and just managed to catch a sliver of a plow windrow. This was enough to haul me deeper into the snow pile and firmly anchor me. Fortunately, my friend showed up and saved the day! I snapped this photo as he was pulling me out. I can’t remember exactly how cold it was at the time but it was around -25C and the wind was steady at 50-60 km/h lofting the loose snow everywhere. It was actually impossible to stand outside for any length of time without freezing or having your face suffer frost nip. The real world windchill would have been -43C meaning there was a high risk for frost bite occurring in 5-10 minutes and frost nip almost instantly. Now that I think about it, this photo does not actually convey how cold it really was but it still says “very cold” no matter how you look at it!
 So remember these key concepts for your cold weather photos. First, a cooler or more blue white balance always makes a picture look colder than warm oranges and reds. Second, photos taken at midday always have too much sunlight, dusk, dawn, pre-dawn and early morning or late afternoon are the best times to achieve your coldest looking photos. Third, use your subject matter in a creative sense, look for ice, steam/fog/smoke, animals and people who look cold or anything else that physically binds the air temperature to an immediate and visible effect on the environment. Fourth, isolation, desolation and loneliness all convey a cold feeling to the human mind, especially if it is clearly winter in the scene. Fifth, if possible, look for unique angles and if available, use unique tools such UAV’s, graduated ND’s, long exposures on the order of 1-3 seconds to blur steam/fog and take your time to get those photos that are not immediately visible or easy. Sixth and last, remember that you’re not going out just for pretty photos, think about the journalistic side of things, why go to a regular park on a cold day if there’s a big broken watermain up the road flooding the neighborhood and encasing everything in ice or a water treatment plant with frozen bursting pipes. The park may be pretty but the news stories can be made pretty with a “wow” factor because your showing cause and effect in one photo. Hopefully these tips will help you with your future photographic journeys.