Teleconverters are special optical devices that magnify the image coming through a lens. A 1.4X teleconverter magnifies the image by a factor of 1.4 and likewise the 2X does the same but by a factor of 2. So essentially a 400mm lens becomes 560mm at 1.4X and 800mm at 2X. The drawback is that you lose light rustling in more f-stops and because you magnifying the image through more glass the overall quality takes a hit.
Here are some sample photos showing the power of a teleconverter when used with an equally powerful lens, in this case, the Canon 800mm f/5.6 IS USM.
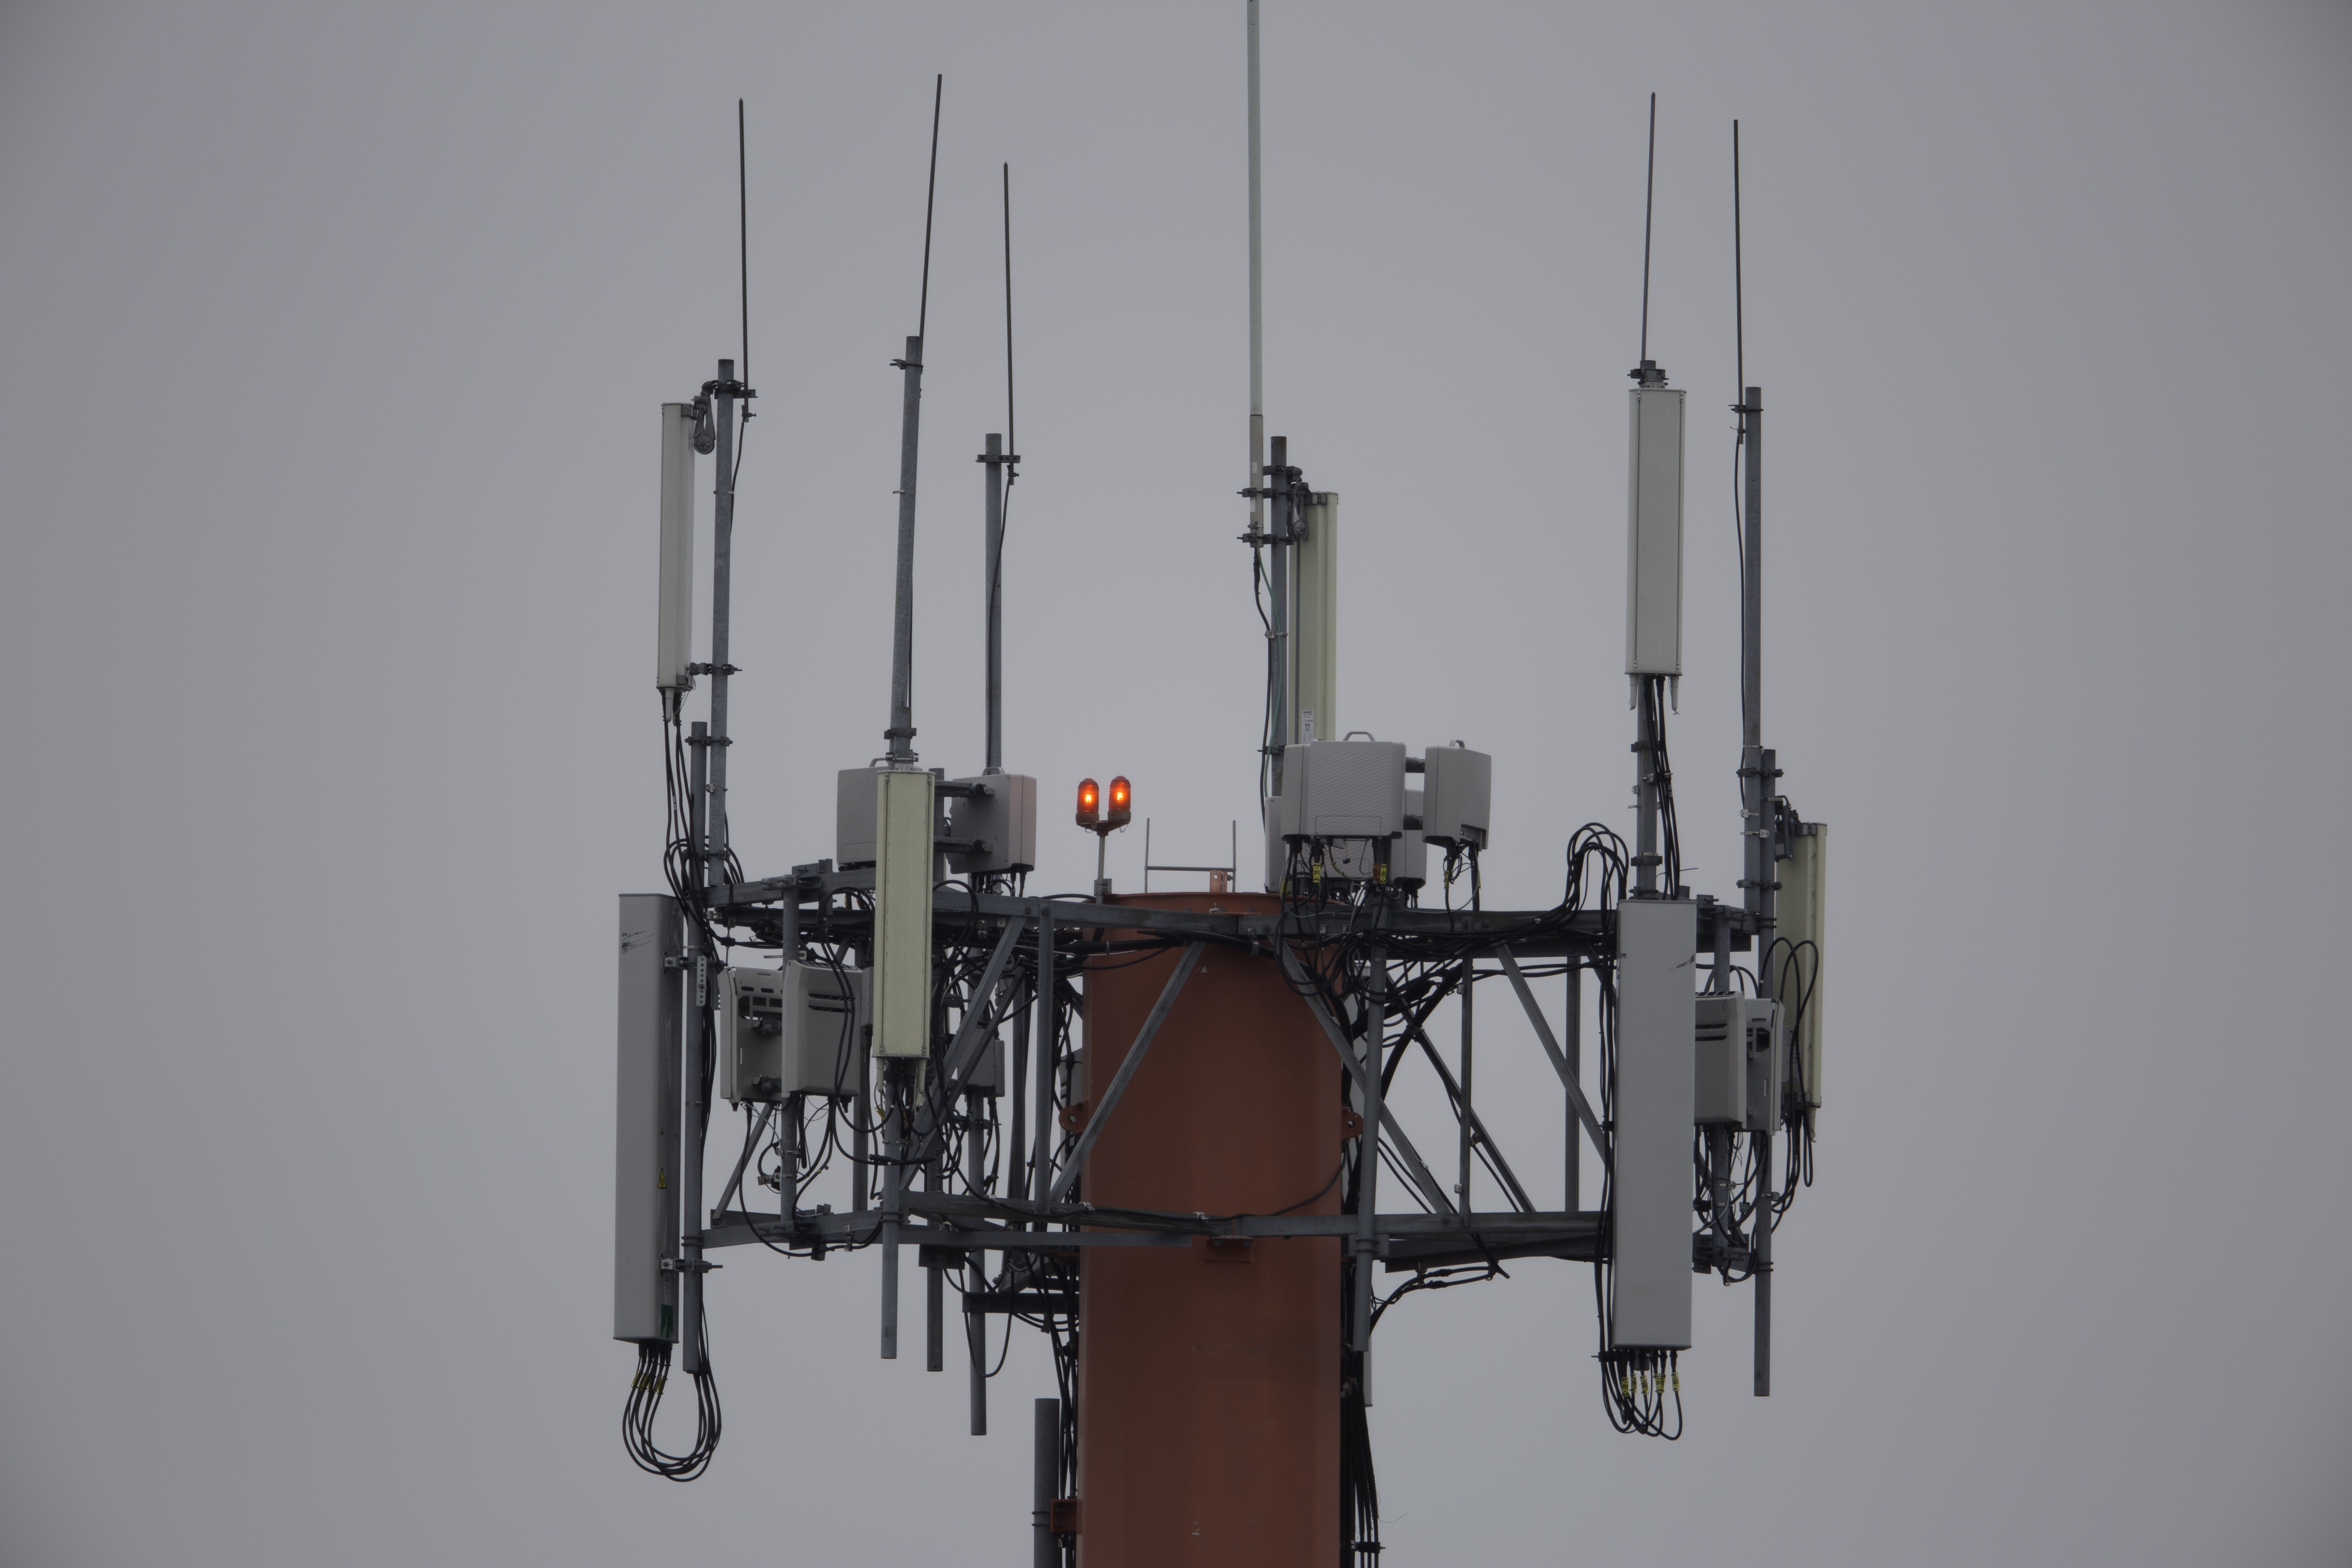
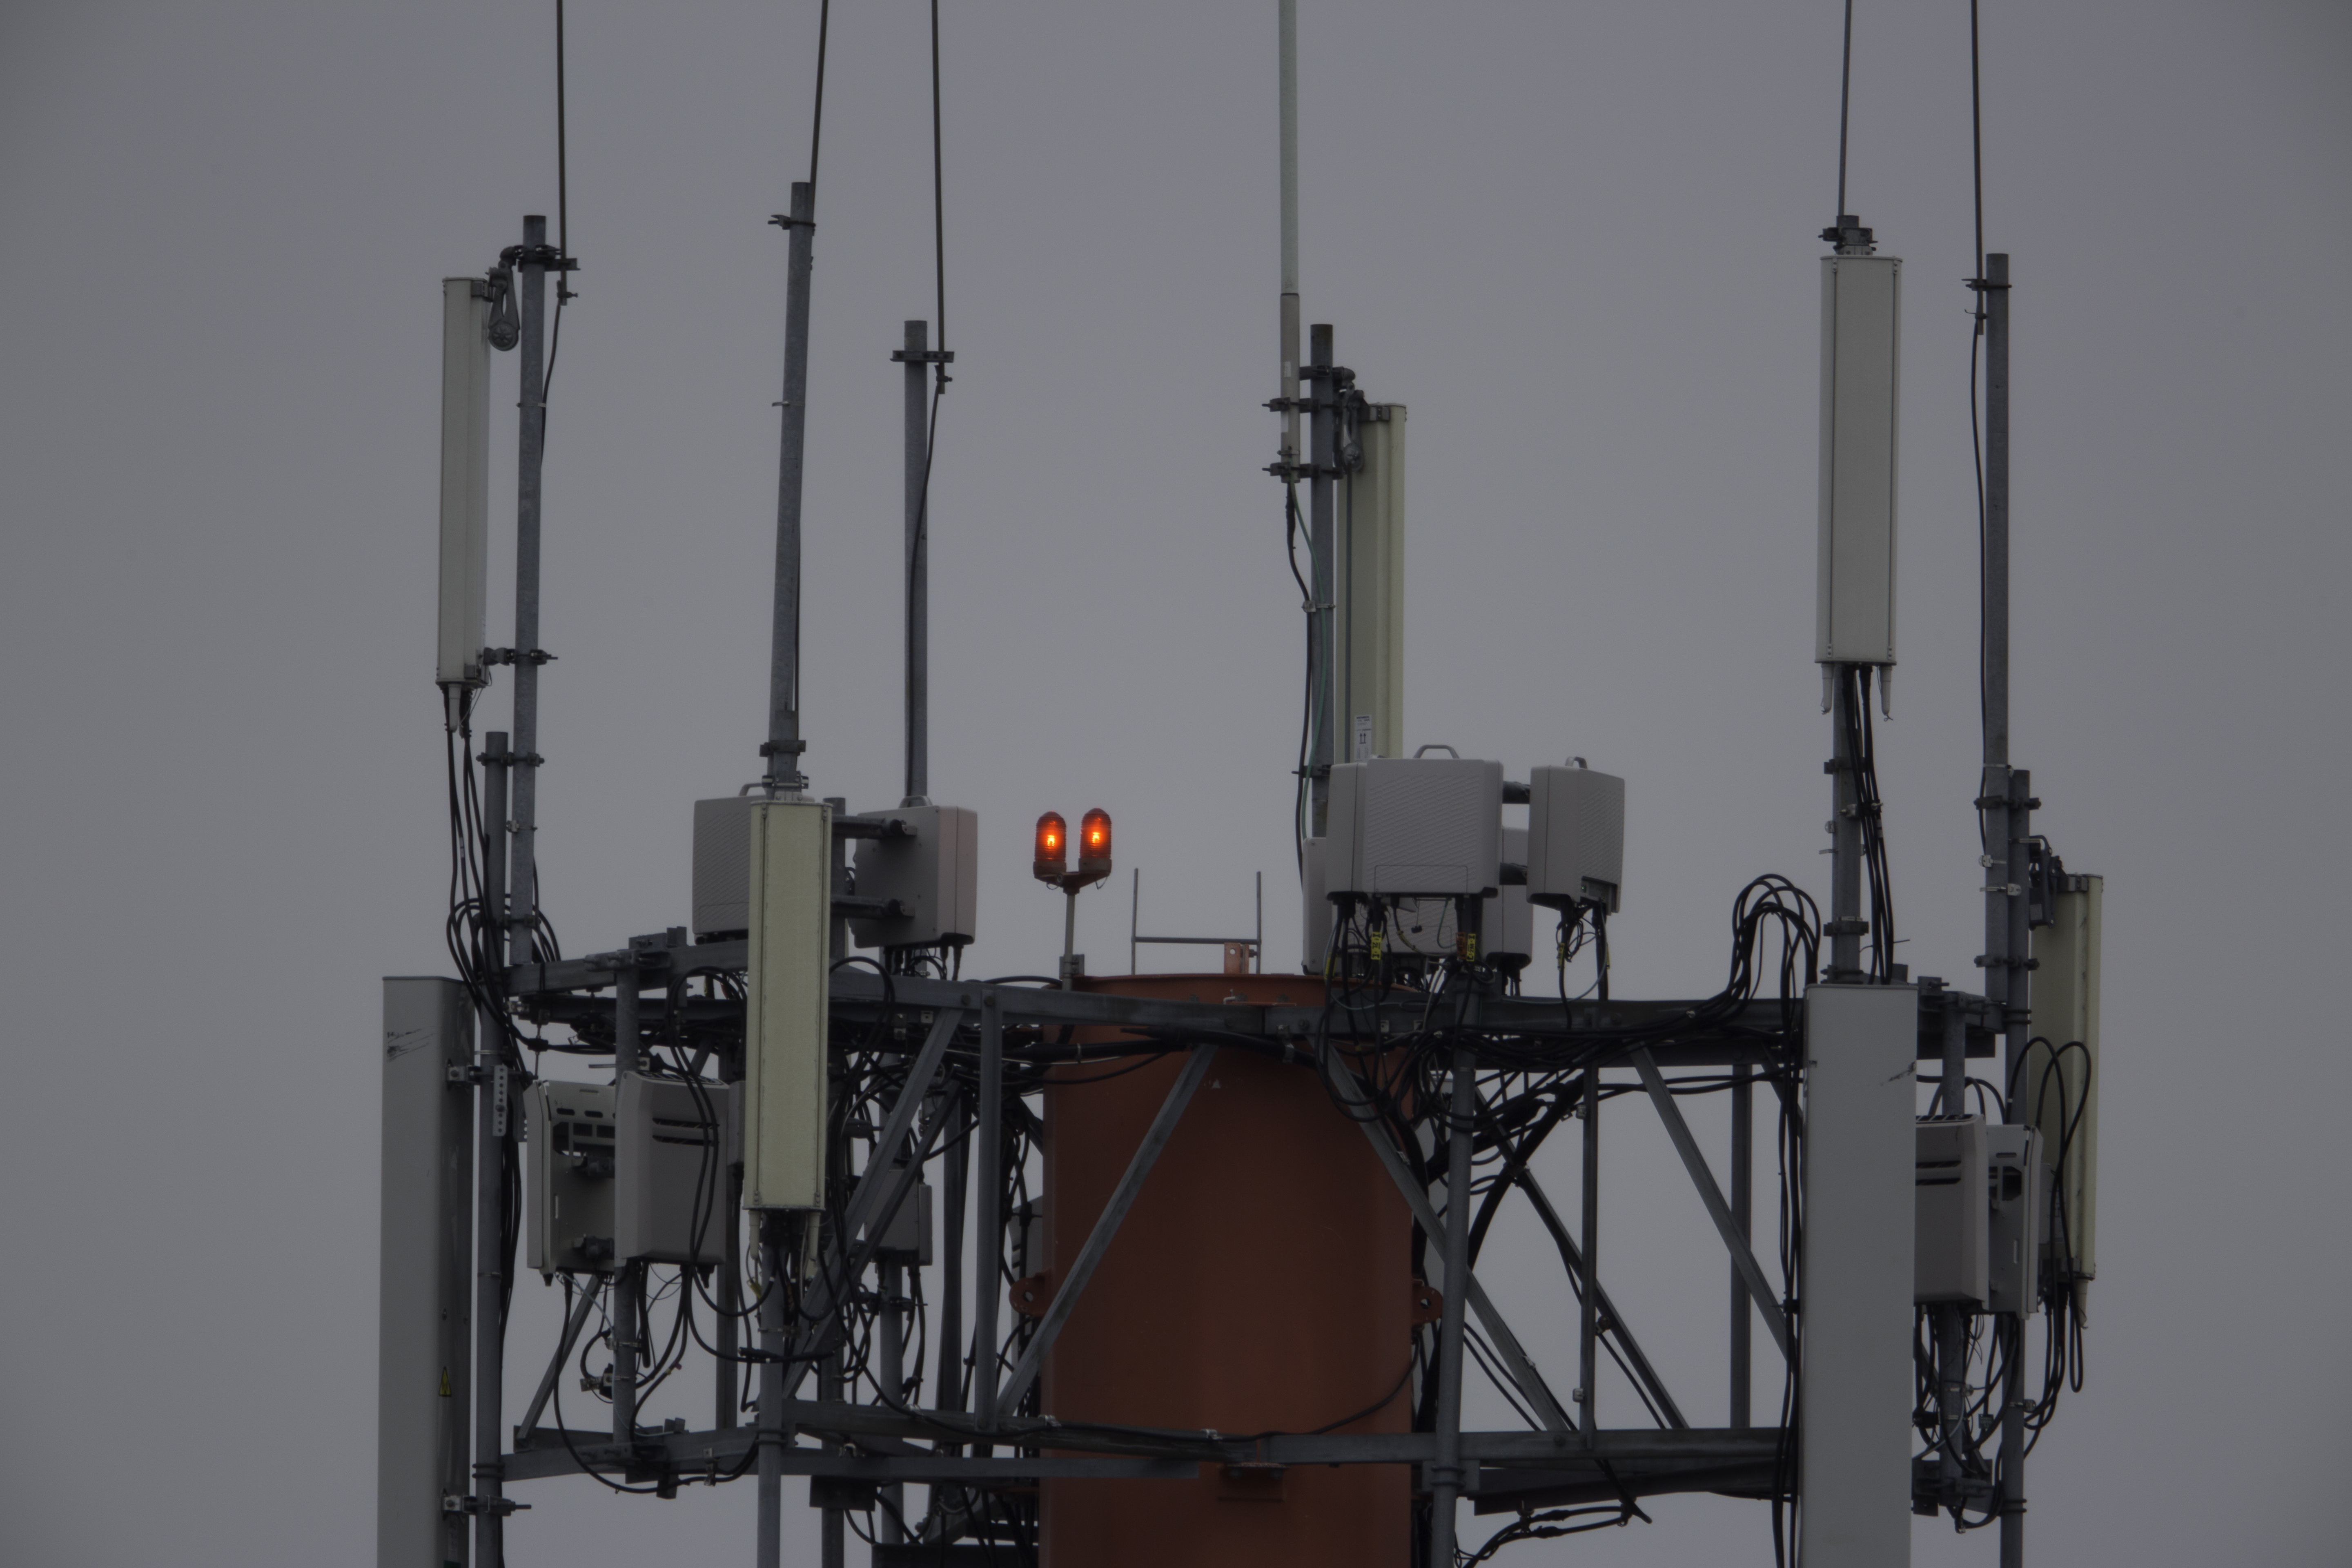
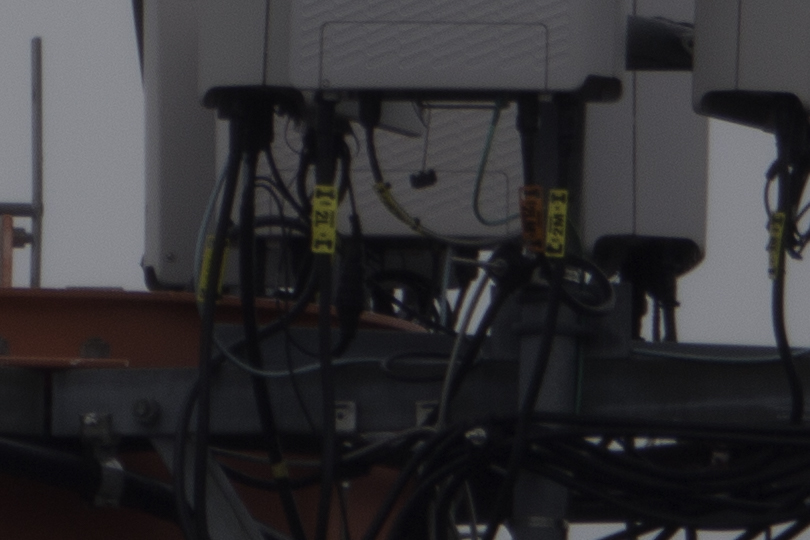
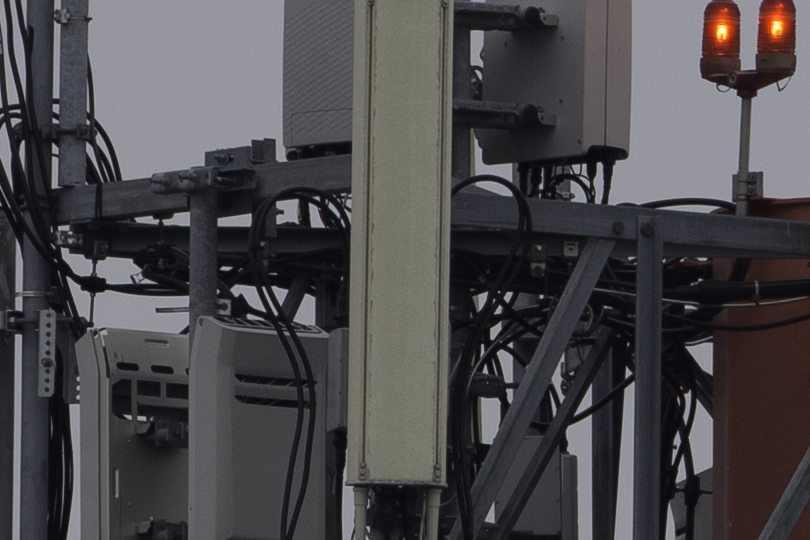
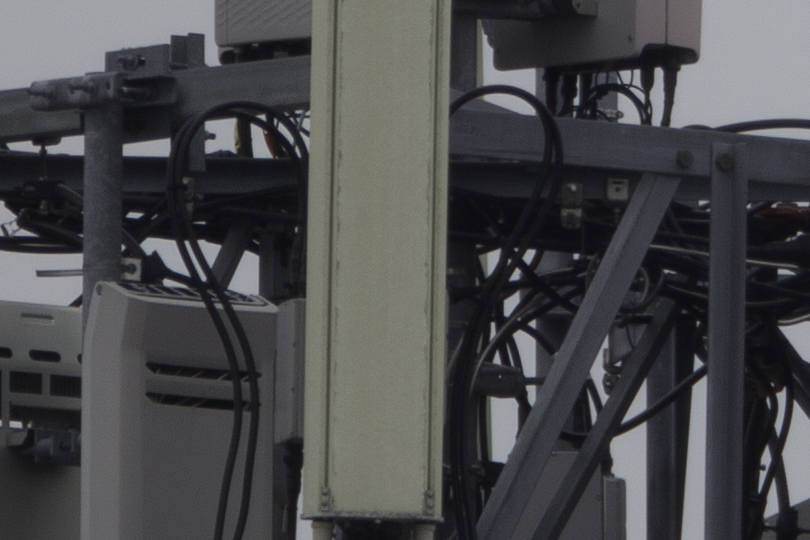
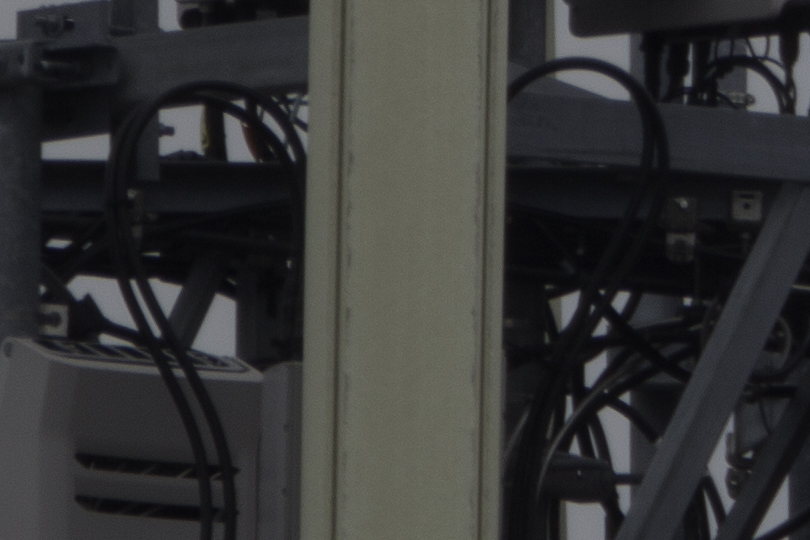
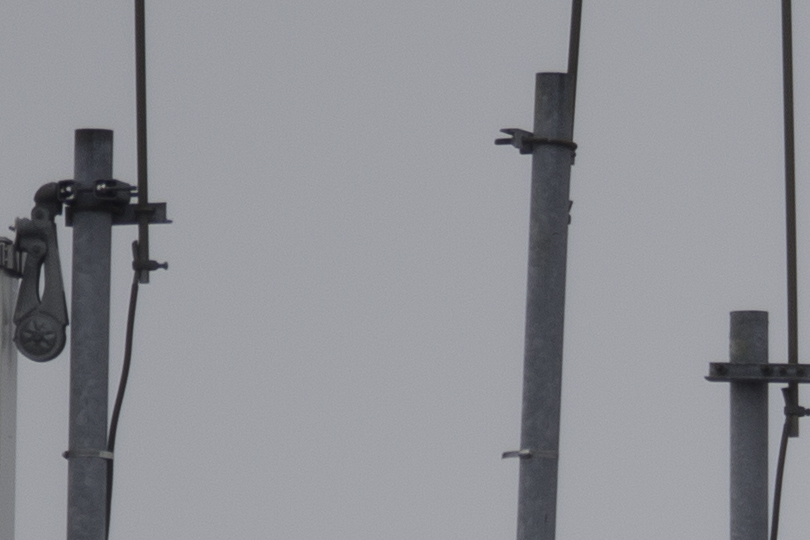
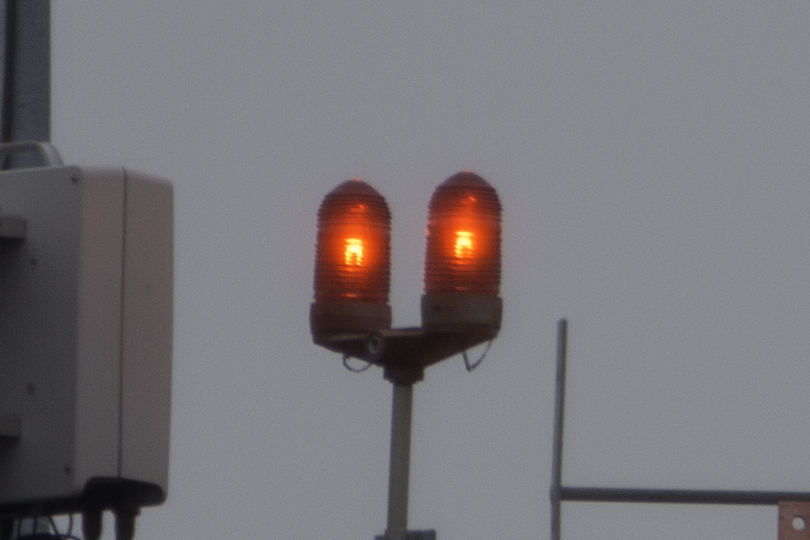
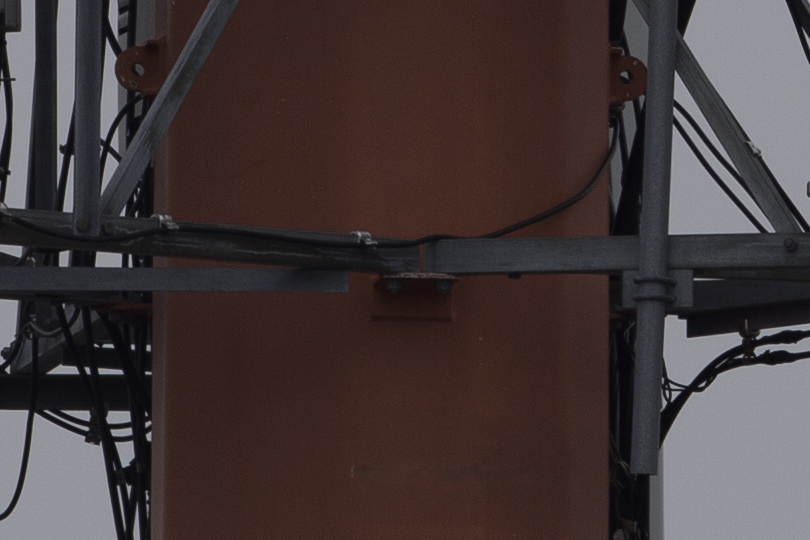
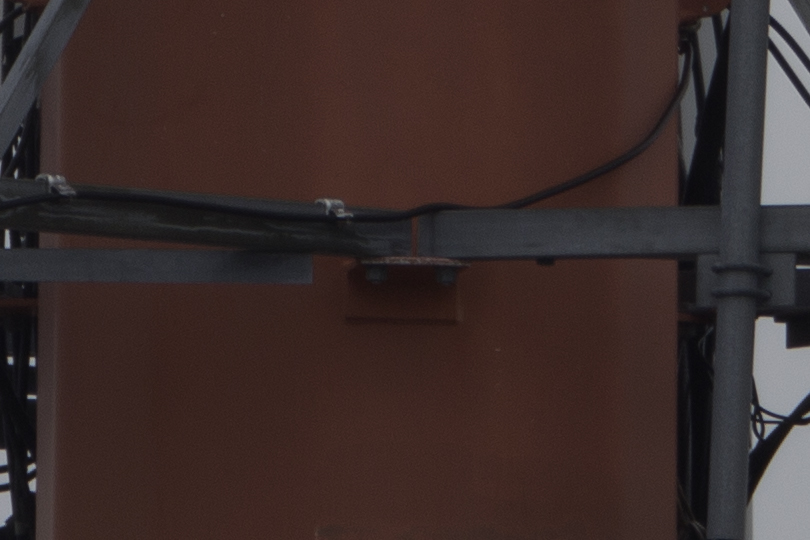
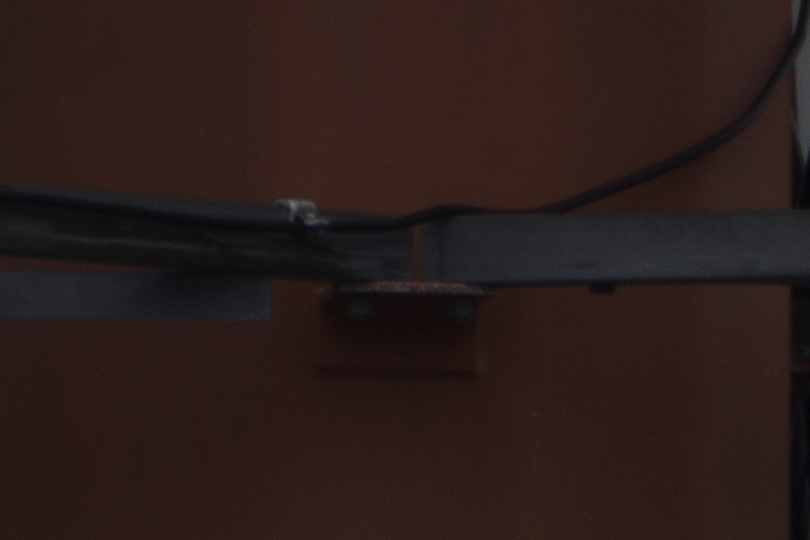
Looking at Google Street View and Google Earth, my subject was a cellular tower 340 meters / 1115 ft away.
Street View
Google Earth
These are the full frame images shot with a 5DMKIII @ ISO 100 on a sturdy tripod with image stabilization turned off for optimum clarity. There has been no post processing, these are 100% RAW to JPG conversions at 100% quality.
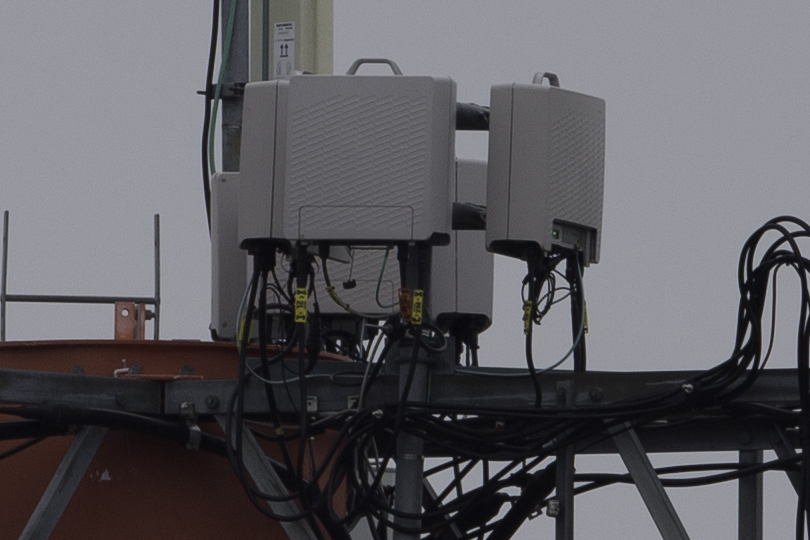
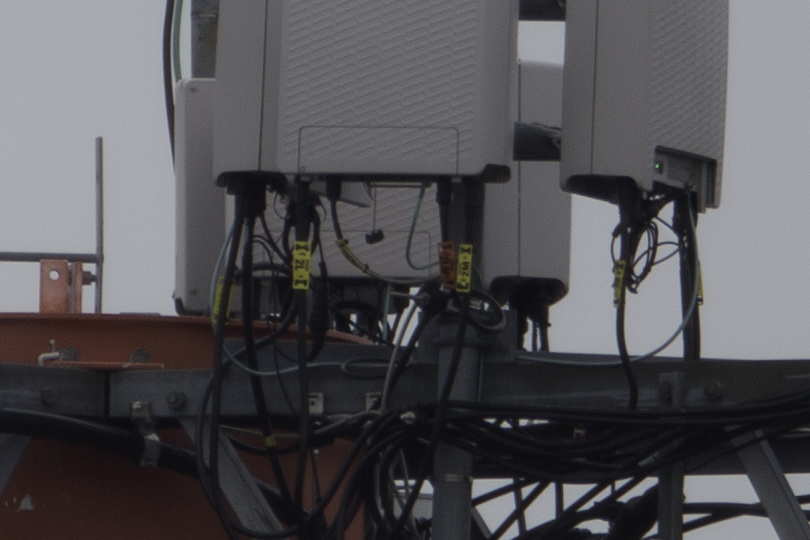
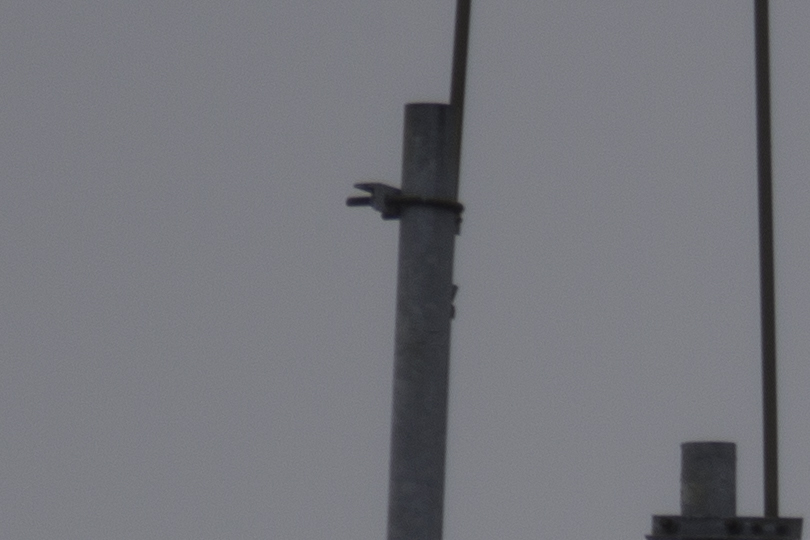
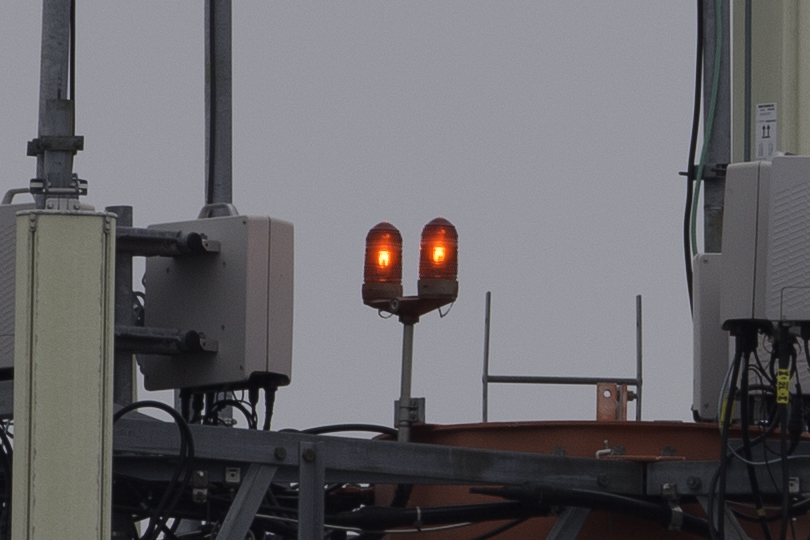
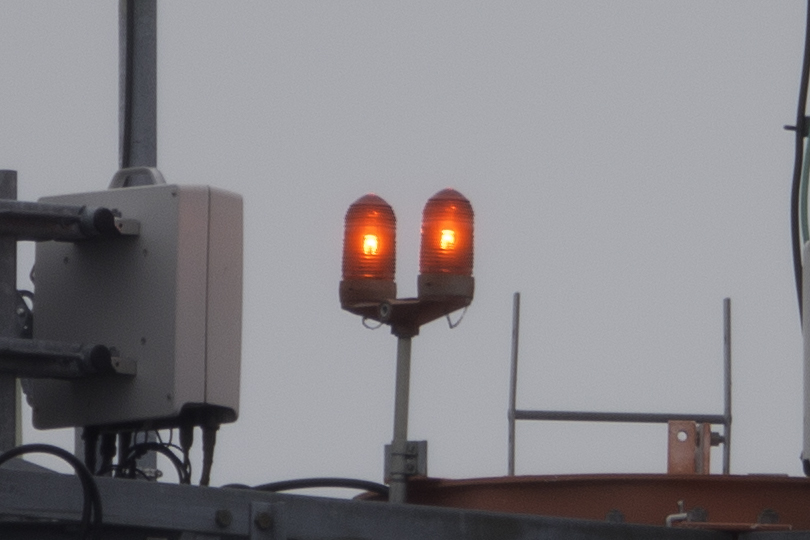
Here are some 100% image crops showing the same area. There has been no processing, these are straight RAW to JPG conversions at 100% quality.
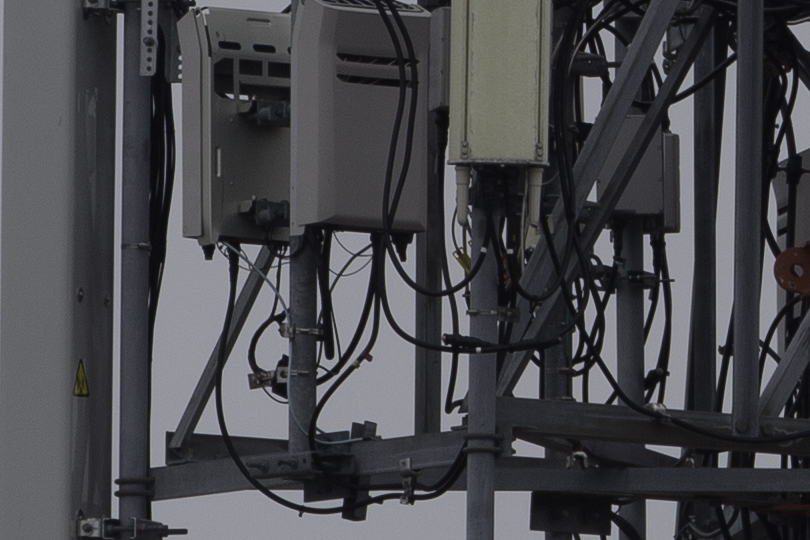
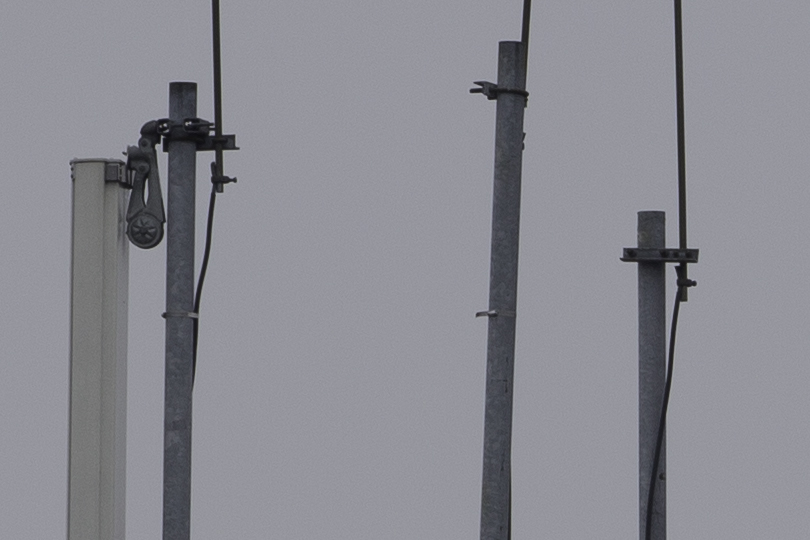
Cell Tower 800mm F11 ISO 100
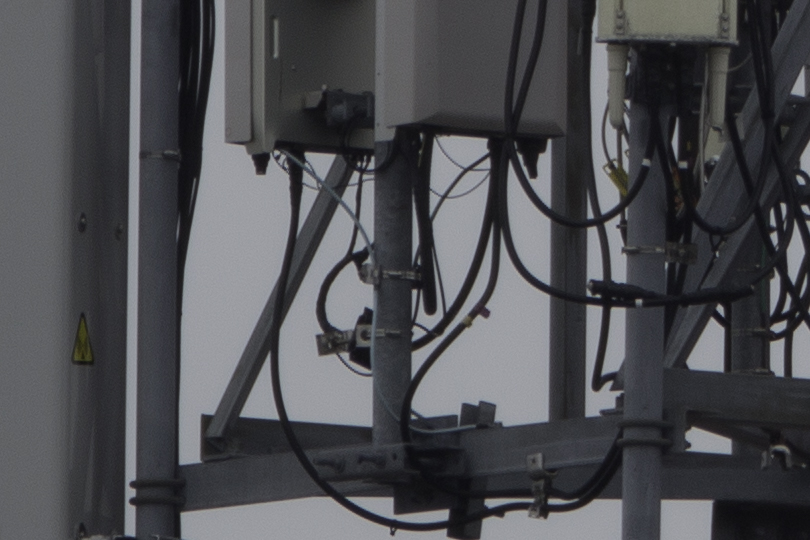
Cell Tower 1120mm F8 ISO 100
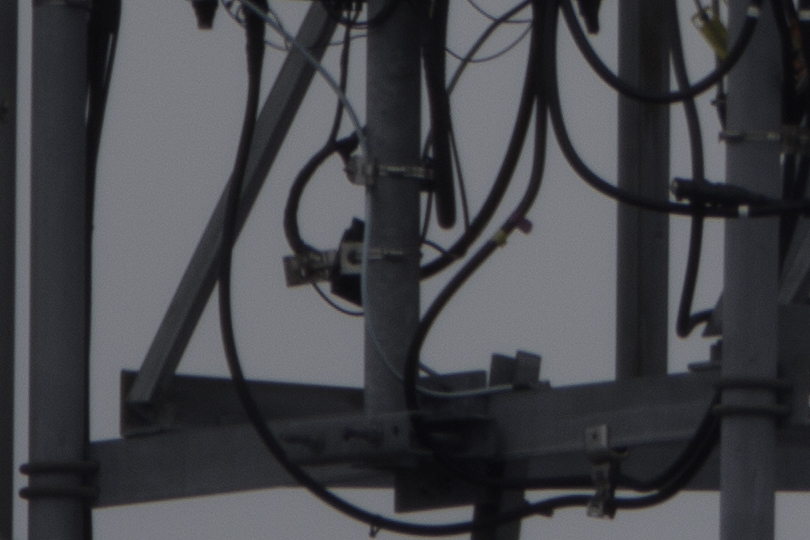
Cell Tower 1600mm F11 ISO 100
Cell Tower 800mm F11 ISO 100
Cell Tower 1120mm F8 ISO 100
Cell Tower 1600mm F11 ISO 100
Cell Tower 800mm F11 ISO 100
Cell Tower 1120mm F8 ISO 100
Cell Tower 1600mm F11 ISO 100
Cell Tower 800mm F11 ISO 100
Cell Tower 1120mm F8 ISO 100
Cell Tower 1600mm F11 ISO 100
Cell Tower 800mm F11 ISO 100
Cell Tower 1120mm F8 ISO 100
Cell Tower 1600mm F11 ISO 100
Cell Tower 800mm F11 ISO 100
Cell Tower 1120mm F8 ISO 100
Cell Tower 1600mm F11 ISO 100
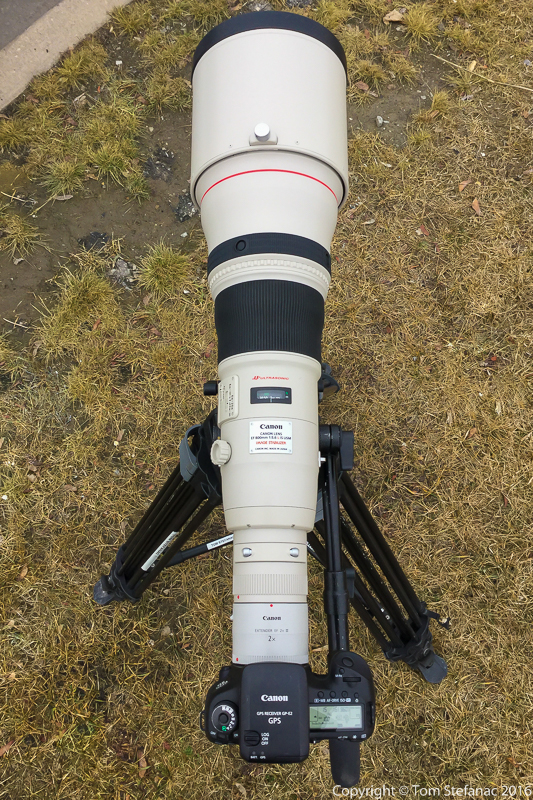
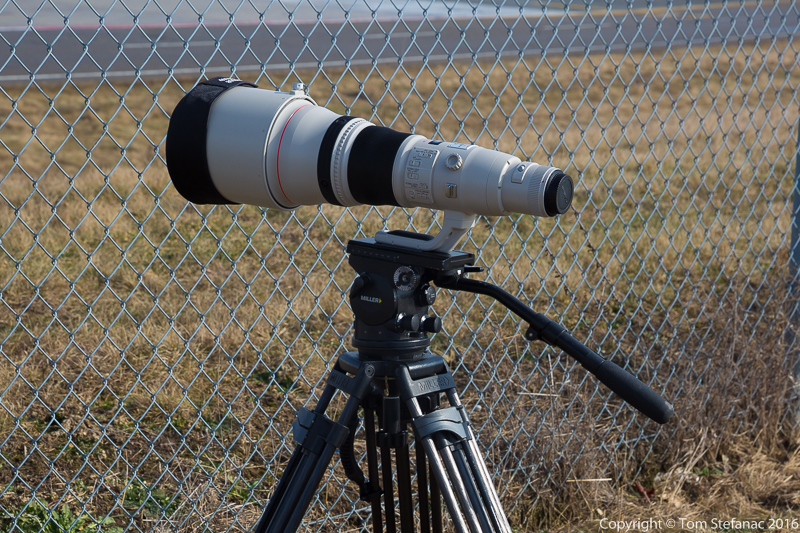
Finally, this is the camera setup used at the time.
Canon 800mm + 2XIII Teleconverter
Canon 800mm + 2XIII Teleconverter
The conclusion is that with each multiplication / magnification factor the image quality degrades ever so slightly and hence 2X magnification has the worst quality while no magnification is the best. However, this degradation is still nominal and far superior to anything achievable using digital magnification. The biggest drawback from using teleconverters is the loss of light resulting in a high F-stop and a slowdown in the camera’s ability to autofocus.
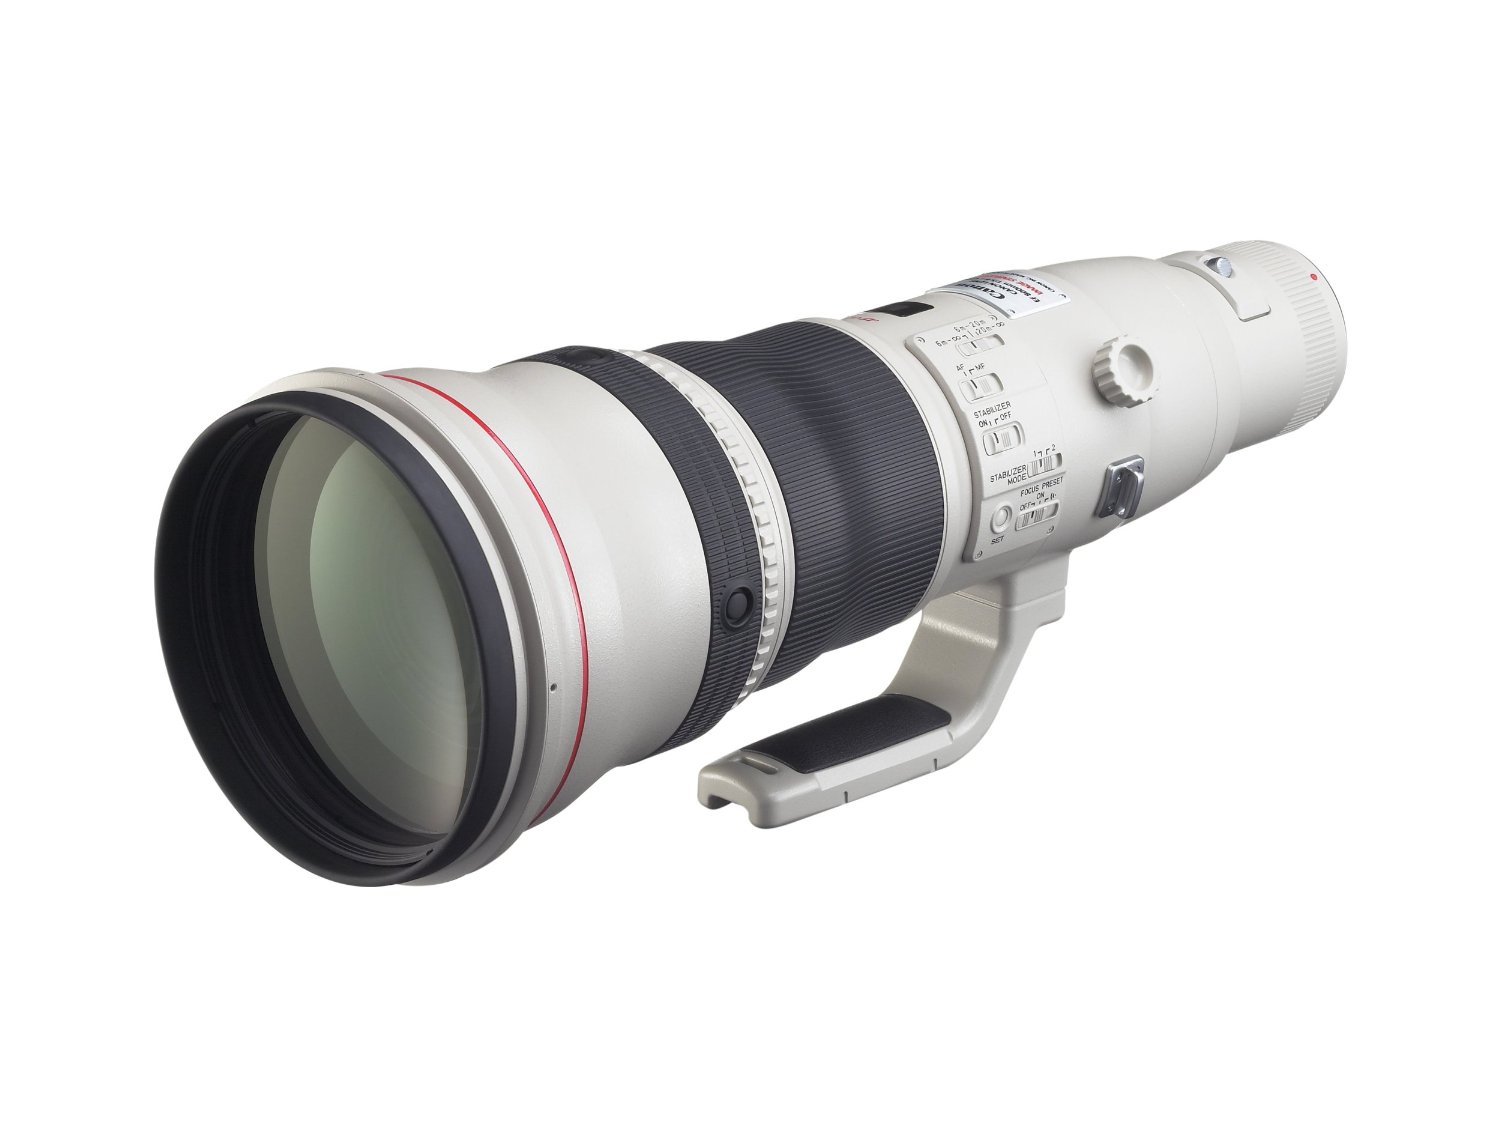
This is the biggest, baddest, heaviest, most expensive and rarest production lens Canon still manufactures that I own. This lens is rarely stocked, it’s almost always a custom order and takes 3 months to build!
EF 800mm f/5.6L IS USM Lens No Hood
So you might be wondering what all the hoopla is about with super telephoto lenses? Well, aside from the fact that they’re rare and exspensive, they’re incredibly powerful tools!
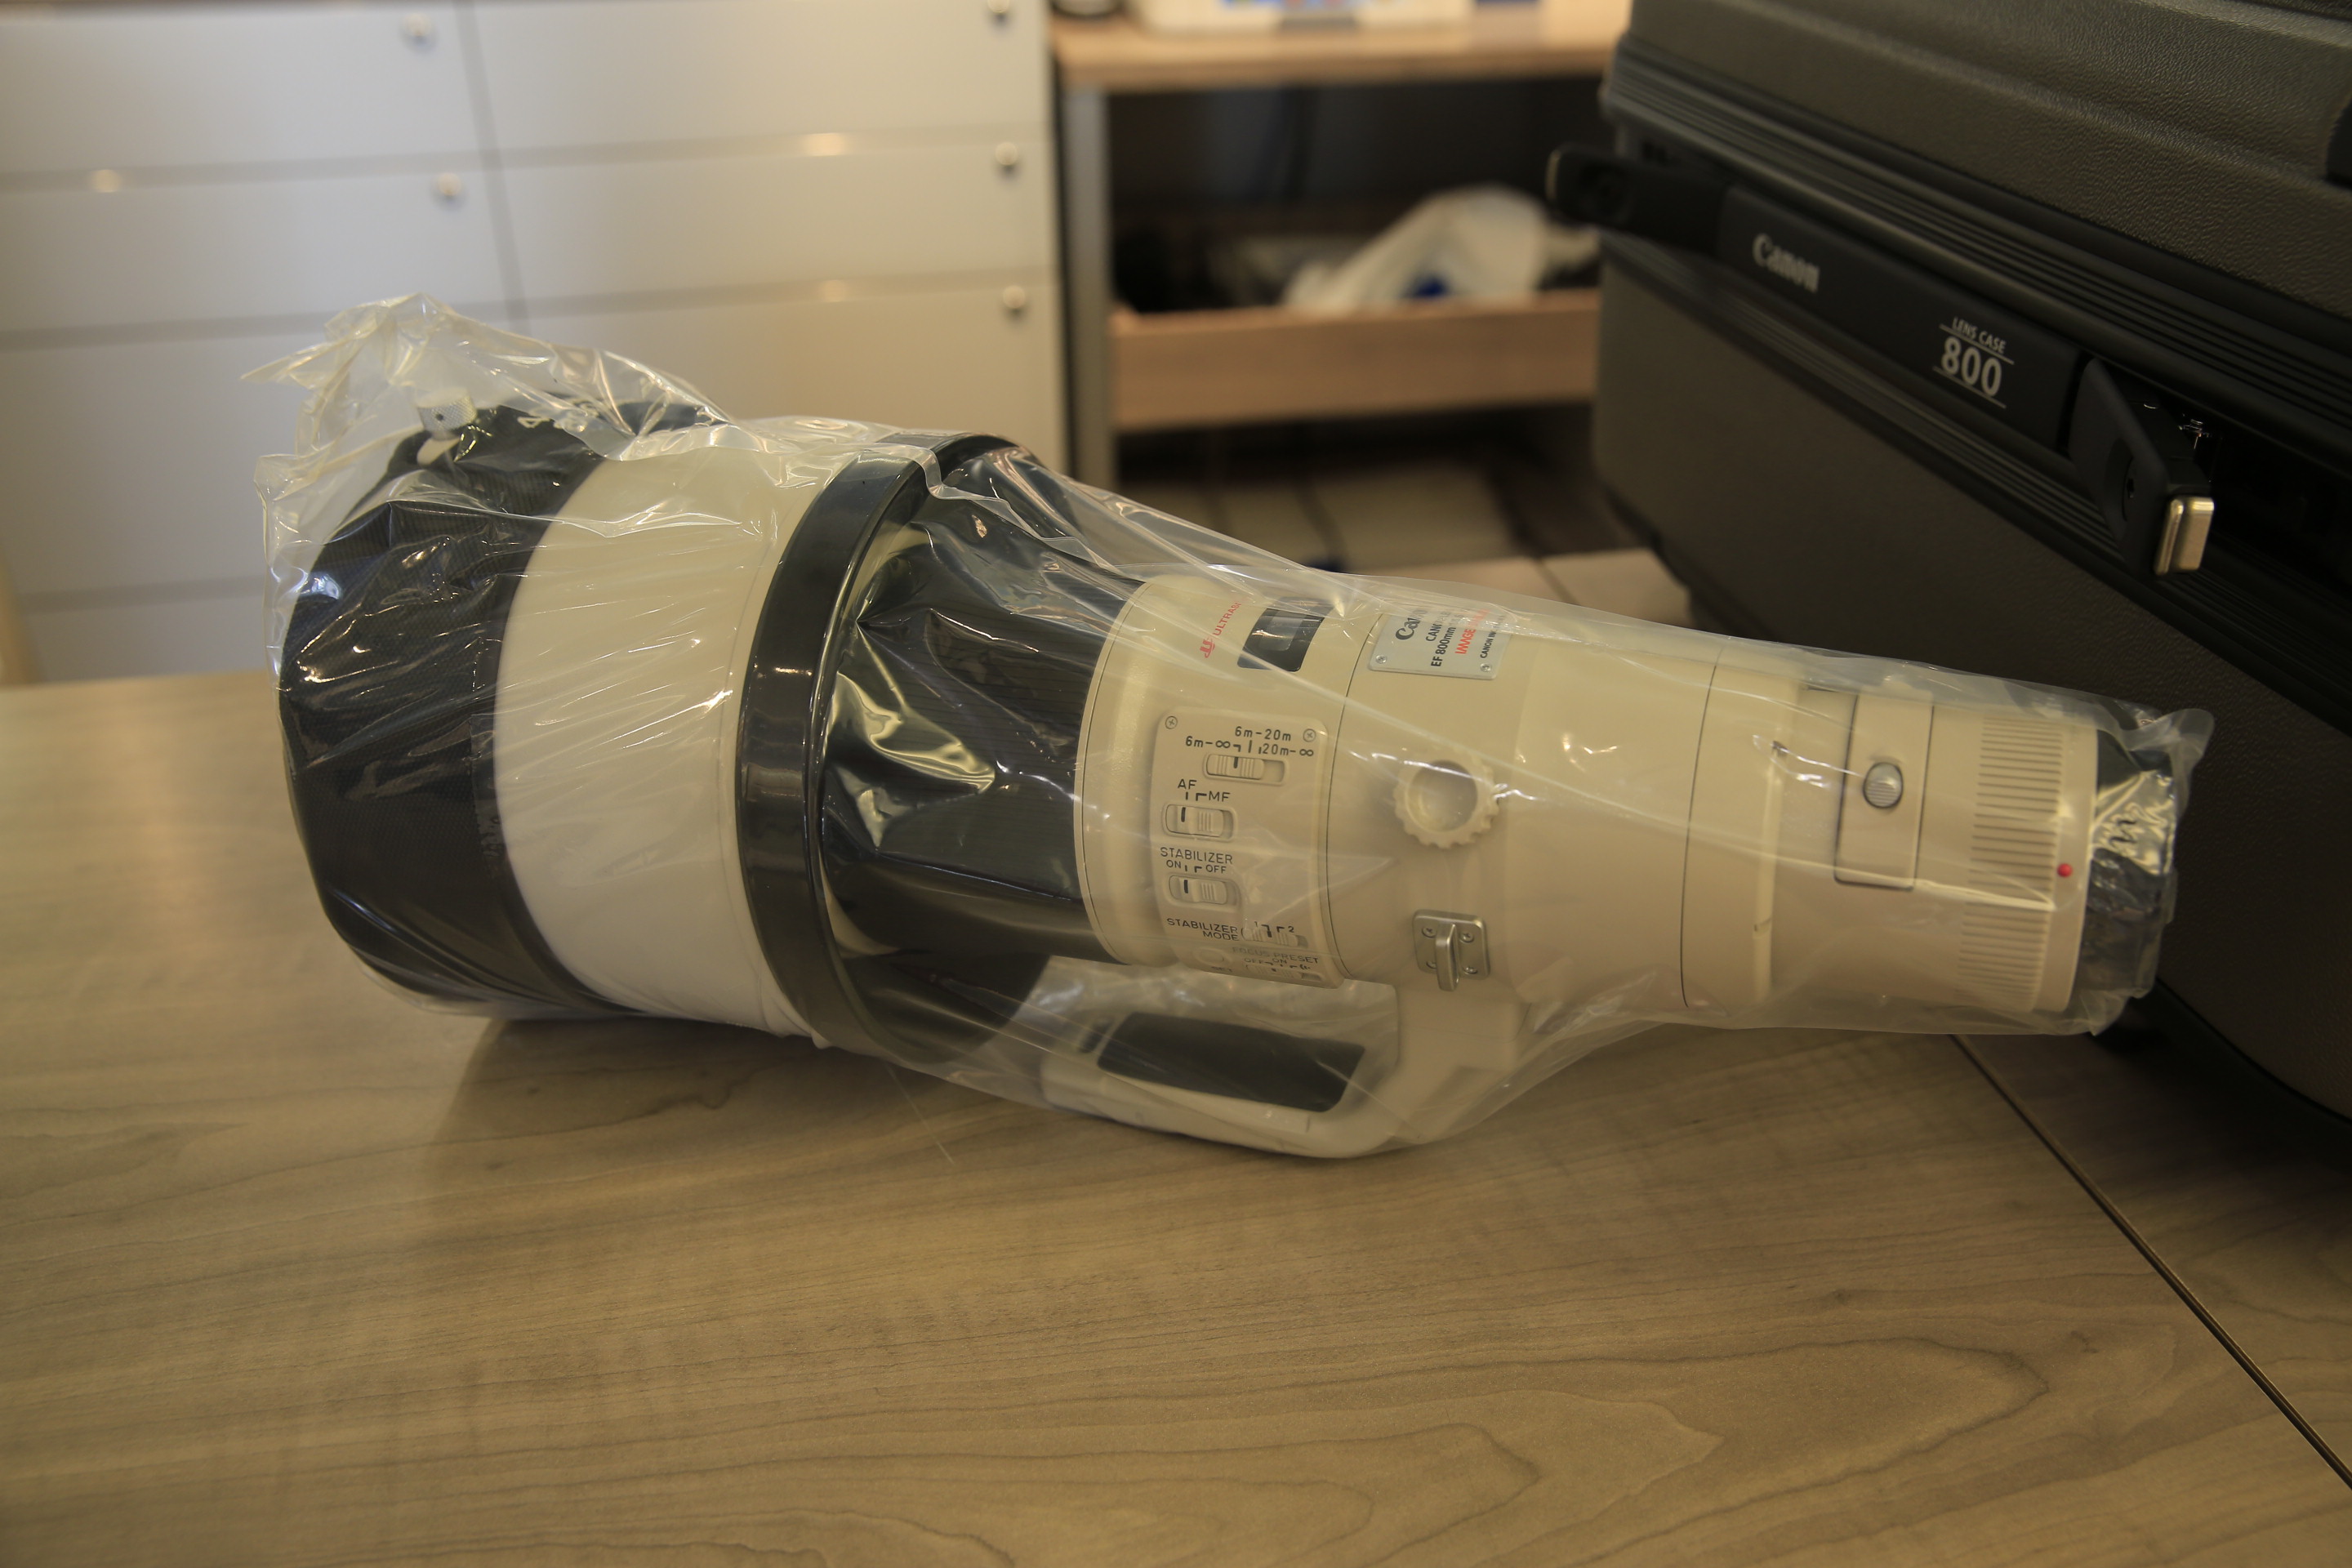
Unpacking the lens after purchase
I don’t know how to even describe this lens, but basically you don’t attach the lens to the camera, you take the camera, tripod, gear bag and then attach everything to the lens. This lens beckons that it needs a camera which is actually the smallest thing you would attach! It’s like a beacon too, people from all around flock towards it to see this rare beast in action. In fact, you don’t even need to be a “photographer”, if you happen to be rich and want to fake it, walking around with this lens will remove any suspicion people may have.
Now, all kidding aside, this is a serious lens with serious reach. It has a minimum focus distance of 6 meters / 19 feet and narrow 3.5 degree field of view which means you probably aren’t going to be photographing wedding rings and parties with it. This type of a lens is built for wildlife, sports, the paparazzi, celestial photography and other unique ventures.
It’s a great tool for air shows, compressing distant landscapes and exploring urban sunrises or new moons but also probably the least useful lens for everyday photography. Without question, it can provide the reach needed in almost any situation, but you don’t always need that reach.
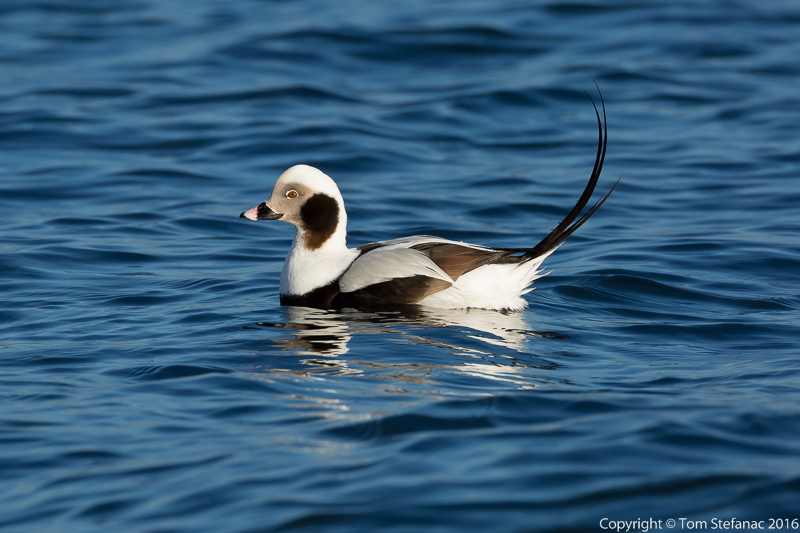
North American Long-tailed Duck @ 800mm 1/640th F10 ISO 320 5DMKIII
The 800mm is not the kind of lens you leave on your front seat ready for action or take on a hike into the woods. It’s the kind of lens that you plan your shooting day around. For one, it’s not necessarily easy or quick to use. It takes a few minutes to pull out, setup and then you need a monopod, tripod or gimbal should you decide to actually use it! Yes, you can use it free hand but it’s not easy and even if you’re physically in good shape with stamina and endurance you will eventually hurt your arm trying to hold it for prolonged periods.
Don’t forget that with a very narrow 3 degree field of view sometimes finding your targets means you’ll be hunting. It’s actually not very difficult to hunt when you have reference objects in view, but against a flat featureless sky it’s easy to lose all perspective. The same holds true to for large featureless bodies of water.
The lens can be setup quickly if you really need it RIGHT AWAY but it’s still not as fast or easy to use as the 70-200mm which offers the ability to acquire a target and then zoom in.
Here are some first impressions I’ve had with the lens:
The lens can be used during the day, night or really at anytime but due to the magnification factor even the smallest vibrations become a big problem. This means that while long exposure operation is possible with a good solid tripod or gimbal even the lightest winds will cause grief and result in unusable blurry images. The same holds true for bridges, buildings and the like which may see vibration from passing vehicles or natural harmonics.
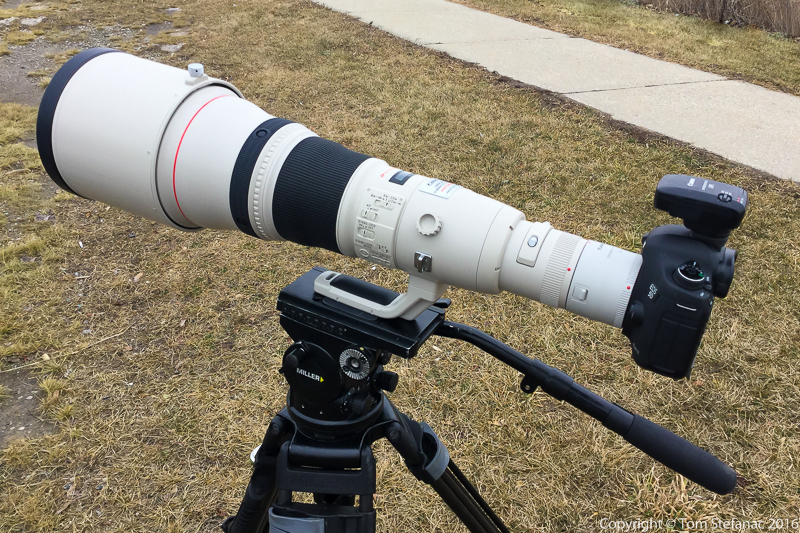
Canon EF 800mm f/5.6L IS USM Lens on a Miller Television Tripod
Coming from a video background, I’m extremely comfortable with video tripods and their associated fluid heads. I’ve found that using this lens mounted on a sturdy video tripod is very pleasing with very sharp, clean results. While gimbal systems tend to be lighter than commercial video tripods they don’t really offer the ability to smoothly pan and follow subjects. Another consideration is that even the sturdiest gimbals are really operating near their weight limit with any super telephoto lenses. Whereas in contrast most commercial television tripods are designed to work with loads of 15-25 kg and easily handle the 4.5 kg / 9.9 lb mass of the 800mm lens. The drawback is that even the cheapest television grade tripod is still substantially more expensive than the highest rated equivalent gimbal and photo tripod combination and video tripods can be very heavy. That said, the benefit of a video tripod is that if you chose to shoot video with your 800mm lens, it’ll look great coming from a smooth fluid head.
The Canon 800mm F5.6 IS USM can also be upgraded to 1120mm using a 1.4X teleconverter. If you have a pro body with the latest firmware, the camera will autofocus using the center point only. This is especially beneficial if you need to squeeze some additional reach out of your glass with minimal quality degradation. In fact, I’ve seen very little if any loss using using the Canon 1.4X III teleconverter, the biggest problem is that you drop from f5.6 to f8 immediately. Still, that’s a not a huge problem during daylight hours and if you’re shooting with a tripod you can get away with using much lower shutter speeds.
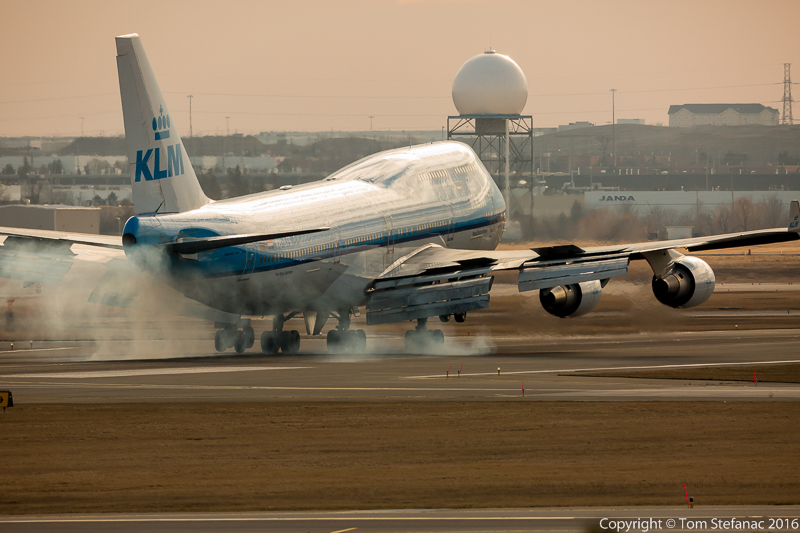
KLM Jet Landing at Pearson Airport @ 800mm 1/1600th F11 ISO 1250 5DMKIII
I’ve also had excellent results turning the lens into a super far reaching 1600mm telescope! It’s crazy to throw a 2x teleconverter onto the lens but for what it’s worth the results are very clean and simply amazing. They’re not as clean as the bare glass at 800 or 1120mm, but the image degradation is nominal and it’s the only “affordable” way for anyone to achieve 1600mm without actually buying a telescope. That said, no camera to date supports AF, the only way I can autofocus lenses at 11 stops is to use the live display autofocus function where the camera intelligently hunts out the sharpest image. It’s messy, but it works 80% of the time. You can also manually focus the lens in live view assisted mode but watch for camera jitter!
As you can imagine, atmospheric optics are a big problem! If you’re indoors or shooting at short distances (under 150 feet) then you should be fine assuming there is not dust, fog or haze. At distances of 300 – 500 feet, atmospherics can become somewhat noticeable but still should not be a problem. Once you’re into the 1000+ foot range you start to encounter image degradation from heat shimmer and haze obstruction. Obviously this is all relative since you can have very clean air and see potentially huge distances or have dense fog and not see past your nose.
Toronto Skyline from 10km away @ 800mm 1/400th F9 ISO 400 5DMKIII
The same is true for heat shimmer, on extremely cold days heat shimmer is generally not a problem and the same goes for days which are windy. The mechanical mixing of air (such as by wind) is good in that it makes the air more thermally uniform meaning heat shimmer is less of a problem, but then you have the issue of vibration from the wind itself and that’s a whole other issue! So it really depends, you’ll have days where you can use the lens to bring a distant city into focus and days where looking down the street at your dog is a problem.
I have yet to really properly test if the lens eats up more battery than smaller telephoto lenses. In theory it probably does since the motor inside the lens has bigger optical elements to adjust (I think) and the image stabilization system has to work harder. That said, thus far I haven’t noticed any real difference in battery lifespan or performance between my 70-200 and the 800 but again I have not really tested both against each other properly.
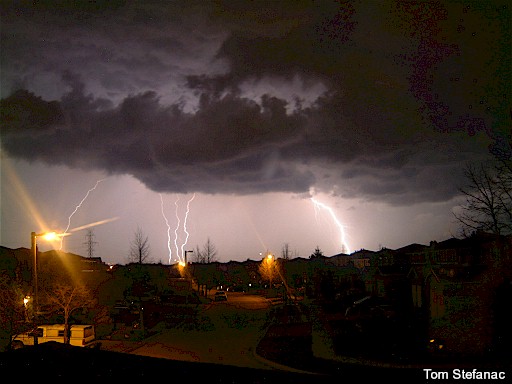
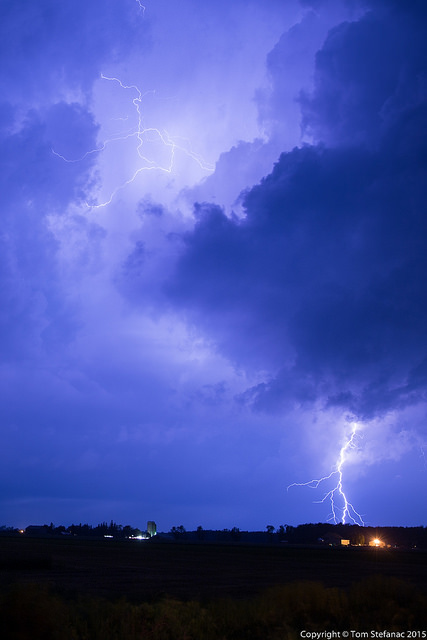
My first ever well composed lightning photo! Mostly luck but this photo changed how I thought about framing and planning – Fuji FinePix 6800 ZoomMost people don’t really realize the powers that short and mid range telephoto lenses offer when it comes to weather. When I first started taking photographs I never really thought about how important pushing into a landscape was, instead I opted for a wider lens to get it all. This same early habit of mine also translated into lightning photography. I wanted to catch the lightning so badly that instead of focusing into where the lightning was I stayed wide and captured the whole sky with a ton of dead space. Yeah I was able to capture the lightning but it probably occupied a measly 1/10th to 1/20th of the pictures total area.
The excitement of taking my first successful lightning photographs (which were pretty poor) soon turned into frustration when I wanted better photos. Initially I was angry that the lightning was not filling my frame properly, and then I realized at some point in my early teens that I should probably try and frame for the lightning rather than take a whole bunch of photos and hope the lightning framed itself. My first successful attempt at framing lightning came in the spring of 2002. An early morning squall line was rolling towards my parent’s house and I woke up 2 hours early. It was around 6:20AM when I saw the storm coming in. I didn’t have a good tripod at the time so I wedged my Fuji Fine Pix 6800Z into my window frame and held it steady for 3 whole seconds. In a matter of less than a second four lightning bolts descended right where I wanted them! It was perfect; I even zoomed in slightly to where I thought they would fall! It was mostly luck, but it taught me to shoot towards the target rather than to target the whole sky.
Lightning strikes Georgian Bay – 88mm @ ƒ/4.0 using the EF70-200mm f/2.8L IS II USMNow the one thing with lightning is that you can’t control it or the weather surrounding it. If you’re close enough to the lightning that it seems to surround you, then you’re simply too close to shoot it safely outside. The other problem with being so close is that you really can’t reliably predict where it is going to strike with any consistency and you’re stuck in a situation where you need to take wide shots of the sky, fight with rain and your limit to compose is compromised.
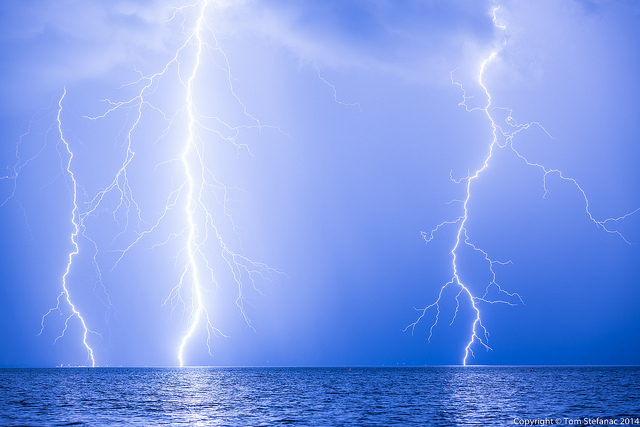
If you’re fortunate enough that a storm is several kilometres or miles away, then you’re in a good position to break out the telephoto lens. The image showing the three simultaneous strikes above Georgian Bay was taken from Wasaga beach looking northwest across the bay. The small town (far left side of the horizon) is Collingwood. These lightning bolts either hit near the shoreline or the escarpment area behind the water putting them around 20 – 30 kilometres from my location. To my eye, they were very far away, but using my powerful 70-200mm lens I was able to push in to 88 millimetres and have the bolts fill the frame. The white glow in the left of the image is actually rainfall from the parent thunderstorm. The benefit of shooting lightning from farther away using a zoom lens is two fold. First, the lightning appears to be focused into a smaller area so you can consistently get good results and in effect predict where the lightning will strike and second, you avoid the rain and bad weather which makes getting lightning photos potentially dangerous otherwise.
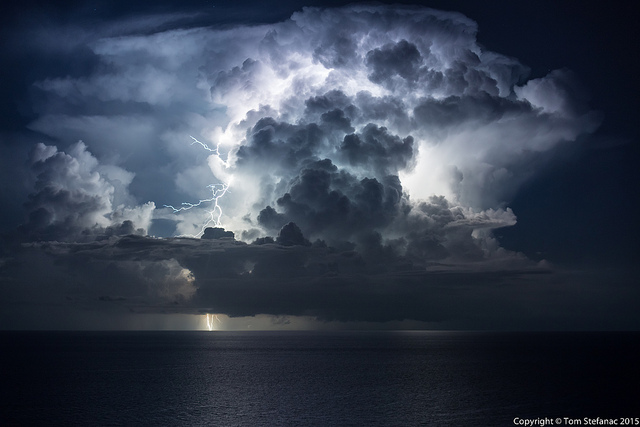
A thunderstorm 80 kilometers off the coast of Hollywood Beach lights up the horizon – 85mm @ ƒ/3.5 using the EF70-200mm f/2.8L IS II USMOn a recent trip to Florida in September (prime thunderstorm season down there) I was greeted by a wonderful nocturnal thunderstorm. The storm on radar was 130 kilometres / 80 miles away near The Bahamas. Once again, utilising the power of the 70-200mm lens I was able to bring the storm to me. There were so many good shots it was like shooting fish in a barrel and I could hand pick the more impressive images showing visible lightning bolts jumping outside of the storm. In fact, I was sort of sad I only brought a couple lenses with me and did not have my whole kit including the 400mm lens. Even at such extreme distances, with a powerful telephoto lens you can pick and choose your composition and see impressive things you may not otherwise.
That said there are limitation to what can be done. All lenses are subject to atmospheric conditions and the more air you put between your lens and the subject the more potential obstruction there is. In Florida, the tropical ocean air is typically clean and you can see for many miles, but once you get into areas like the eastern half of North America and where I live in Toronto, atmospheric haze can become a real burden. In the heat of summer when low level smog lingers you’re often hard pressed to see more than maybe 10 kilometres and even then, shooting a thunderstorm through that thick soup of dirty air does not produce pleasant or vibrant results. That said, not every day is hazy and some storms are very clear or do a good job of cleaning the air around them. Other storms produce so much rain the lightning may get completely buried and then even the best lens won’t help you! Then of course, there’s fog, low cloud, trees, buildings and any number of other potential obstructions to hamper your photographic efforts.
It’s no surprise that most photographers hunting lightning gravitate towards lakes or open spaces. These locations give the cleanest field of view and sometimes but not always have less haze. One thing to note is that heat shimmer is typically not a problem with lightning because the flash duration is so short. Although exposures which include other visible elements not illuminated by the lightning (buildings, evening horizon, etc) may still suffer from heat shimmer distortion.
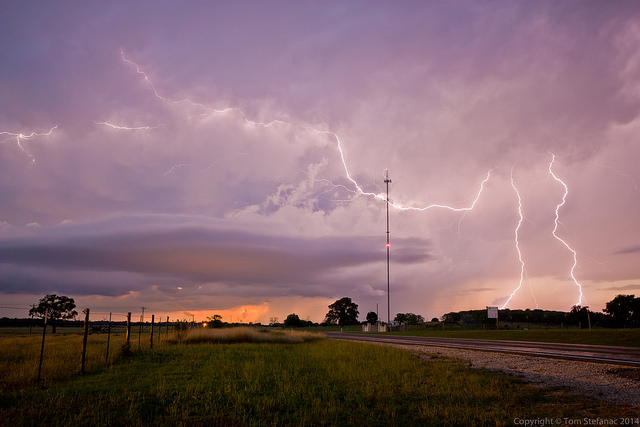
Lightning jumps across the sky in Texas – 20mm @ ƒ/5.6 – Sigma 10-20mm USM ƒ/3.5 EX DC HSMNow, you don’t always need a powerful telephoto lens, sometimes a wider lens is just fine. This central Texas lightning image was taken at 20mm and I captured the whole sky during the early evening. This was a much drier thunderstorm in the final stages of its life and was putting out a fair bit of lightning. Despite the storm looking close it’s actually around 15-20 kilometres away. The lightning bolts were just huge and so was the storm! Trust me, everything is much bigger in Texas and that’s no joke! The other thing to note is the radio tower, I could have moved to a spot without the tower but the sky would have been pretty empty otherwise. The radio tower actually gives a little substance and balance to the image filling it in and allowing the viewer to get a sense of size or even depth perception! I will admit that I did have my fingers crossed that a bolt would pick it off but that never happened.
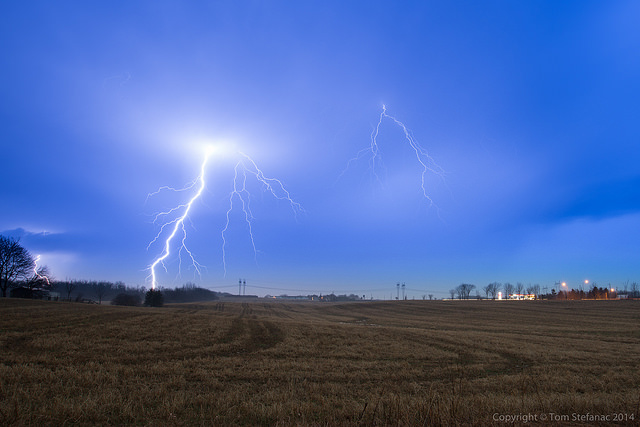
Lightning bolts from a weak fast moving thunderstorm with no structure – 22mm @ ƒ/8.0 – EF16-35mm f/2.8L II USMIn another example, there was an early spring thunderstorm just north of my home. The storm was moving very quickly (80km/h) and I needed to just find a clear spot to land and take photos. The storm had rain, no clearly visible structure and I really had no clue where the bolts would fall from. So I did the only thing I could and shoot the better part of the horizon filling the frame with the storm. In this case, two well placed bolts descended in frame. The framing could have certainly been better but nature did not cooperate and that’s just way it goes sometimes.
One last piece of advice is to not get frustrated! When you first try taking lightning photos, especially with a more focused telephoto lens you’ll inevitably fail or you’ll miss a few good bolts between frames. It’s normal, it happens, just don’t fixate on your losses and move on.
Then you also have those situations where the storm spits out all sorts of lightning but just does not perform for the camera or you find the perfect spot, get your gear setup and then realize the atmosphere has changed and low clouds have moved into your field of view and obstructed the sky. It happens, nothing you can do!
Too much lightning creating ghosting – 24mm @ ƒ/2.8 – EF24-70mm f/2.8L II USMThere’s also the problem of too much lightning or the wrong kind of lightning. Here’s an example from Southern Ontario taken on June 22nd 2015. This was a powerful supercell thunderstorm which is the strongest type of electrical storm you can get. The storm was producing huge volumes of lightning and flicking every second or so. There was so much lightning, it was hard to get a good photo because the constant flickering washed out the storm and hid the more powerful cloud to ground bolts. In my example to the left you can see ghosting from the cloud. This was a 30 second exposure at ISO 100. I had to use a very low ISO to keep the cameras sensitivity to a minimum but I couldn’t close the iris too much or else the actual bolts I wanted would be too dim. Unfortunately there was so much intra-cloud or sheet lightning as it is sometimes called, it created the ghosting. Even at much shorter exposures I was still getting ghosting or washed out bolts.
Remember, always keep a safe distance from the lightning you’re photographing and no picture is worth your life!