Instant Film Polaroid Style

Instant Film by Vaughan Weather

Remember those good old instant cameras? Well, you can still buy them but finding Polaroids instant film is not exactly easy. Sure, once upon a time you could walk into any store and find just about all the film you could have ever wanted.

Today that’s hardly the case but with the internet finding film is about having patience, the patience to find a good reputable distributor and then waiting for it to work through the mail system.

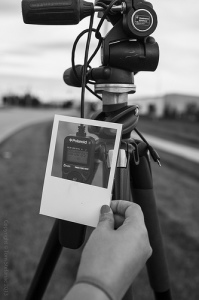
In what was a spur of the moment thought I decided to replicate some picture in picture photography, but Polaroid style. I decided to get my girlfriend who is a very brave hand model to hold a piece of paper in front of my lens. I was hoping to do an 8×11 shot but I did not have any crisp paper with me, instead I found an old white 4×6 wedding invitation. She held the blank side of the invitation towards me; I framed the shot and took it, then I quickly took another without her hand or the paper in the shot. This gave me two photos, one with a clean background and the other with the paper and her hand which would essentially be the picture.

In Photoshop I automatically stitched the two images together using the automated align & stack tool. I then used a layer mask to create a 4×4 square hole in the paper and allow the background layer to burst through. I tweaked the background contrast to make it look like there was a loss in brightness/contrast to get more of a matte look on the paper and make it look like an actual photo of the background. I did want to make the image believable; otherwise it just looked like a piece of paper with a square hole in it (hardly the effect I’m going for).

Seeing as my remote trigger is a cheap 10 dollar Polaroid unit that operates flawlessly I might add, it was only fitting to make this the focus point of the image. Polaroid instant film meets a Polaroid trigger in a digital world.

Maybe next time I’ll bring some empty picture frames with me and see how those images turn out.

Unintended Effects & Happy Accidents

Pigeon Liftoff by Vaughan Weather

Sometimes mistakes can become “artistic intent” or as I like to sometimes call it, a happy accident!

In this case I was trying to frame pigeons in a cluster phobic looking shot, there was a rather large cluster of them that were busy pooping on a utility pole and these pigeons were in no hurry to move anywhere, or so I thought!

While I was busy lifting the camera and doing “camera stuff” I completely ignored a big noisy street sweeper coming down the road. Apparently, pigeons hate the noise of these machines; I found it odd since they paid no attention to the passing vehicles, some of which were big noisy busses and trucks. But as soon as the machine was a stones throw from the pigeon gathering they all started taking flight!

This entire situation caught me off guard, it was early in the morning, and there was a nice yellow/golden cast against an increasingly blue sky. Because morning sunlight is never really strong and I’m always looking for the best quality photo at the lowest ISO, I was shooting at ISO 100 @ 1/125 of second with an F8 aperture for maximum clarity. These settings were perfect since the pigeons looked like statues, they simply were not moving.

Of course, as soon as I went to take the first photo the noise from the street cleaner just sent the pigeons crazy and they all took flight. I panicked and started snapping photos not even realising my settings weren’t even close to the more realistic 1/800th of a second I would need to freeze a birds flapping wings while in flight. This slow shutter speed hit me like a brick as I took the 3rd photo in my series. I quickly dialled up the ISO, shutter and kept shooting as the pigeons formed a huge mass in the sky.

Once all the action calmed down I looked at my photos. The photos in flight were cool but not overly exciting, then scrolling backwards as I hit the first three I took at the slow shutter setting I was impressed at how cool the blurred wings looked. This surprise element of motion blur brought the birds in flight to life while the motionless bunch still sitting on the wires were sharp and clear thanks to the low iso and narrow aperture.

Would you believe it, the “bad photos” were actually my favourite ones!

This just goes to show that before you curse yourself out for having the wrong settings or planning one shot when suddenly you need a whole different approach, things can sometimes work out for the better. Truth be told, I probably could not have planned a shot like this which is why it’s all the more exciting to have a happy accident.

Just remember, if anyone asks, this was always your “artistic intent”.

Testing the Canon 2x EF Extender III (Teleconverter)


Canon EF 70-200mm f/2.8L IS II USM @ 200MM Test With Canon 2x EF Extender III (Teleconverter)Canon EF 70-200mm f/2.8L IS II USM with a Canon 2x EF Extender III (Teleconverter) mounted on a Canon Rebel T4i / 650D bodyCanon EF 70-200mm f/2.8L IS II USM @ 70MM Test without Canon 2x EF Extender III (Teleconverter)Canon EF 70-200mm f/2.8L IS II USM @ 70MM Test With Canon 2x EF Extender III (Teleconverter)Canon EF 70-200mm f/2.8L IS II USM @ 200MM Test without Canon 2x EF Extender III (Teleconverter)


Moments ago (literally at 12AM Sept 1st, 2013) I acquired the flagship Canon 2x version 3 teleconverter from a friend who recently visited New York on a trip and was kind enough to purchase and bring it back for me.

These are the first test images I’ve taken to test the clarity.
The general rule is that for the best picture the camera should be at least two stops above the teleconverter, so for example my F2.8 lens automatically becomes an F5.6 lens with the teleconverter connected. I would then add two additional stops bringing the number up to ~F8 for maximum clarity.


Canon EF 70-200mm f/2.8L IS II USM with a Canon 2x EF Extender III (Teleconverter) mounted on a Canon Rebel T4i / 650D body
The new extender is shorter than the version two model with the biggest difference being the ability to send data about the lens through the teleconverter while the teleconverter add it’s own data into the mix. This appears in the EXIF information in the lens model field as EF70-200mm f/2.8L IS II USM +2x III indicating the lens is being used with the teleconverter. In the lens info field, the multiplication factor from the teleconverter appears as 140-400mm f/0. All other tidbits of data remain the same (f number, camera mode, focuz, etc etc).


Canon EF 70-200mm f/2.8L IS II USM @ 200MM Test With Canon 2x EF Extender III (Teleconverter)


Above, this photos is the lens at it’s maximum zoom of 200mm using the teleconverter which makes it a 400mm equivalent image. Since I’m shooting on a T4i which has a 1.6X crop factor, this image would then become the equivalent of a 650mm zoom if the T4i were using a full frame sensor.

Seeing as I literally just took these test shots, I notice very little or no deterioration of the image which to me seems to be a massive step up from the poor reviews and aberration / softness that the version two extender received.

A full set of images with and without the teleconverter with the 70-200mm lens at minimum and maximum zoon are available here for your viewing.

http://www.flickr.com/photos/vaughanweather/sets/72157635326592584/


I’ll post more images in the coming days once I get a chance to really test this new toy out!