The Scarborough Bluffs at Sunrise

Scarborough Bluffs Sunrise by Vaughan Weather

Looking through some of my older images yesterday I found two photos from the Scarborough Bluffs.

For those who might be wondering, the Bluffs are a natural geologic cliff feature on the east side of Toronto primarily composed of sand and in some places leading to a 90 meter drop straight into Lake Ontario. The bluffs were a product of the last ice age and the draining Don River. They look very similar to the limestone cliffs of England in some places because of their white appearance.

One of the best overlooking shots of the bluffs can be achieved from the foot of Cecil Crescent where it officially ends at Scarborough Bluffs Park. For other perspectives, specifically looking up from the foot of the bluffs, Brimley Road becomes Bluffers Park Rd at the edge of the lake; from there it’s a 10-15 minute walk west to the Cathedral Bluffs, the most stunning vertical piles of sand and cliffs.

I’ve seen many brave photographers climbing, cliff hanging and boating up to the edge of some of these pillars. I’ve also seen the “less brave” using drones, kites and other tools to achieve what I can only image are some spectacular images.

My images overlooking the Bluff’s are a product of circumstance and opportunity rather than planning and choice.

Scarborough Bluffs by Vaughan Weather

I was there to cover a news story about a man who had fallen down the bluffs to his death (yes that happens semi-frequently) and only the week earlier a group of teenagers who tried to descend the bluff became trapped and spent the night. People often make the mistake of trying to descend some of the cliff sides, only to realize going up is often harder than heading down and this is further complicated by dew and overnight moisture which makes the grasses very slippery.

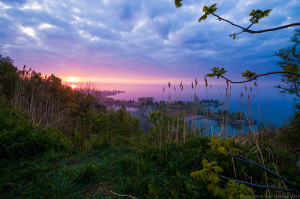
While I was wondering around just outside a small portion of the park which was taped off for the crime scene, I saw the glow from the soon to be rising sun in the east. I quickly knew I had an opportune time to grab some images of the sun. A low hanging stratocumulus deck reaching out to the horizon provided a wonderful converging line to focus attention on the sun and offset the blue sky. I also used the dense plant life around, most of which was green to balance the perspective and offset the strong red/magenta and yellow/orange hues from the sun.

The end result was more tropical than I could have imagined and provided a full pallet of subtle colour ever increasing towards the sun.

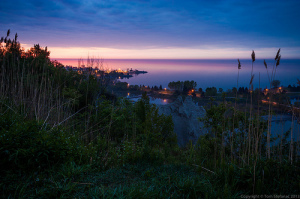
As crazy as it sounds, I’ve actually taken a few images from this general area in the past, none of which I really cared for. They were either later in the day or evening images where shadows from the setting sun washed out the shoreline. So, the lesson learned here is to take full advantage of any photo opportunity and southeast facing cliffs look best at sunrise with lots of colour!

I would like to return in the future on another hazy morning and see what I can gather from the ground for an alternative angle.

Simulating Medium & Large Format Landscape Photography

Humber River During Late Summer by Vaughan Weather

Do you ever see those wonderful landscape photos with the bright vibrant colours, the smooth silky water and soft moving clouds?

Well chances are you have and these photos have traditionally been the domain of medium and large format field cameras using a bellows and rear plate which holds a piece of sheet film. The advantage these cameras have is that they can shift and tilt which corrects perspective, they have super small apertures, sometimes as high as F/60 giving an incredible and crisp depth of field. The downside is that that they are big, slow to setup, a tripod is necessary and you really need to know what you’re doing because film isn’t cheap and you won’t know what you have until well after the fact.

That said, in my opinion everything about medium and large format makes it special and often the results are well worth the effort needed!

In today’s digital world, you can simulate large format images but it takes patience and even more time to setup and go through the process than it would with a 4×5 box camera.

The super high apertures associated with medium and large format field cameras have the effect of not only producing super sharp images but also serve to slow down time immensely and what I mean by that is they will require a 1 – 4 second exposure (or longer) even in full daylight. This allows water and clouds to smear into a silky looking surface which is highly desirable.

Moss Covered Stones

In order to achieve the same effect with a digital SLR you need neutral density filters and good strong ones. My favourite ND is the B+W ND110 which knocks down light by about 11 f-stops. If you shoot at F/11 with the filter you effectively now have an F/22 setting and this can turn a full daylight exposure that would be 1/500th of a second normally into a 3 or 4 second exposure. This will allow you to get the desired silky effect that has been a staple of medium format landscape images for over a century.

In order to achieve the same level of sharpness, you need to take multiple images at slightly different focal lengths; you’ll need at least 4 images using an F/22 setting and 8 images at F/11 from infinity to maybe 6 meters. You can then import these images into an application like Photoshop and have them automatically aligned and then stacked, this process is called focus stacking because only the sharpest parts of the images will be combined giving a near true infinite depth of field.

Naturally between the filter forcing the camera to require a long exposure and having to take multiple images at different focal lengths you can easily spend five or ten minutes just getting one photo that you still have to process which is longer than you would need with a medium or large format camera.
But at the end of the day, as long as you took the time to frame your scene and had patience your end result will certainly be pleasing if not simply impressive!