Chasing the Great American Eclipse
I’ve been waiting pretty patiently for this eclipse since the early 2000’s when I decided to hunt down the next total solar eclipse that would arise in North America. What makes this eclipse so special is that it is not annular but rather total. Annular eclipses are cool, but the moon never actually completely covers the sun. With a total solar eclipse the moon fully covers the sun and a multitude of observable phenomenon occur which simply don’t during an annular eclipse.
For example, with a total eclipse not only is the transit of the moon visible with its slow disappearance but so too is the Baily’s Beads phenomenon which are the last slivers of sunlight squeezing past the various mountains on the moon. As the light vanishes suddenly, out of seemingly nowhere, totality begins and the suns corona emerges with red prominence’s visible on the edges of the disk. The sky become so dark that the brightest planets and stars become visible. It’s an incredible view!
But enough with the geek talk, let’s get down to business!
Chasing a solar eclipse is much like storm chasing. You have a general area of preference for viewing, you have a list of tools that you need, you have to be in the right place at the right time and lastly you need to know what your end goal is, what you want to get out of the eclipse. Fortunately, unlike storm chasing where we don’t really know what’s going on until those final few hours before the storm, with an eclipse we know when it’s coming, where it’ll be longest and the type of eclipse. The decision then becomes where exactly to head to watch it and will it give us what we want?
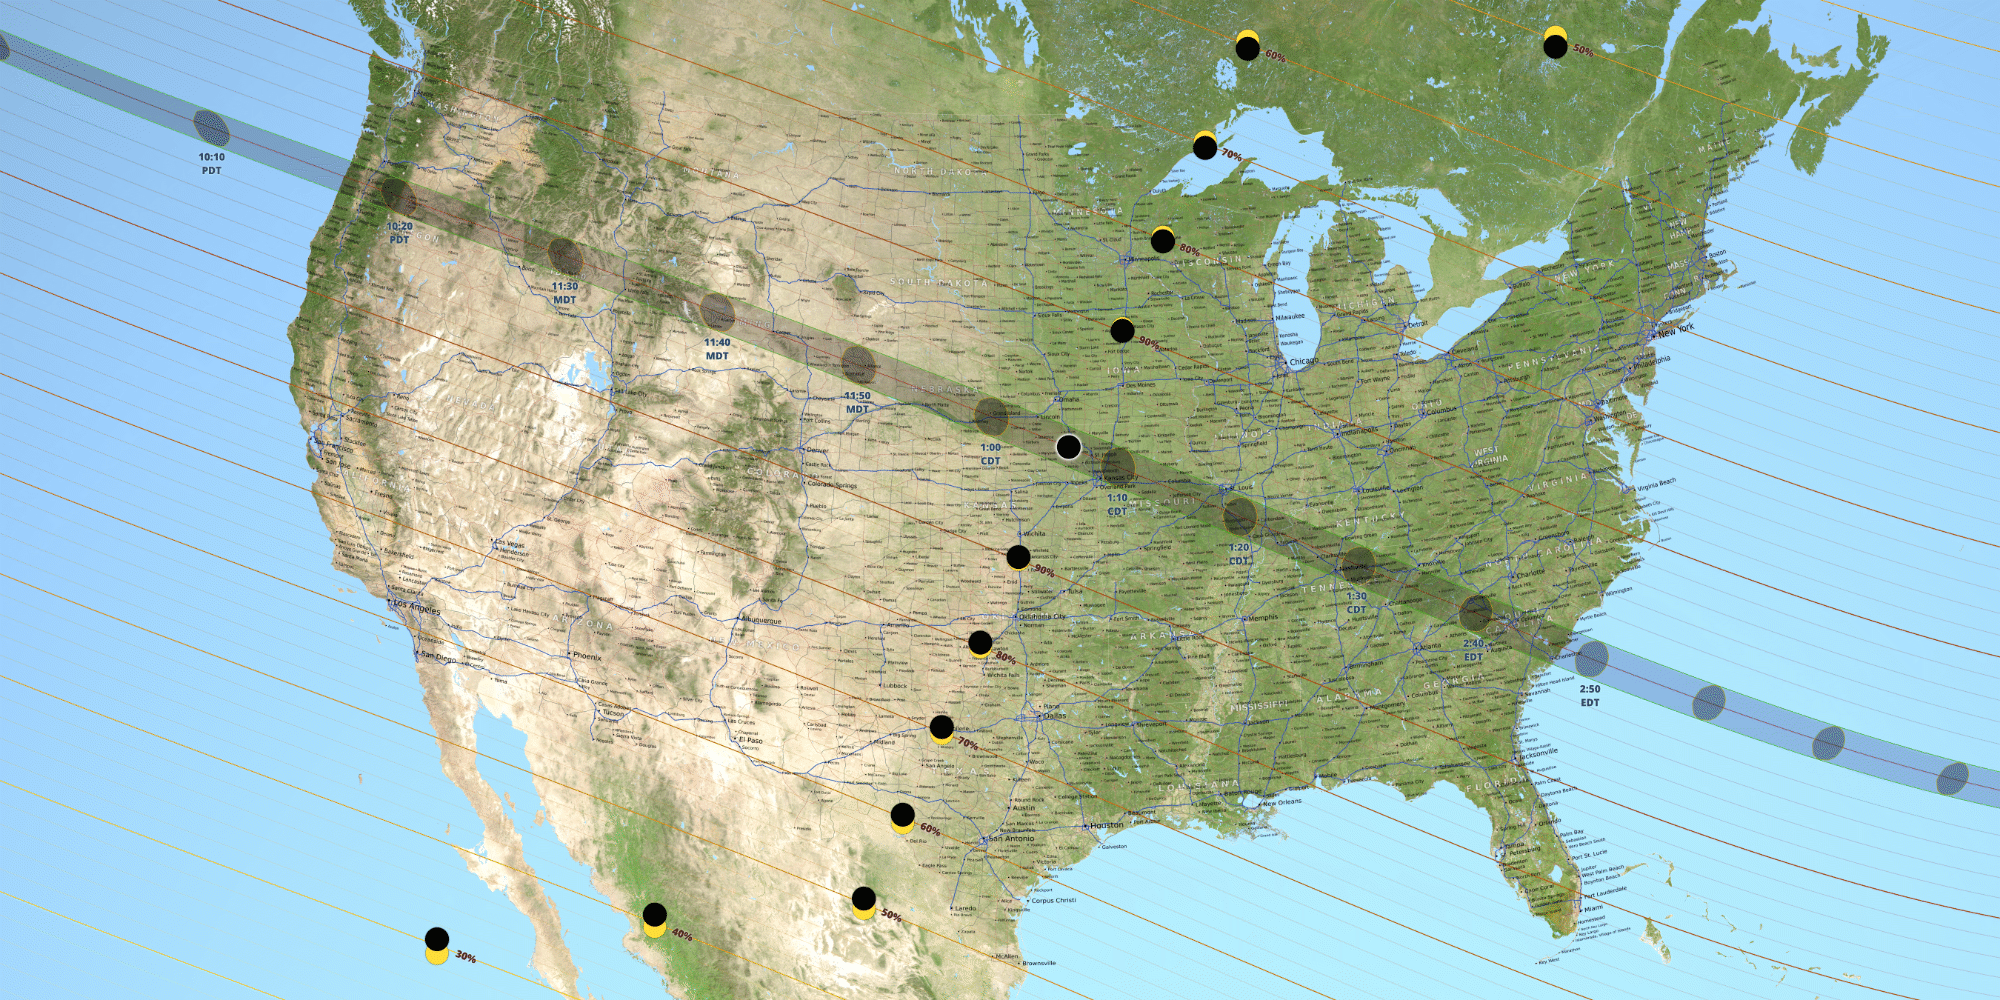
In my case, I want to have the longest duration possible for totality with the best chance of see the corona. Unfortunately, the area with the absolute longest duration is not necessarily the most favorable location when it comes to cloud cover. In this case both the areas presenting the greatest eclipse and greatest duration are in Southern Illinois and nearby Northwest Kentucky.

Precipitation Totals – Station Plots – August 2016
The problem with Southern IL and Northwest KY is that in August, especially mid to late August, the humidity tends to be very high! Plants are typically at their largest and foliage most extensive. This means transpiration rates are very high driving up local humidity values. There’s also abundant moisture that advects northward from the Gulf of Mexico which itself is beginning to get very warm by this point and posing a more substantial tropical weather risk. The high humidity values that arise locally and from afar make daytime cumulus clouds prevalent and the resulting thunderstorms a near daily occurrence. Couple this already cloud littered unstable environment with the lesser risk that the remnants of a tropical cyclone in the Gulf of Mexico may dive north and you have a recipe for great uncertainty with the potential for abundant cloud cover.
A thunderstorm isn’t even the problem so much as a weak cumulus field which could easily lead to just one single poorly placed cloud obstructing everything! Unfortunately, there’s simply too much humidity, vertical instability and resulting cloud cover. To put it in perspective, even if only the sky has 5-10% cloud cover, that’s too much! It just takes one cloud to ruin it all.

Precipitation Totals by Zone – August 2016
In order to avoid potential cloud cover, my eyes are drawn to the west, particularly the Nebraska/Missouri border where humidity values fall off east of the Mississippi but the duration of totality is still on the order of 2 minutes, 39 seconds, merely 3 seconds shorter than the greatest duration of totality in Illinois . Looking at the rainfall maps, it’s clear that the diminishing humidity values heading west translate directly into less rainfall which translates directly into less cloud cover at all levels. In fact if looking closely, it’s easy to note how the rainfall totals drop drastically west of Grand Island, Nebraska along the 98th Meridian. This is in part due to an increase in elevation, the dry downslope flow east of the Southern Rocky Mountains and diminishing vegetation density. This area is geographically where the Great Plains begin and the Central Lowland Plains fade off, the heavier forest cover tends to follow the moisture and naturally because of this sits east of the 98th, but the vegetation west becomes more grassy and shrubby meaning there simply is not as much transpiration to be had. The ground also becomes progressively more dusty and rocky, especially towards North Platte and Scotts Bluff which is directly reflective of the decreasing moisture in the atmosphere.
One other consideration which I will discuss in more detail a little later is the timing of the eclipse. The eclipse will begin in the west and travel towards the east. For areas that are far west into Oregon, morning fog, haze and low level stratus pose a threat since they may not burn off in time, and east of the Mississippi River where the eclipse will occur closer to noon, daytime heating will give rise to increasing cloud fields that will likely become denser with the potential for afternoon thunderstorms across Kentucky extending to the Atlantic cost of South Carolina.
All these factors combined suggest that the greatest potential for completely cloud free skies at all levels is generally from central through western Nebraska into Wyoming.
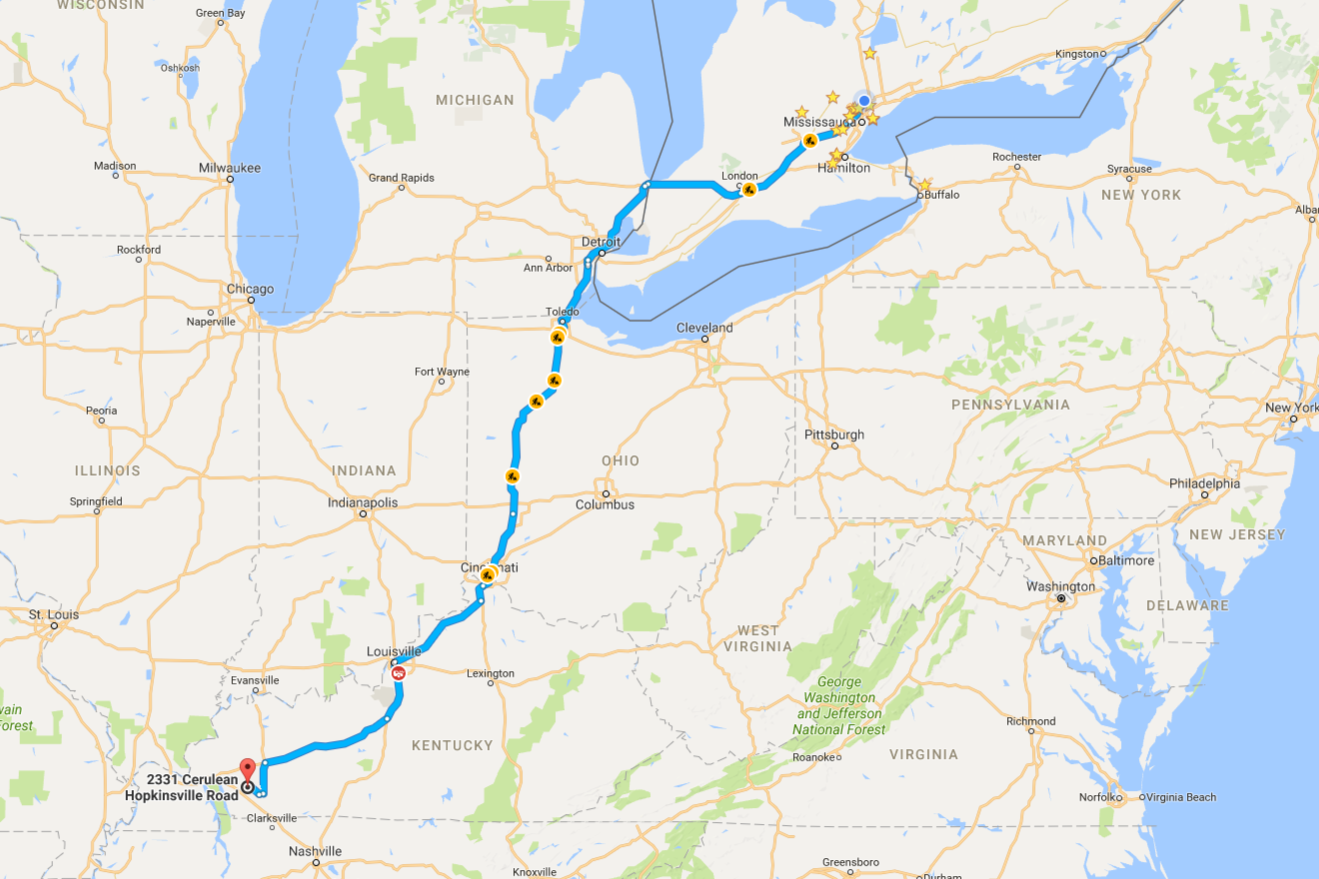 Cerulean Kentucky – Greatest Eclipse at 2m 40.1s – 12hr drive @ 775 miles |
 Lick Creek Illinois – longest duration at 2m 40.2s – 12hr drive @ 800 miles |
|
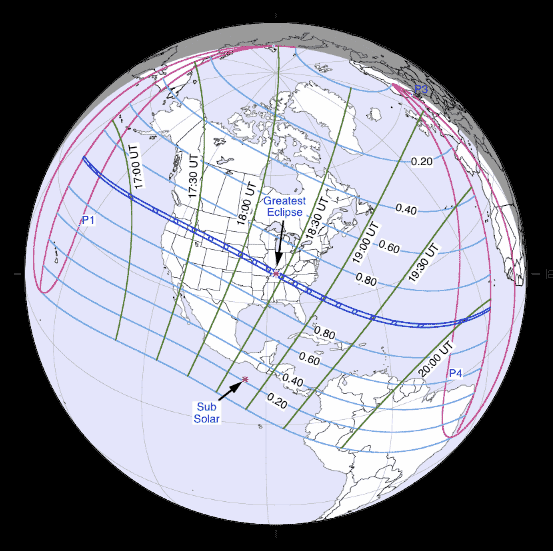
Given that Nebraska has the greatest potential for the least overall cloud cover, I need to consider driving options. Obviously the shorter the drive the better. The irony for me is that the two shortest drives are where the greatest and longest duration of totality occur. The two farthest options are where the least cloud cover from a climate stance occurs. It’s not an easy choice for me because I’m comfronted with the option of driving as little as 11.5 hours or as much as 19 hours. The eclipse also occurs progressively earlier west due to the time zone change and natural path. What this means is that there is no room for recovery. When chasing storms, the trend is that things farther west trigger later than things further east. So if storms are expected at 6PM EDT, 6PM CDT and 6PM MDT, you gain an extra hour heading west which each time zone since it goes from 22UTC to 00UTC. The eclipse is very different, it moves from west to east against the timezone change and very quickly, when the eclipse happens in Oregon it’ll only be a matter of 25 minutes before Nebraska see’s it. As a concrete example, the eclipse will start at 16:04 UTC (9:04 AM PDT) in Oregon on the Pacific coast and begin in central Nebraska just 30 minutes later at 16:34 UTC (11:34AM CDT). Then less than 20 minutes later it’ll begin in south central Illinois at 16:52 UTC (11:52 AM CDT). So even as I drive west and cross different times zones, I don’t actually really save any time, in fact I lose time since the eclipse moves from west to east. Logically this would suggest I should travel east, but again, the moisture increases and makes the cloud risk prohibitively high. Thus there is no room for error and driving calculations must exclude time zone variances. Of course anyone chasing the eclipse should strive to to be in position and setup well before the eclipse begins. It also means I need to choose a target location sooner rather than later should I head to Nebraska versus Illinois. |
|
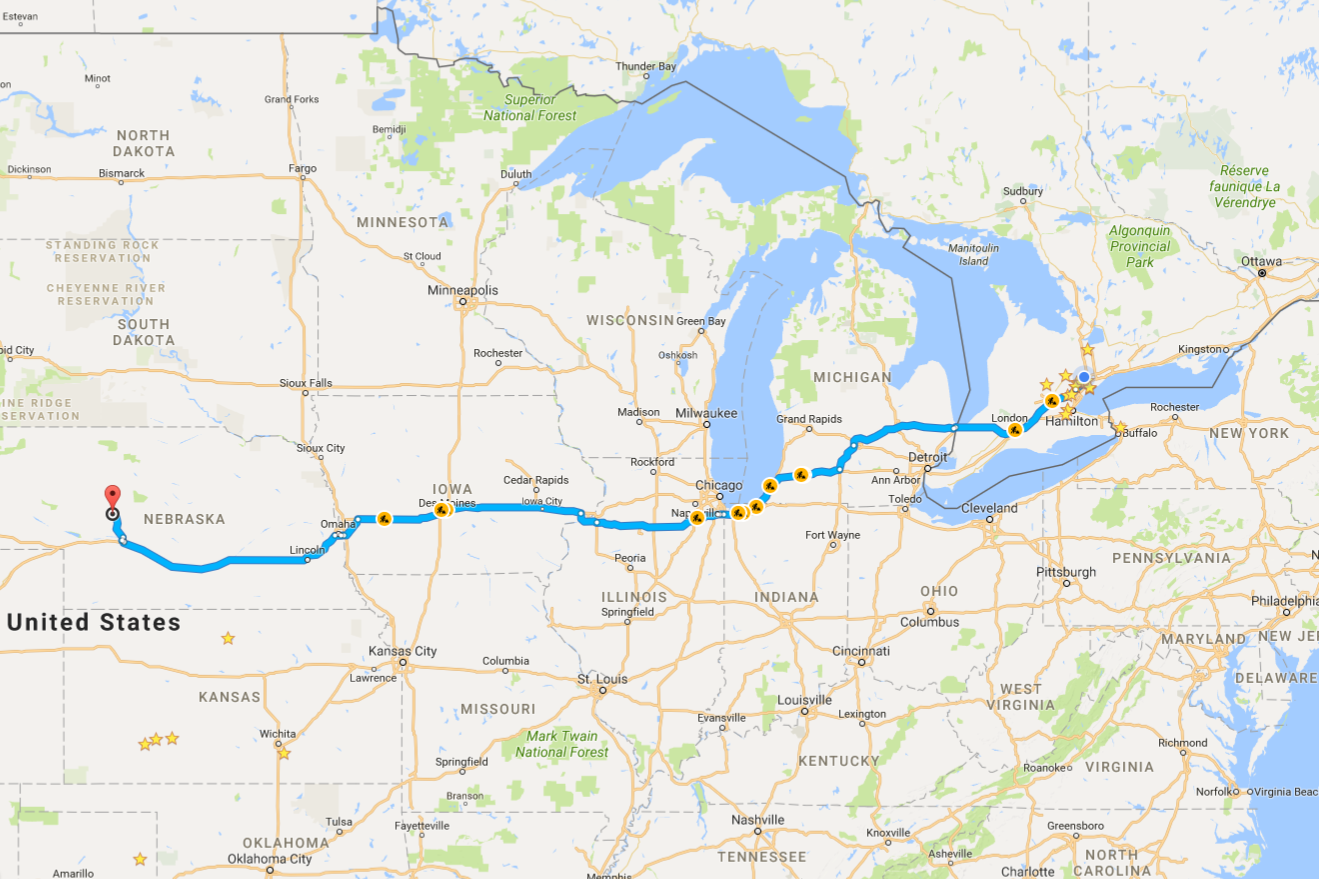 Tyron Nebraska – driest & likely least cloud cover – totality 2min 33s – 19hr drive @1275 miles |
 Fanning Kansas – closer than Nebraska, still cloud risk – duration of totality 2min 38s – 15hr drive @ 1000 miles |
Fortunately the one advantage weather junkies have over many others is the ability to forecast and really comprehend the weather. While you can always attempt to plan things based on statistics, the statistics only really matter if they’re right the day of and that’s a huge risk to take because statics are just the overall weather pattern for a given area over a certain time frame smeared together. The reality is that the weather always varies from day to day, minute to minute and even the most favourable statistic are no guarantee of anything. I like to think of statics and climate patterns as a loose guide, they help narrow down the viewing window, but can’t be used to fine tune it.
It’s important to realise that the most important decision making will occur in the final three days leading up to the eclipse. Then when weather junkies and eclipse chasers should be fine tuning their forecast. I’ll be looking for strong ridging, areas that are devoid of moisture at both the low, mid and upper levels as well as the upstream environment for any potential cloud producing weather.
I can’t stress how important it is to look for weather patterns that favour clear air at all levels with good visibility and are prohibitive to human induced cloud growth such as contrail development behind airplanes.
An important but lesser consideration for eclipse chasers will be air quality and smoke contamination from wildfires. I’ll be doing my absolute best to avoid any smoke plumes anywhere that could potentially set haze upon the viewing opportunity.
Photographic Tools

Looking at the highly reflective MrStarGuy Solar Filter
For me personally, a large part of the eclipse will be having the opportunity to photograph it.
I’ve been slowly building my photographic arsenal leading up to this day for years and as crazy as it sounds, the 800mm lens is one thing I specifically purchased primarily for the eclipse. If you had to ask me about what my motivation was to purchase it, the eclipse was really the single most important event that pushed me over the edge and believe me, if I could have afforded the Canon Ef 1200mm lens for $180,000 I would have purchased that too. But make no mistake, I’m not rich and the 800 really did break the bank.
I did consider telescopes before purchasing the Canon 800mm, but by the time you outfit a telescope and find one which has excellent optical quality you’re back in a similar ballpark with cost. The difference is, the lens is a lens which is great for everything from sports and nature to eclipses, while a telescope is really not useful for anything except celestial objects. That said, a 1000mm or 1500mm equivalent telescope is still slightly cheaper than an 800mm canon lens.
But having a big lens is just one part of the equation, understanding how to use the lens correctly is a whole different ball game.
Unlike everything else, the sun is not something you can just photograph. Because the sun is so bright, trying to shoot the sun with an unfiltered lens would result in the immediate death of the sensor exposed to it. Think about it like this, a lens really is just like a magnifying glass, it focuses concentrated light on a smaller area. If you can burn paper and set fire to hapless ants with a simple magnifying glass, just imagine what would happen to a camera sensor on the receiving end of that huge super amplified 800mm image. Needless to say, the results would not be good at all!
In order to protect the camera and lens, I’ve employed the use of a special daylight sunlight filter manufactured by MrStarGuy. It’s basically a specialized aluminum foil film sheet that significantly reduces the brightness of the sun only allowing a small but safe amount of light to pass.
The filter is similar in blocking power to a 1000x ND 3.0 filter. It’s so strong nothing else at all is visible except the sun when placed over the lens, and unlike a standard photographic ND filter, there is no colour cast. Most photographic ND filters tend to add a magenta tint to the image, the tint grows stronger as the blocking power of the filter increases. Thankfully, these colour casts are easy to remove with modern digital photography, but with the MrStarGuy system there is no need for colour correction as there is no tint which is a small but added bonus.
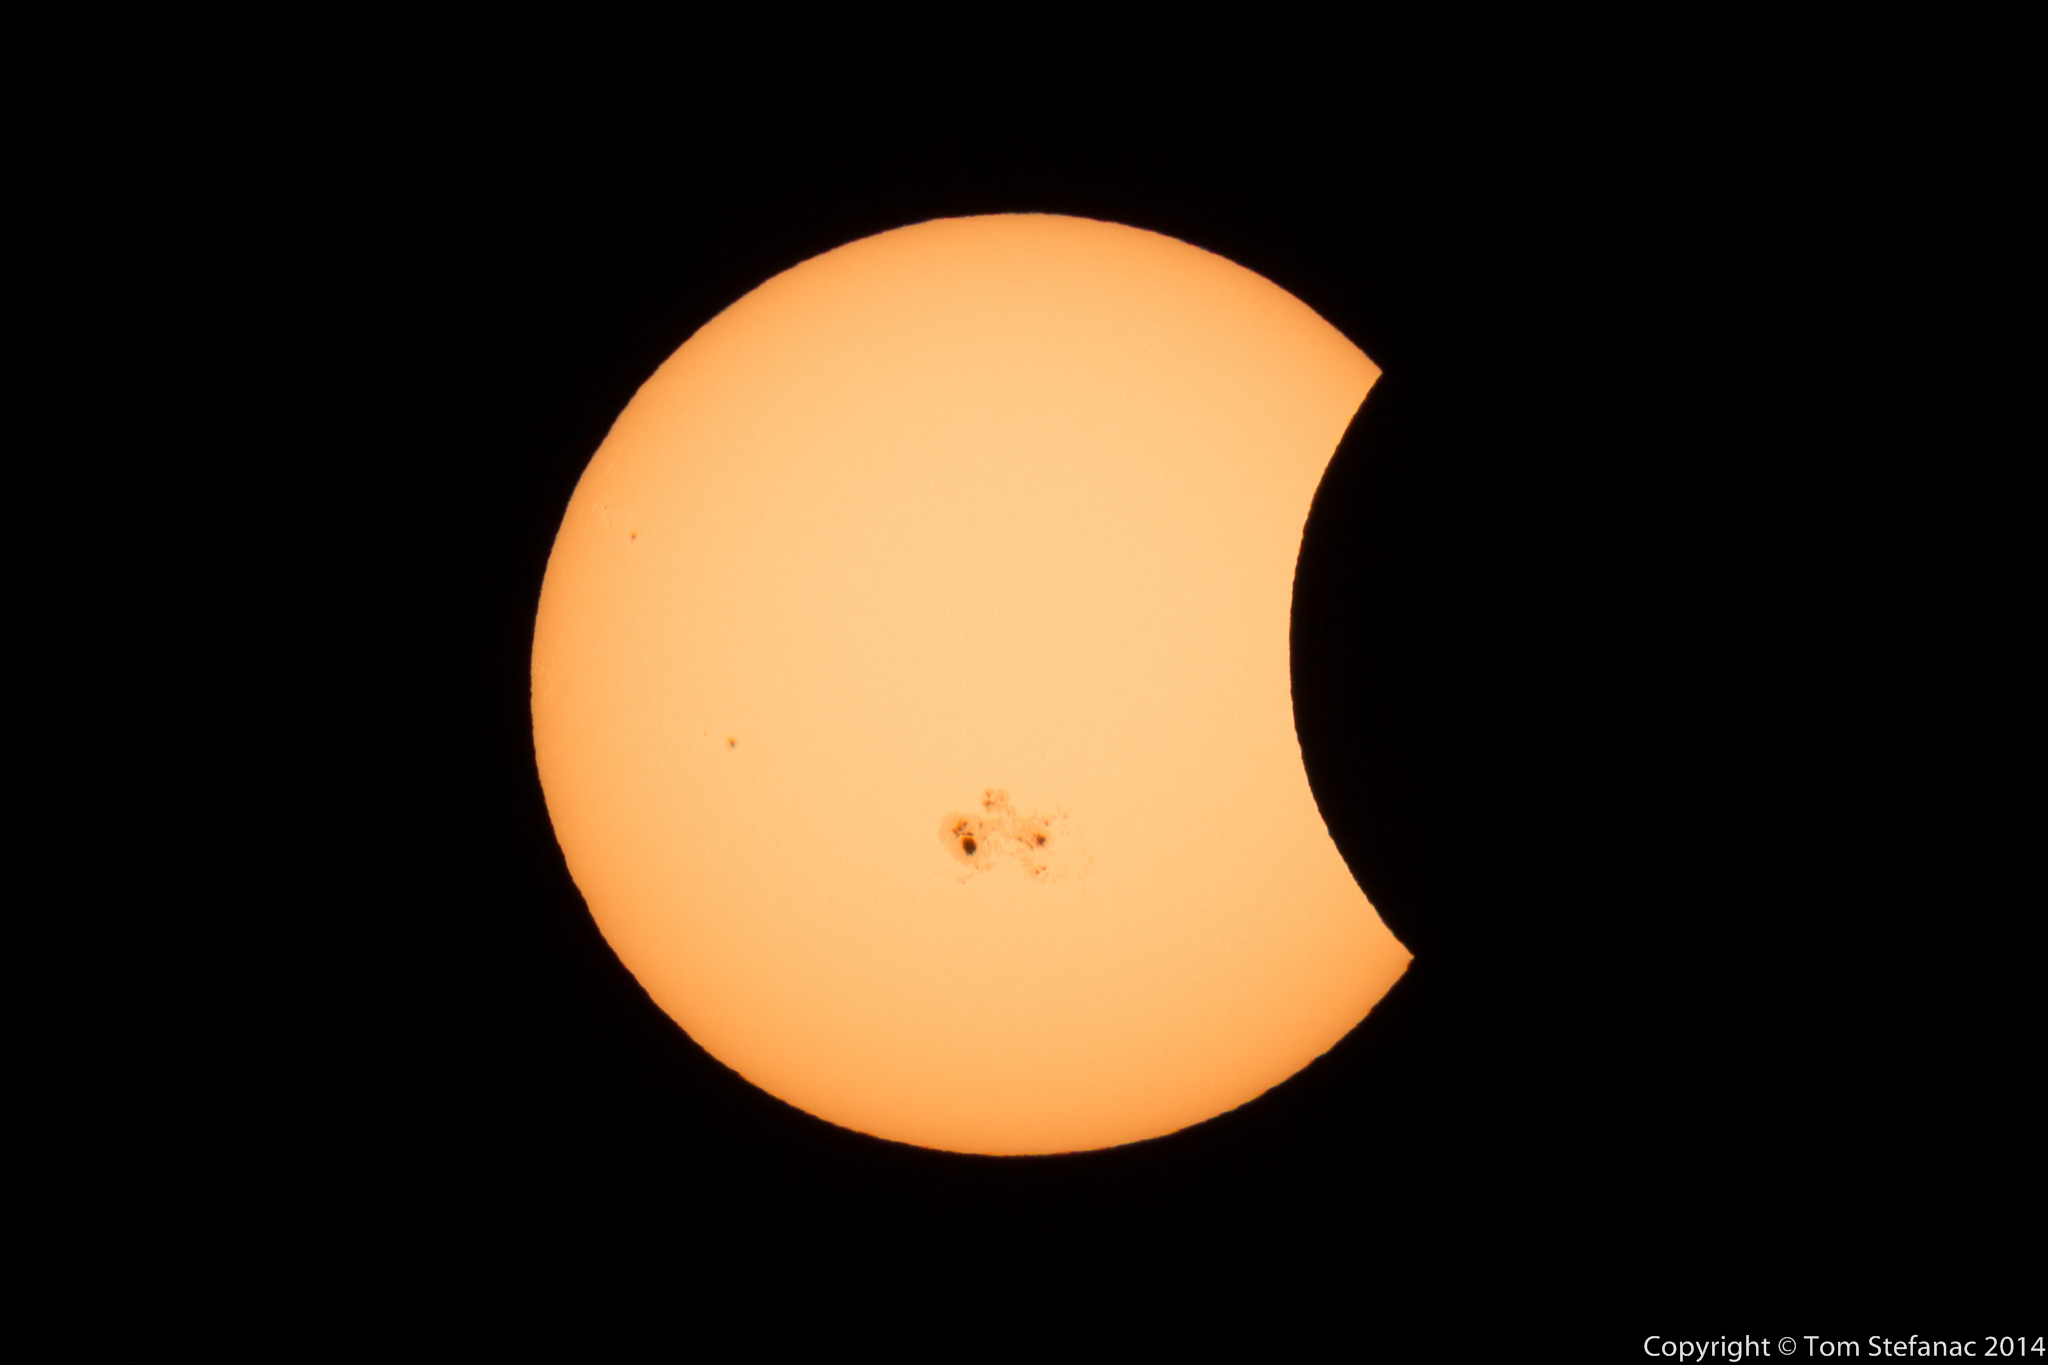
October 23rd 2014 Partial Eclipse
The filter to my surprise is optically very clean with no visible degradation to the image quality. The second thing that’s very important about this filter is that it is quickly and easily removable.
The filter is really only to be used during the first 95% of the eclipse, but once totality nears and the Umbra (moons inner shadow) approaches, it’s imperative to open the lens up in order to capture Baileys Beads, the suns corona and any prominences once totality occurs.
Then as the eclipse passes the midway point and 3rd contact begins I’ll quickly need to put the filter back on as totality ends and the umbra gives way to the penumbrra (moons outer shadow). This is the phase where the light intensity begins to grow again and the strength of the light can become damaging for optical devices, observers and camera sensors.
To give an idea of what the sun looks like when using a powerful blocking filter, here’s a sample from the October 23rd 2014 partial eclipse. Unfortunately just as the eclipse was starting to get going the sun set. But here you can clearly see how the sun looks with a filter as the moon passes in front. This photograph was taken using a 400mm lens and B+W ND 3.0 1000x filter. There is no colour correction as the sun was beginning to set and very orange.
Another important point to note is that a good sturdy tripod is really a must when shooting the sun, especially towards midday. Trying to hold a heavy piece of glass or anything up towards the sun is never easy! It’s better to let the tripod do the heavy lifting so you can focus on the photos.
Now a tripod is not a must, but a tripod becomes much more important during totality, especially if you’re interested in a somewhat longer exposure to capture all the fine detail in the suns corona. As a lens become longer, whether it’s a telescope or photographic lens, even the slightest shake or jitters become highly amplified.
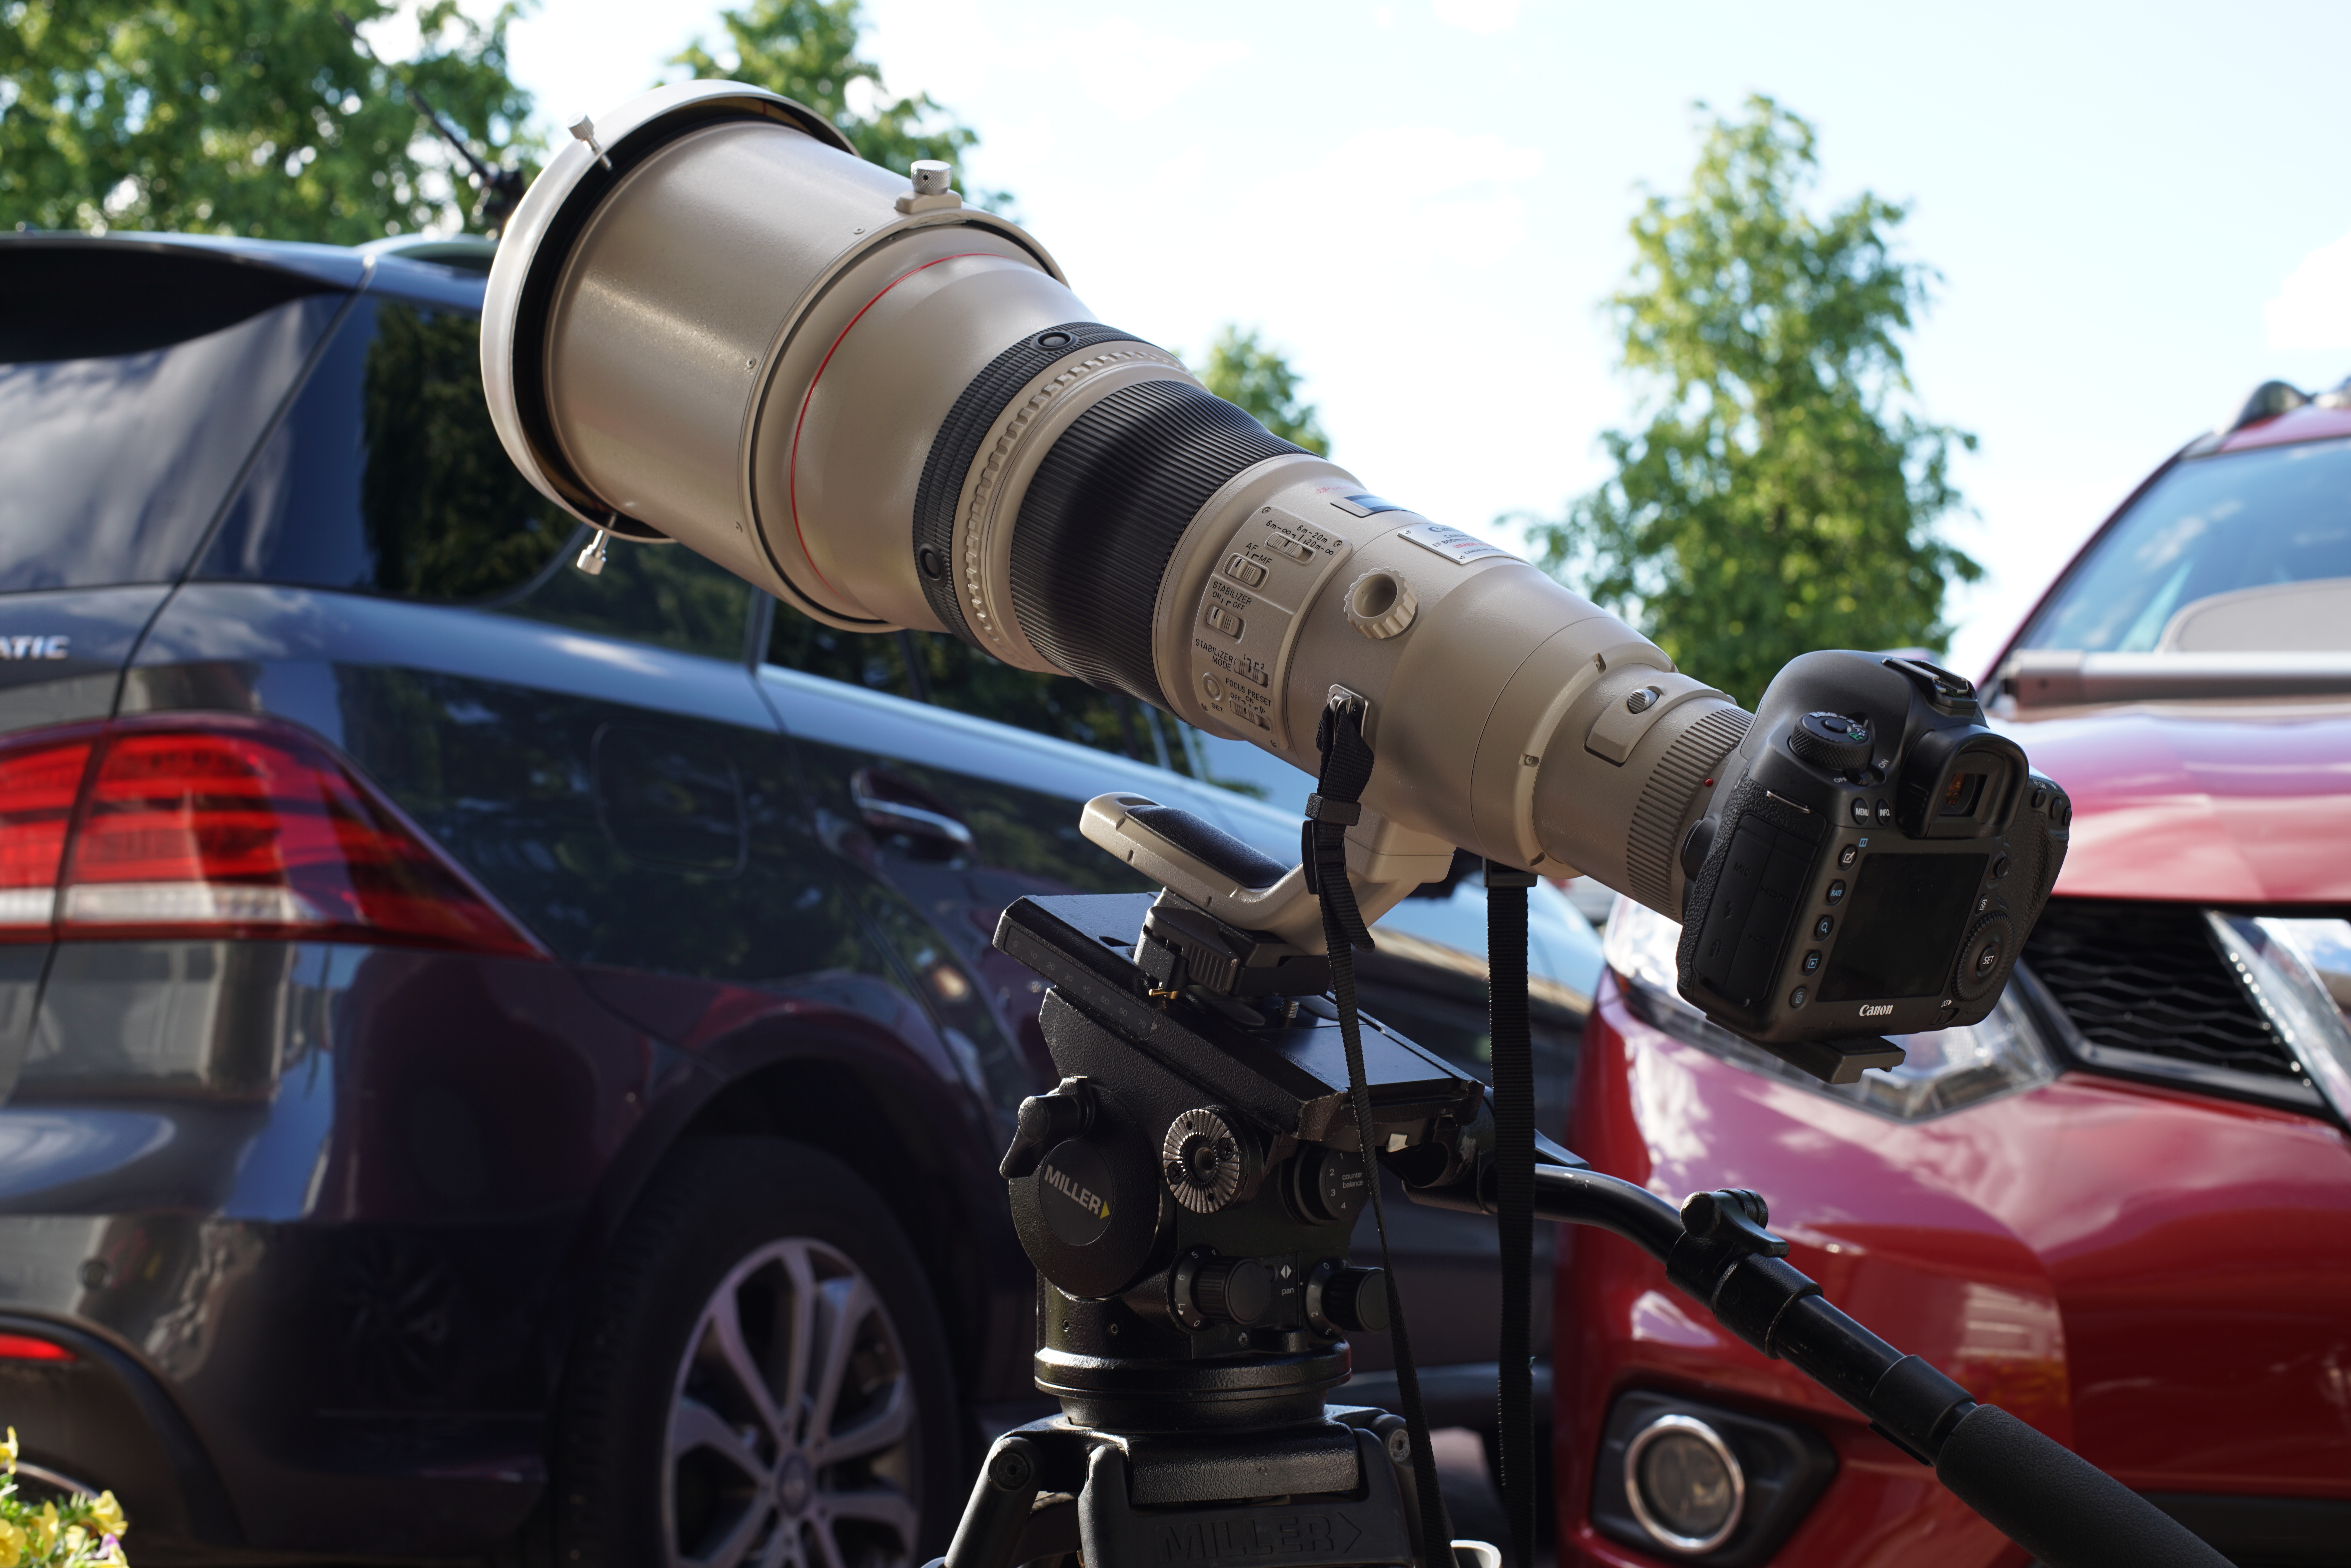
The Canon EF 800mm f/5.6L lens with a MrStarGuy Solar Filter
There is one caveat, unlike a photograph of a static subject, the sun and moon are moving. This means that even with the use of a tripod, if the exposure is too long blurring will occur and the movement of the sun along the photographic plane increases with the magnification factor. So as a lens becomes bigger or more zoomed in, the shutter speed too must increase to prevent motion blurring, and this is something a tripod or image stabilizer cannot prevent, only a faster shutter speed has the power. Anyone into astrophotography or sports has dealt with motion blur. If you leave a shutter open too long star trails are the result. The longer the exposure, the longer the trails and the greater the blurring.
One solution to celestial motion I have not mentioned is a tracking motor/tripod system. There are telescopes out there with automatic tracking that are specifically designed for night sky photography. Tracking telescope/tripod systems are highly effective if setup correctly but very expensive and not typically designed for traditional photographic equipment. So the one solution to motion blur that does not involve a faster shutter is a tracking system.
During an eclipse the dark disc of the moon will give the sun a pacman type appearance as more and more of it is hidden out of view. During a total eclipse there are 5 phases, first contact, second, totality or max occultation, third and forth contact. First contact is the point when the moon first passes in front of the sun, second contact is around 50% coverage, totality or max occupation is the maximum possible coverage at a set location, and then third and fourth contact are the ending phases as the moon revels the sun once again and occultation returns to 0%.
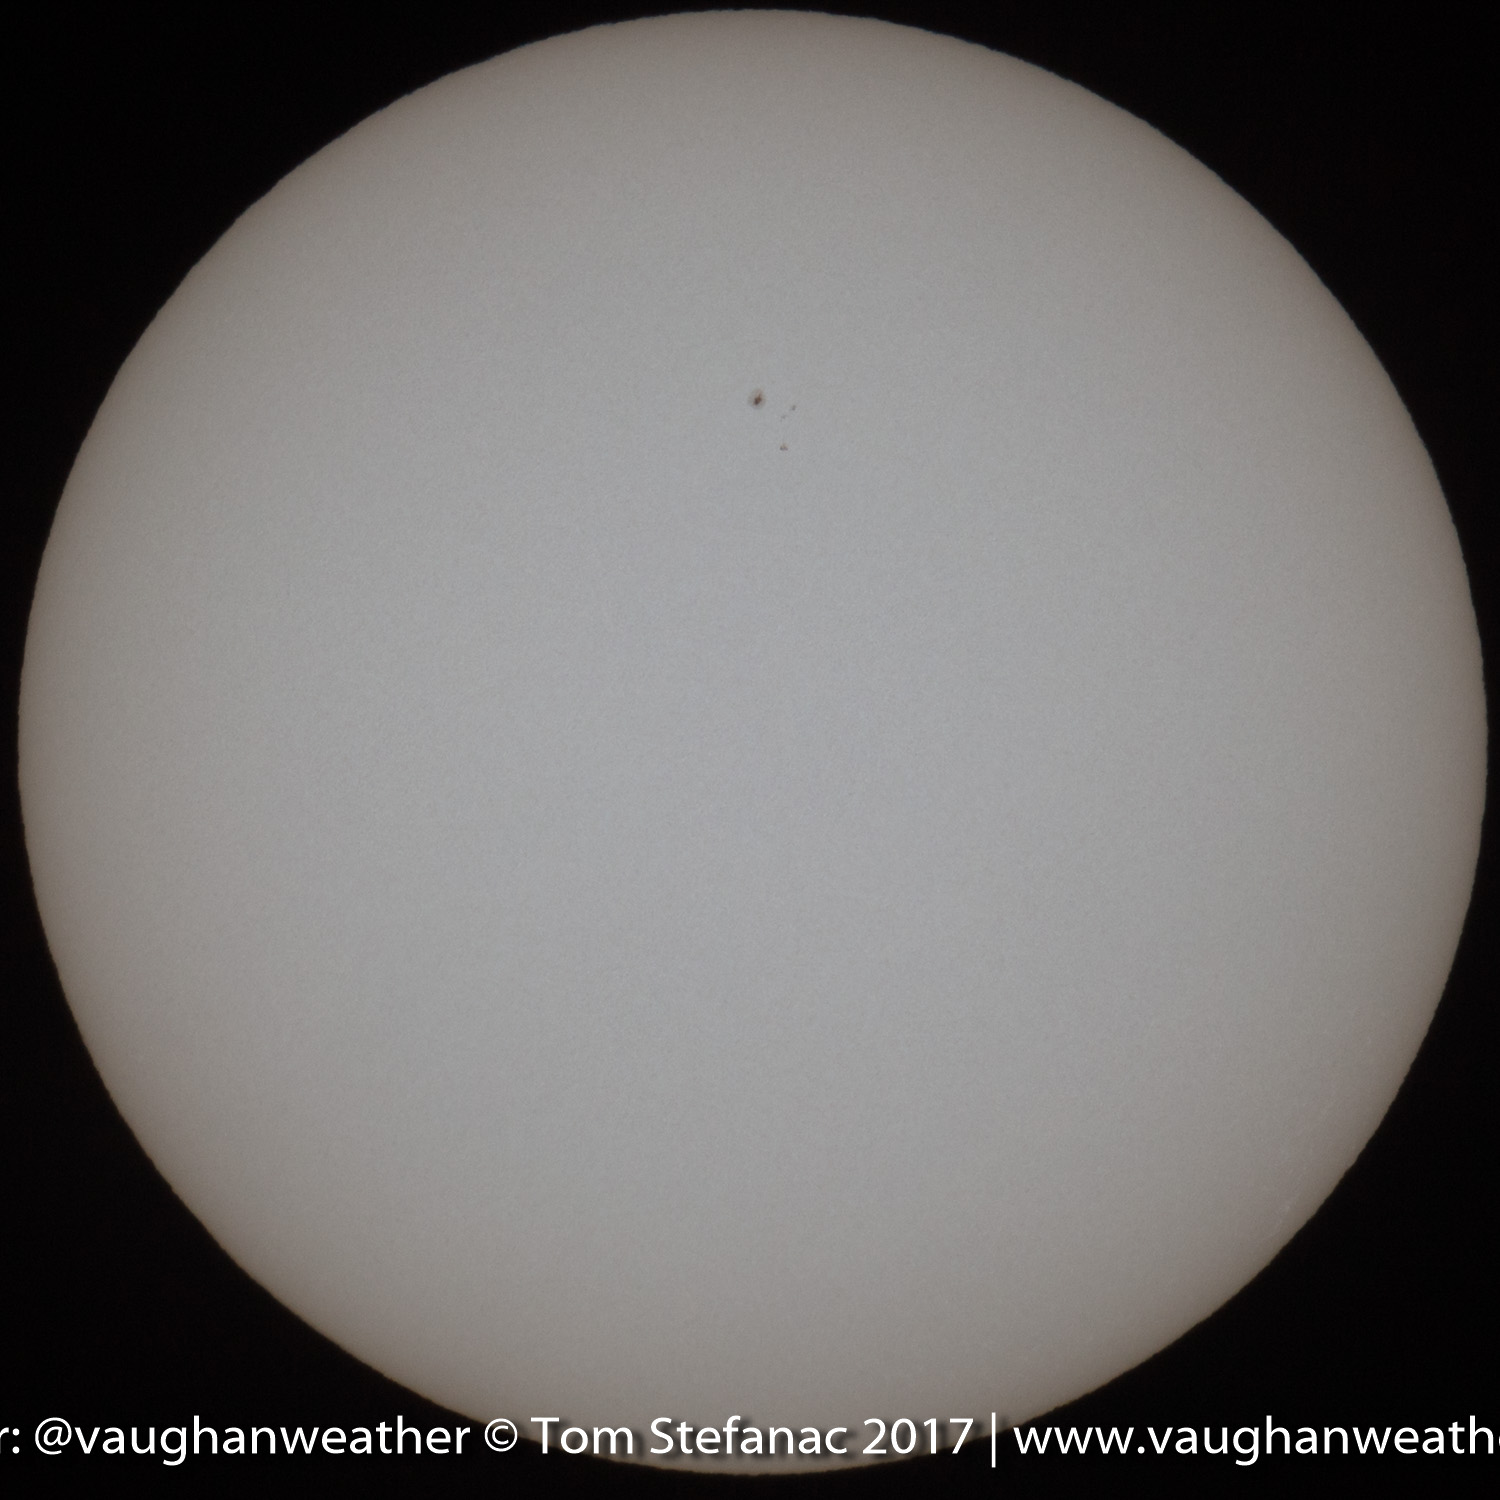
The sun through the Canon 800mm lens with a small sunspot visible using the MrStarGuy solar filter
Because the solar intensity varies greatly during an eclipse it’s very important to remain on top of light levels. The human eye is masterful at adjusting itself to the ambient light level, that’s why it’s easy to walk from a bright resturaunt out onto a dark street without noticing how much the luminosity has changed. Yet on a camera you’ll easily be pushing 20 or more F-stops between daylight and moonlight, and closer to 50 f-stops if looking at the sun without a filter. An eclipse is one of the most extreme natural light variances you can find in nature short of a volcanic eruption blocking out the sun. Because of this it’s important to always keep on top of your cameras metering and constantly adjust exposure levels as necessary.
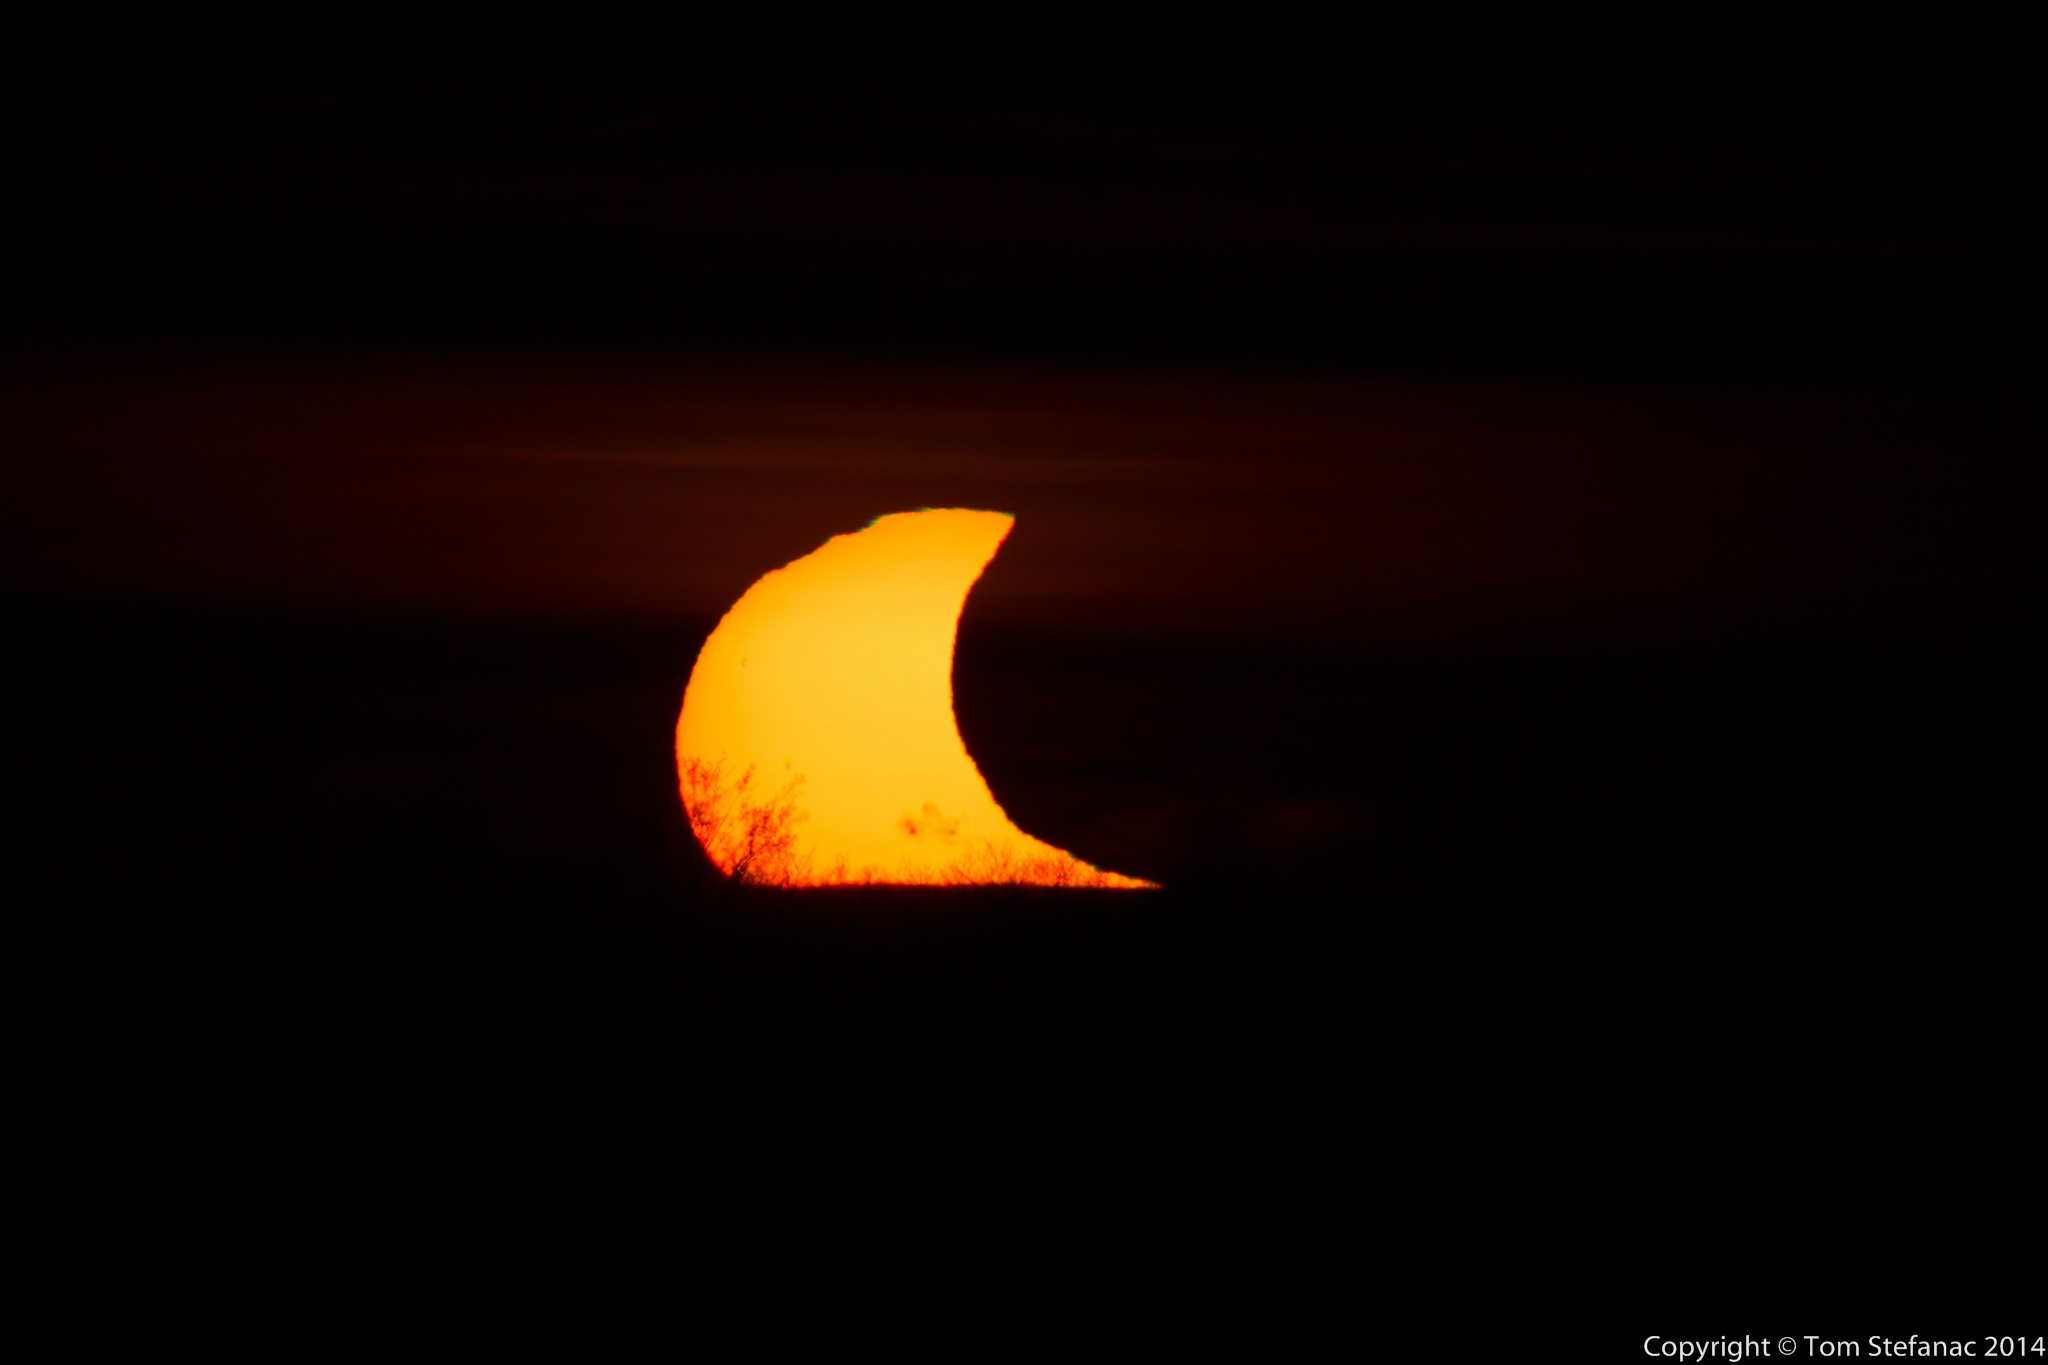
October 23rd 2014 Partial Solar Eclipse Sunset
You might also notice the sun in these images appears white, and that’s because it actually is. The sun is white because it emits all visible wavelengths of light. If you look a photo of the midday sun, or the sun without earths atmosphere obscuring it, it has a spectral colour balance of around 5600k which is basically white. Stars that are hotter than our sun tend to be a little more blue and stars which are cooler appear more red. From an artistic point of view, I personally prefer photographs of the sun to have a slight orange tint to them, it just feels a little more natural, what kid ever painted the sun white in their kindergarten class?
For more information and a great tutorial including exposure charts for various focal lengths, apertures and iso’s visit Mr Eclipse. This website has a plethora of highly useful information to help you plan and achieve the best possible results during the eclipse.