Posts in Category: Chase Tools
Canon 5DSR
The latest, biggest and baddest addition to my photographic arsenal is the Canon 5DSR. This beast of a camera shoots at a whopping 53 megapixels (effectively 50.6), more than double the resolution of the 5DMKIII, three times the resolution of the T4i and over four times the resolution of the XSi. Part of the reason I splurged on this camera was the desire to utilize the new Canon 11-24mm lens to the fullest, which means squeezing every pixel out this body/lens combination.

Canon EOS 5DSR
In short, the 5DSR is basically a 5DMKIII on steroids, it’s virtually the same exact body with a couple tweaks in the menu, more vibrant colours and overall better colour science with much more powerful Dual DIGIC 6 processors. The tradeoff is that the autofocus is a hair slower than the 5DMKIII and the 5DSR can only shoot 5 frame per second vs the 6 frames per second the 5DMKIII can shoot. All in all though, for landscape, weather, sky and studio portrait photography, the 5DSR is a powerful tool!
The Canon 5DSR with a Cokin Z-Pro sunset filter
If you’re wondering which camera I give preference to, don’t worry, the 5DMKIII and T4i still get plenty of use. I basically keep a different lens on each body so I can quickly achieve the photo I desire without having to switch lenses. Wider lenses I tend to keep on the 5DSR, midrange lenses on the T4i and zoom lenses on the 5DMKIII. I found that the autofocus of the 5DMKIII is superior to the T4i and yields very good results when shooting something soft like a tornado at 150-200 millimeters which might not have rigid contrast. The T4i does very well with intermediate lenses and gives the 24-70mm lens a little more reach while maintaining autofocus. The 5DSR is slower than the MKIII but faster than the T4i and yields a lot of information that can be used to crop wide-angle shots.
Enjoy some sample photos I’ve taken with the 5DSR below!
EOS 5DSR Sample Photo – Full Resolution Here

EOS 5DSR Sample Photo 2 – Full Resolution Here

EOS 5DSR Sample Photo 3 – Full Resolution Here
Photographic Accessories
In addition to the DSLR bodies themselves, I have an array of filters, polarizers, plate holders and trigger / remote systems.
Having a good quality, responsive SLR is the first step in taking great weather photos, the next is having the tools that can take your camera to the next level.
Canon 5DSr with a Cokin Z-Pro Filter Holder, ND8 Grad, B+W C-Pol on a 16-35mm f2.8 lens with the GP-E2 GPS attached to the hot shoe.
Photographing storms is never a quick easy process, yet storms by their very nature require you to be a fast, accurate and confident photographer. You need your camera to be focused correctly, the exposure to be accurate, white balance acceptable or faithful and a steady hand or tripod to prevent motion blur/jitter. Only after all these factors are correct can you start taking photos and make adjustments to composition, and other elements.
Once you’ve mastered the basics, and learned how to use your lenses effectively, then you can add things to them such as circular polarizers to deepen the blues in the sky and make the clouds pop out.
You can also add graduated filters to help balance the bright clouds against the darker foreground. If you’re really brave, you can combine polarizers, neutral density grads and even coloured filters to make things pop or create hyper-realistic art.
I say art because the instant you push your photo beyond a faithful true to reality representation, it’s no longer realistic to what was there but a form of pseudo realism. Think about it like this, if I use a filter to make the sky pink and the pink sky somehow balances perfectly with a big white thunderstorm against a field full of yellow sunflowers, it’s acceptable as a cool photo, but it’s no longer realistic. I’ve tricked your eyes into believing something that’s probably impossible and further to that point, manipulated reality to create something that I feel looks better. The photo is partially representative of what was there since I did not remove elements but it’s not faithful to the reality of the moment since I added false colour to the sky.
So remember, tools like filters and grad to help you turn your photos into art, or make them more representative and faithful to what was there. It all depends how you use them.
Vaavud Sleipnir
I’m one for gadgets and the Vaavud Sleipnir is the perfect gadget for any weather nerd! I was familiar with the whole crowd funding program around Vaavud and their original wind meter but it was not until I wandered into Fogh Marine in Toronto that I saw the Sleipnir sitting in a cabinet.
Fellow storm chaser Colin Williamson holding an iPad with a Vaavud Sleipnir
I had a choice of three hand-held anemometers ranging from a standard Kestrel to a Davis ultrasonic device but the Vaavud unit was the cheapest of the three and had one major benefit, it could store and share the wind data. The Vaavud needs a compatible phone to make the unit work since it basically uses the microphone/stereo/trrs jack to send data to an app that turns it into usable information.
During my initial testing of the Sleipnir I was very impressed with the directional accuracy and velocity data resolution. I compared it against a few more expensive anemometers I have including my Davis Vantage Vue and a brand new Vortex Inspeed unit, and the Vaavud was basically on par with both units but additionally able to catch some of the more subtle micro gusts.
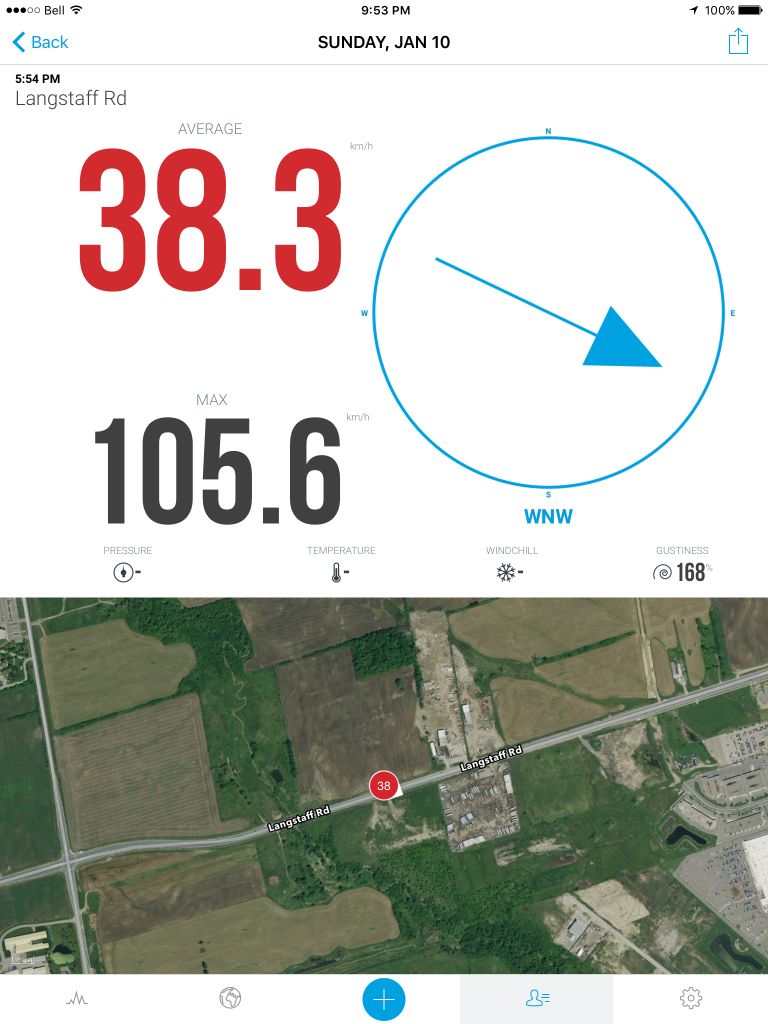
Vaavud application running on an iPad Air 2
The unit as a whole is super responsive and seems to take measurements several times a second catching all the smaller gusts. This data can then be graphed in the program, shared to a larger map and database or even automatically uploaded to DropBox. It’s a great device to keep in your pocket, or somewhere in your car. The one detriment is that it seems to eat up your phones battery and while most all iPhones seem to work fine with it, my Android devices are hit and miss. Plus, if you’re using it in really wet conditions then you have the issue of water getting into your phone by leaking down the pin into the audio port and damaging the internal electronics. Obviously you have to use it with care and caution or for shorter periods in rainy weather.
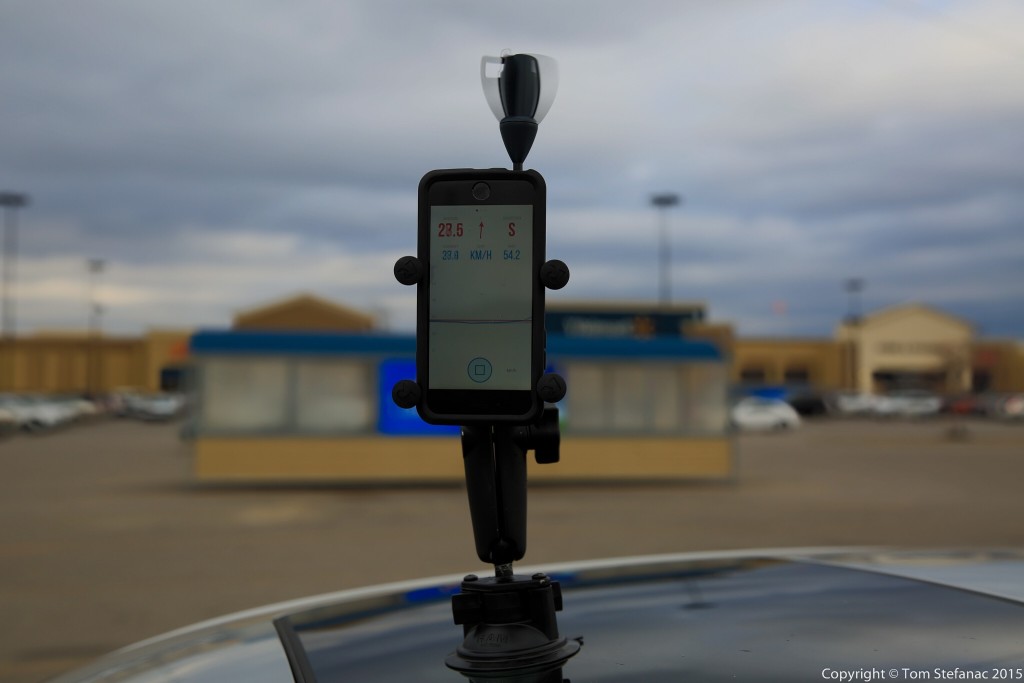
Vaavud vehicle mounted without TRRS extension cable
For my storm chasing and weather needs I developed a vehicle mounted solution. Originally I had simply stuck my iPhone and all to the roof of the car by using a suction mount and RAM X grip. While it works perfectly, the phone is still exposed to any elements and not easily accessible. Plus I accidentally drove away a few times with the phone up there and had the mount failed I would have been out of a phone and $600!
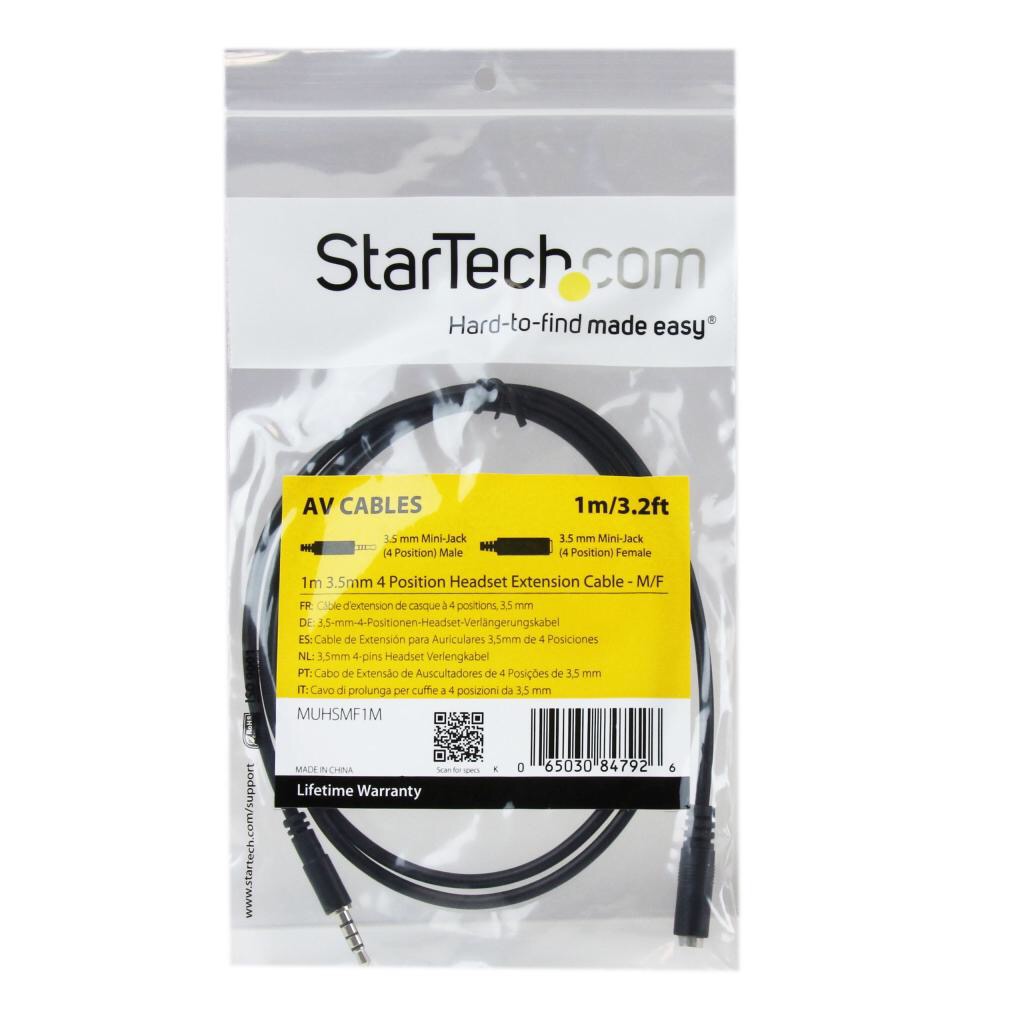
StarTech 2 meter / 6 foot TRRS extension cable used with the Vaavud Sleipnir
The solution was to purchase a 2 meter long StarTech TRRS cable from Amazon.ca and keep my phone/tablet inside the vehicle while leaving the Vaavud unit mounted outside. My initial testing reveals that the Sleipnir operates just fine with the extension cable. I have yet to really test how waterproof or weather/dust resistant the anemometer is but at last I can now mitigate any risk to my phone/tablet. This is especially important when your inside of a powerful thunderstorm.
The one draw back is that the digital compass data is lost when inside the vehicle. This means the directional wind component of the Vaavud becomes useless. But overall that’s a small price to pay for having recorded and geotagged wind data that will catch all those smaller but important gusts.
I’ll continue testing the vehicle mounted unit and update the blog with my findings. Once the weather is warmer I intend to build a small 30cm tall post to get the anemometer as far away from the vehicle body as possible to increase accuracy.
You’ll find a short video below showing fellow storm chase Colin using the Vaavud in 80 km/h winds.
Vaavud Shop – https://vaavud.com/shop
Fogh Marine – http://www.foghmarine.com/
StarTech – TRRS Extension Cable
Amateur Radio
Communication is a key part of storm chasing and this is especially true if there are a few people in a group chasing together. There are many communication tools in today’s world ranging from cell phones to unlicensed FRS walkie-talkies but the best means of communication for storm chasing is ham radio because it works when cell phones don’t and the quality and range of communication is far superior to FRS/GMRS and CB.

All amateur radio operators across the globe require a license. In Canada, a basic license will get you privileges above 30 MHz, that means you’ll be able to use all the standard VHF/UHF equipment. I have both my basic+advanced with full privileges except morse code, so I’m able to operate in any of the allocated HAM radio bands.

For storm chasing, all my HAM radio gear is considered mobile equipment. This means, these are radios that are specifically designed to be mounted in a vehicle and operate off the vehicles battery power which is typically in the 11.5 to 14.4 voltage range. Mobile radios typically also have quick keys and features on the microphone and radio face plate which makes operating them easier than a normal base station radio would be.
Most storm chasing communication occurs in the 2-meter VHF spectrum between 144 and 148 MHZ. In North America 146.550 is often the primary FM simplex channel used, with 146.490 and 146.580 being two other alternative channels. Another channel, 146.520 is the FM calling frequency, this is reserved for making contact or calling out for someone to respond. After contact is made it’s standard practice to move to another frequency/channel.
The reason 2-meters is considered the band of choice for mobile communication in rural environments is because vehicle mounted antennas don’t have to be overly large to work efficiently, the noise floor is relative low and you don’t need a very good ground plane to “ground” or anchor the antenna. As you get lower in frequency the noise floor rises, antennas get bigger and the ground plane becomes more and more important. As you get higher in frequency the radio waves become smaller requiring smaller antennas, and the noise floor drops but there is a trade-off. For one, high-frequency radio waves (1.8MHz – 30 MHz) typically have better ground propagation than very high frequency waves meaning that a signal on 50Mhz will in theory travel further through hilly terrain and trees than a signal of the same strength at 145MHz and an ultra high frequency signal at 450MHz will preform even more poorly.
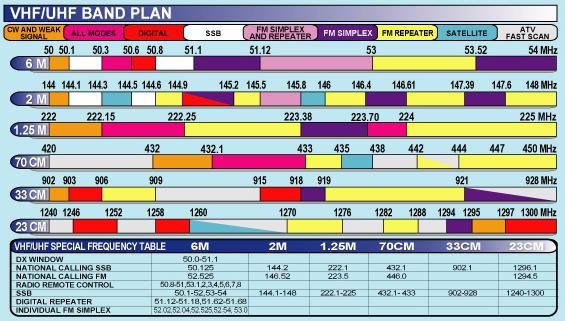
This is all in theory of course. The problem is that a 10 meter or 6 meter radio wave requires a big vehicle mounted antenna. A quarter-wave antenna on 10-meters / 29MHz needs to be ~3.5 meters tall, and for 6-meters / 52 MHz you need a ~1.5 meter tall antenna. Yet, for 2-meters / 146MHz a 1.5 meter tall antenna is 5/8th of the radio wave, so your almost at full size which increases your ability to pull in and receive a signal. When you factor all these real world variables, 2 meters is easily the ideal band which will get you the most range and signal clarity in a rural mobile environment.
One other aspect of HAM radio which makes it perfect for storm chasing is the use of repeaters. Repeaters are basically half-duplex radio systems mounted high up on towers, buildings and even mountains for maximum range. A repeater receives a signal on one frequency and immediately repeats it on another frequency. So if I only had 10 km of range on simplex with a repeater I might be able to get 40 to 100 kilometers of range or more through a repeater.
This is why Canwarn and Skywarn nets are hosted on repeaters which cover large areas. These nets are activated during severe weather and allow spotters and chasers to relay important information to the net control station who can then directly send it to the proper weather office so a watch or warning can be issued, etc.
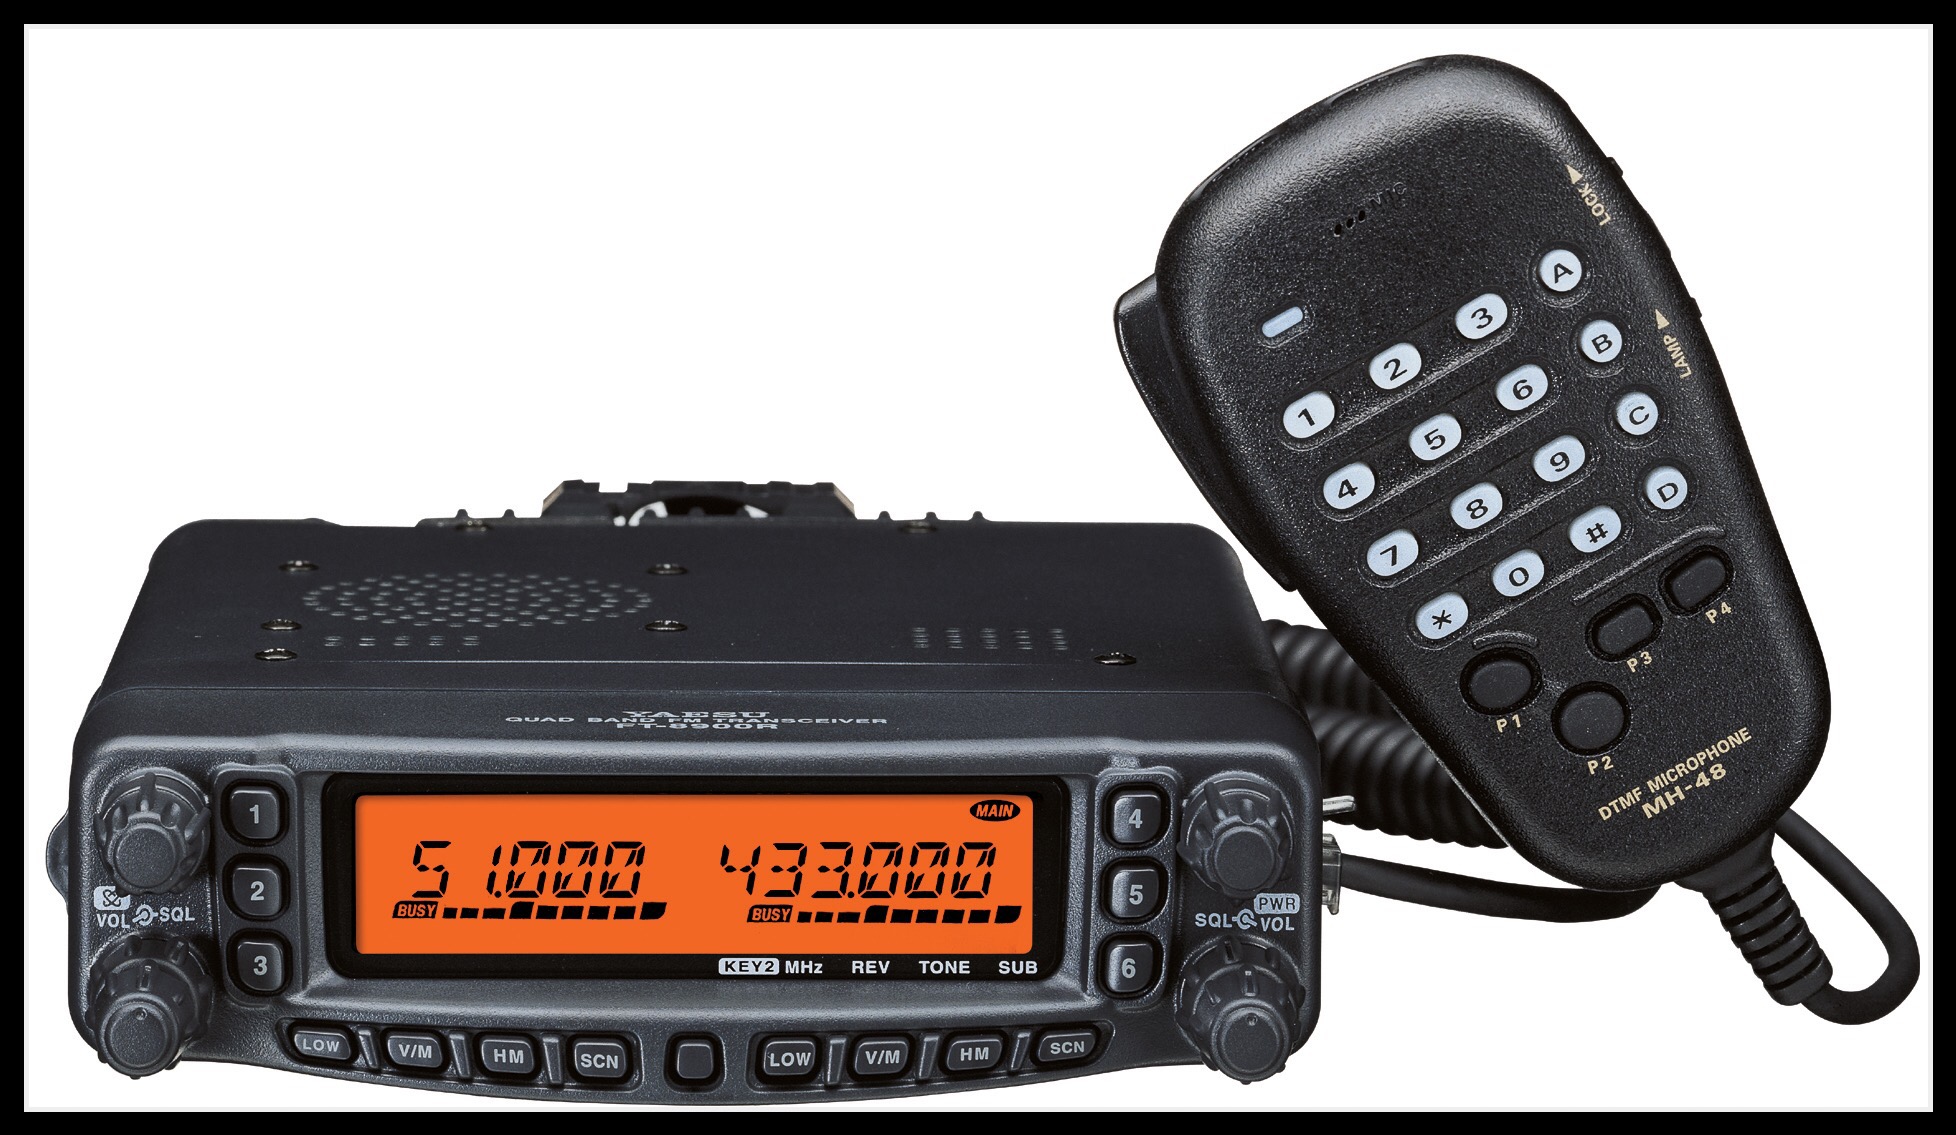
In my vehice I have two radios, the first of which is a Yaesu FT-9800R. This radio is a quad-band unit covering 10, 6, 2 and 70 centimeters which basically gives me access to all the parts of the HAM radio spectrum where FM is used. It also has crossband repeat, dual-receive and transmit plus 700 memory channels. I’ve put every repeater for the province of Ontario in this radio and have state zones I load in while storm chasing in the U.S and other places. It’s basically my core radio for repeaters and whatever else I might need. However I don’t typically use it for simplex communication.
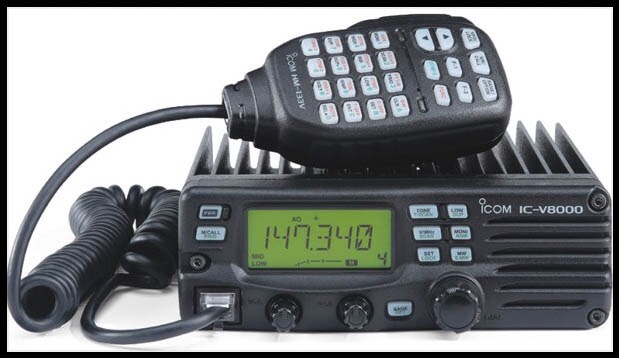
My second radio is the real workhorse which I use religiously for chaser to chaser communication. It’s the Icom V8000 which boasts a whopping 75 watts of power and is tuned to minimize noise. It’s a mono-band radio meaning it only supports 1 band (VHF 2-meters) but that’s fine, with a good high gain antenna this radio can go the distance and the audio is super clean. Despite supporting a whopping 75 watts it also has low power modes and I’ll often only need to use it with a meager 2.5 watts running into a high-gain 5/8th whip antenna to get the job done. That said, when I do need 75 watts, it delivers without hesitation powering through whatever.

All my antennas are trunk-lip body mounts. I would use magnetic mount antennas in the past but they would sometimes blow off in high winds, scratch the paint or create other problems. Often they were not sealed well and rain would creep in destroying the coupling system. With trunk-lip mounts the antennas are always firmly in place, well grounded and I’ve not had any corrosion issues. For the FT-9800 I use a quad band antenna called the CR-9800 made by Diamond and for the Icom V8000 I use a Comet 5/8th whip which I’ve cut and tuned. When chasing in tornado alley I also sport a CB radio and put on a trunk-lip mounted K40 antenna to use with it.
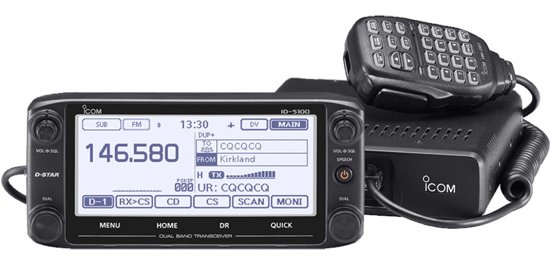
My most recent acquisitions have been a portable DMR radio, TYT-MD380, and two D-star Icom units, ID-51A Plus and Icom 5100A. There is currently a shift occurring in amateur radio where traditional FM signals are being replaced by a growing number of digital voice modes.
Digital-voice radios are nothing new, in fact they’ve been around for years (think cell phones) and many amateur radio enthusiasts have been using them. The first widespread non-cellular digital systems were commercial iDEN networks followed by NXDN, Apco-P25 and many others. All of these systems were commercial in nature and meant amateurs were usually buying used commercial gear.
Digital voice radio is just like FM, except instead of an analog signal being sent out where noise such as static and natural artifacts interfere, digital modes use codecs like MP3’s or other digital mediums to store information. The radio receives this digital signal and puts it back together into something audible. All digital radio codecs are lossy in that they lose information as radio signals become weak, noisy and degrade but the microprocessor in the radio uses error correction logarithms and the like to put the audio signal back together.
In some cases digital voice signals can be received much farther away than FM signals with near perfect audio quality thanks to amazing error correcting technology.
Today D-Star (ambe codec) is the primary digital voice radio system used in amateur radio followed by DMR/MotoTrbo. D-star is really geared for amateur use but unfortunately only Icom is the current major manufacturer. DMR radio is a commercial digital system, but you need to buy a commercial radio to use it and it can’t be easily programmed on the fly. In the not too distant future FM will likely be completely replaced with digital-voice modes and one mode will likely dominate but until then I have capability in all the modes to remain compatible with everyone and everything!

iPad Air 2
Before I write one word praising Apple or the iPad let me be very clear, I’m not an Apple fanboy. I prefer the Android ecosystem and the flexibility and openness of their devices which include an easy to access and manipulate file system. However there are some things that just work better in combination.
In this case the iPad Air 2 is the ideal platform for the latest version of RadarScope which runs smoothly and virtually flawlessly. The iPad also provides a very stable portable / mobile hotspot for other devices to connect to and the added or increased precessing power ensures that there are no hiccups. So between the hardware and software everything runs very smoothly.
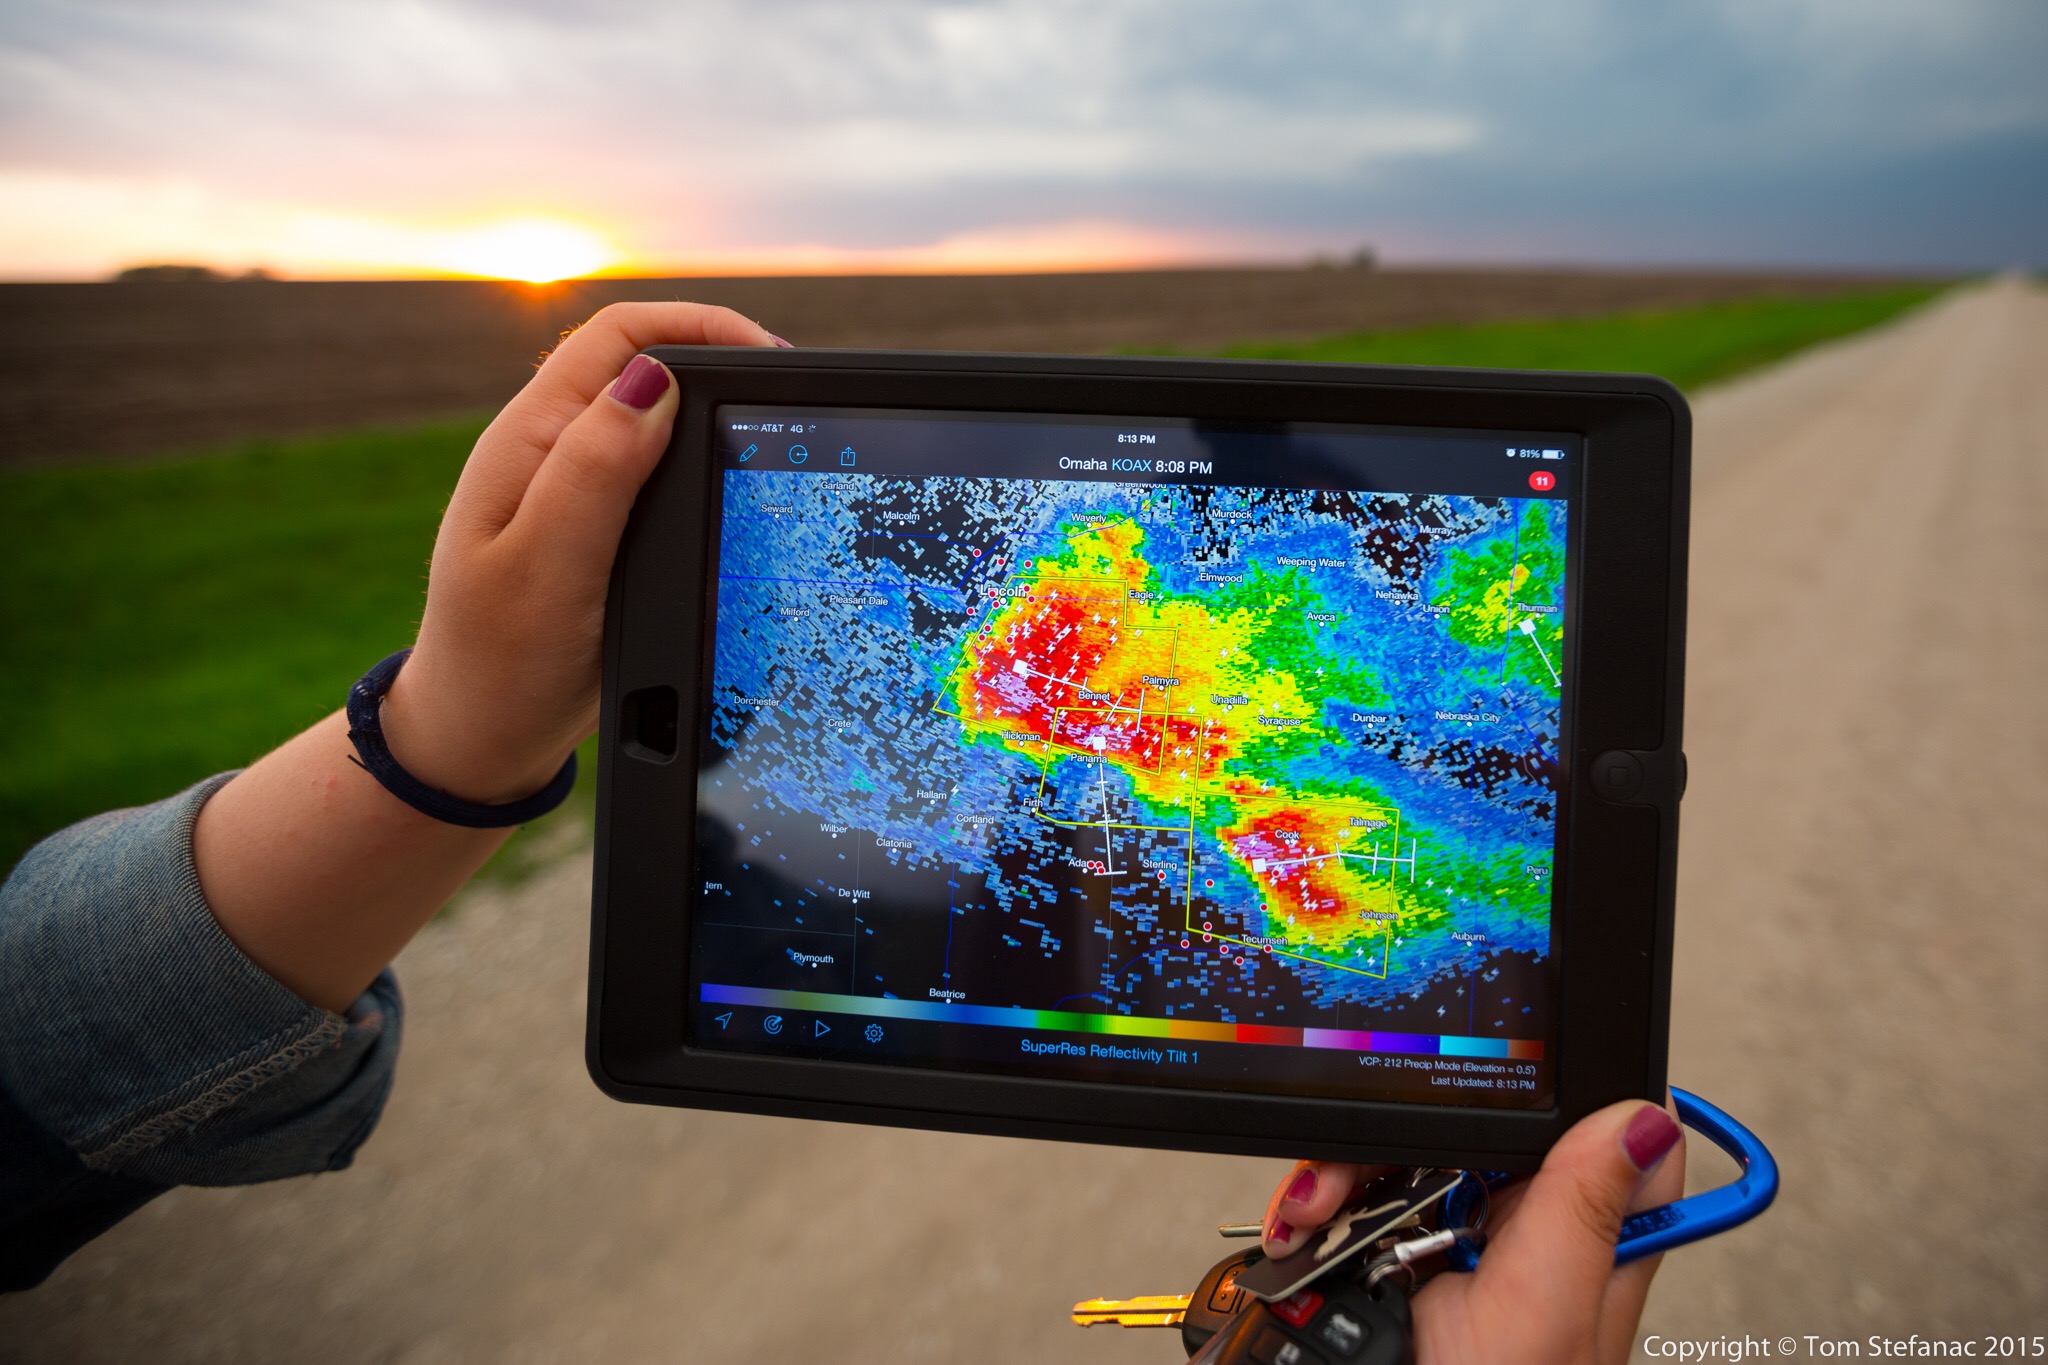
Jen holds the iPad Air 2 in a field showing the radar image of an encroaching supercell thunderstorm which is visible in the background
The reason why I chose the iPad instead of a larger Android tablet is two fold. Firstly, it was simply the only tablet on the market which offered both GSM and CDMA service, so in theory it can run on standard 3G/4G LTE networks but it can also run on Verizon and Sprints weird GSM/CDMA hybrid technology. Secondly, I already have a bunch of Android tablets and wanted something different which would give me a pure integration for RadarScope. Hence, the iPad Air2 was the perfect device to allow me to accomplish both. Using it as a hotspot also allowed me to mitigate the need for an expensive portable hotspot. I find the more devices you need to link together, the more problems you’ll have and the more likely it is that something will go wrong.
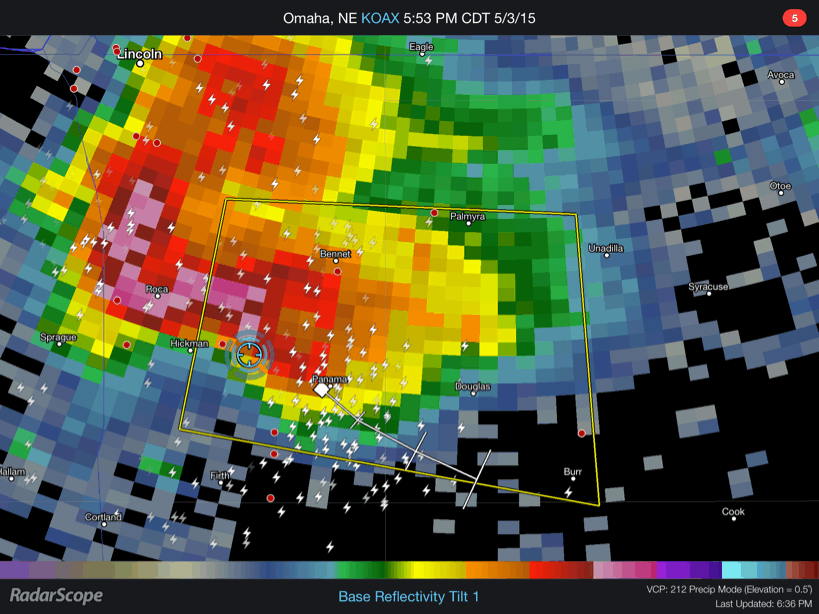
RadarScope showing a large supercell near Hickman NE using Level 3 data
Here’s a small GIF loop taken from the iPad using radar scape showing standard level 3 data from the KOAX radar in Omaha, Nebraska. We’re the blue circle which is derive from the GPS chipset that’s built into the cellular modem in the iPad.

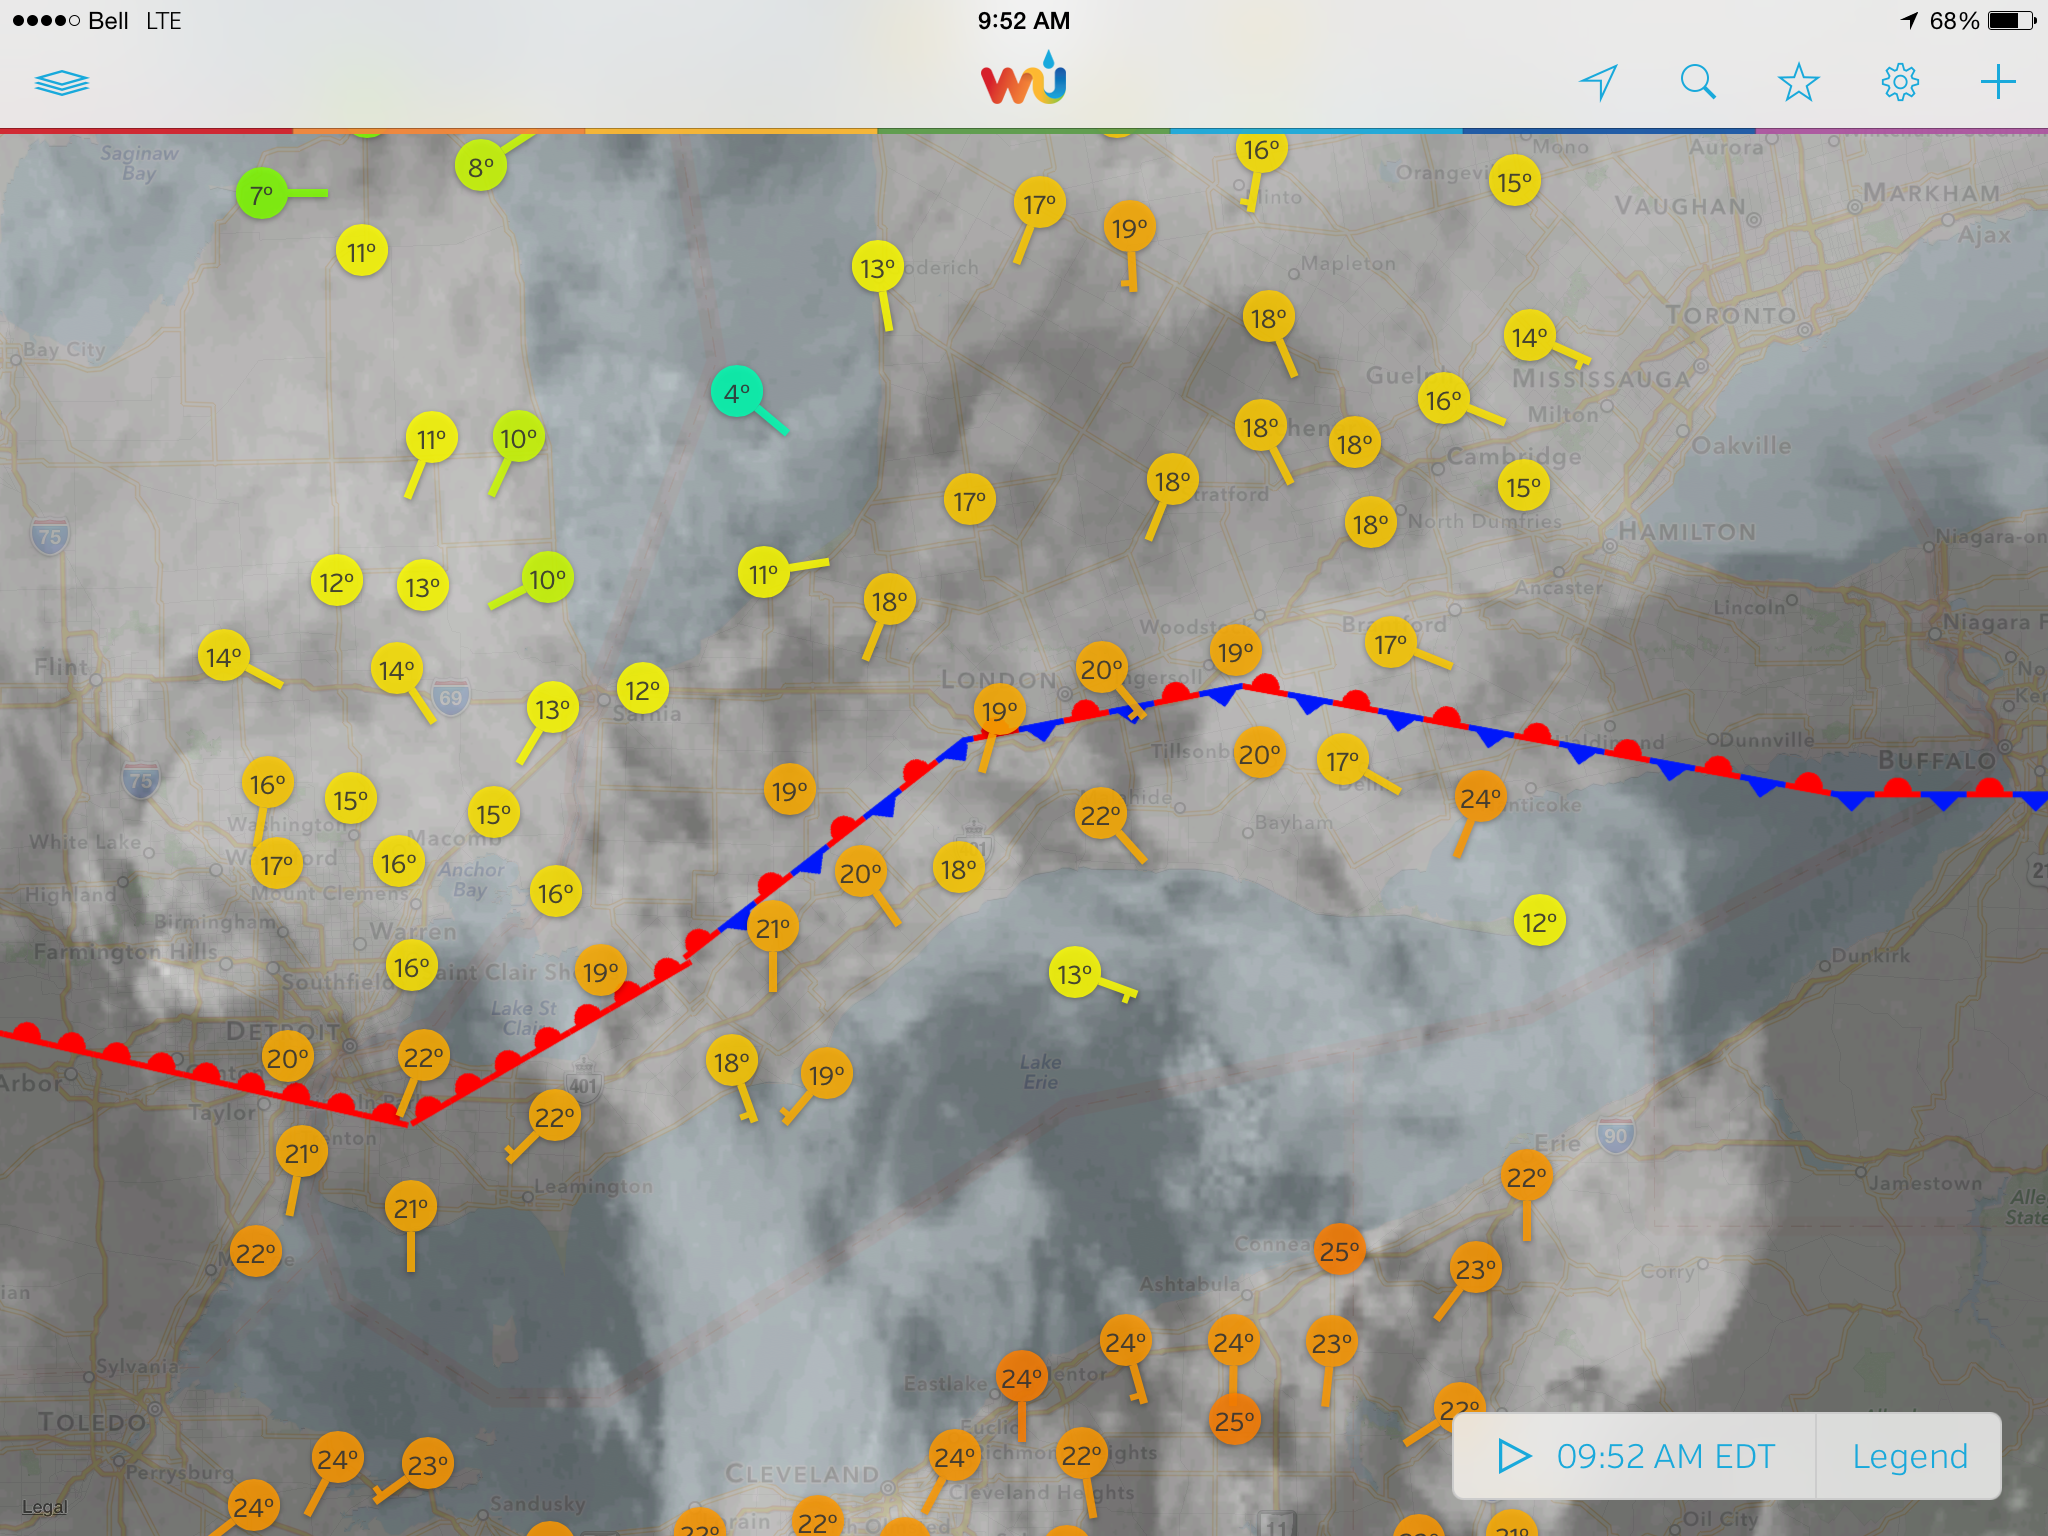
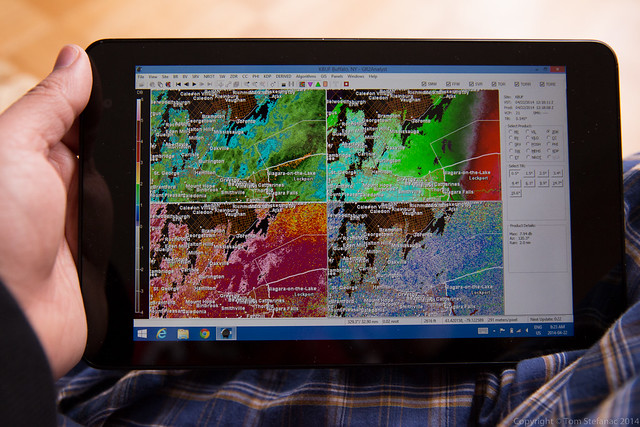
RadarScope showing a chain of storms rolling across central Kansas using Level 2 data.
Here’s another shot showing the iPad in action as we drove through east-central Kansas. You can see that the iPad is in “hotspot” mode sharing the connection with my Dell Tablet which had GREarth running. You’ll also note that the radar data is very fine. RadarScope calls this data “super resolution” but it’s really just the 0.5 degree Level 2 radar data. The beauty however is that the WDT server strips the rest of the layers (0.8 through 19) out and you just have the lowest available level which is really only what we care about when chasing and looking at reflectivity data. By sending out only the needed layer the file is substantially smaller than it would normally be. For example if I attempted to view this same radar data on my Dell Venue 8 using GR2AE one frame of radar data would contain all 19 tilts and be approximately 3mb in size. It’s not a big deal when your in an LTE zone but once a hundred chasers show up and start straining what limited cellular framework there is even LTE data will slow down. Now just imagine trying to use GR2AE when you only have 1 bar of 3G data. So for me it’s simply a more efficient way of looking at the same data.
There are of course trade offs, GR2AE is an incredibly powerful piece of software sporting NROT, MEHS, and other specific algorithms which require all tilts and are extremely accurate and very useful. It can do circles around RadarScope but the reality is when your chasing, you just need basic radar data, all the fancy stuff is for the analysis after the chase or best served as tools that forecasters need when issuing warnings in real-time.
WunderMap App showing surface observations, a stationary front and visible satellite data over Southwestern Ontario
The iPad is also a good tool when used with iPad specific applications such as WunderMap. To explain it in a nutshell, if you know what GREarth is, then WunderMap is an extremely watered down version of that. The one thing the WunderMap App boasts which few other programs can offer is data from personal weather stations and some of this data is real-time updating ever 2 seconds. My own weather station updates every 5 seconds and is used in the WunderMap app. Obviously you need to take any data from these stations with a grain of salt since the quality control and placement can be questionable but it still provides a huge volume of actual observations far greater than you could ever get if you were only use airports, METAR stations and mesonets. So this iPad specific app can be very useful for quick nowcasts or simple situational awareness.

Chase Vehicles
Over the years I’ve had a variety of different vehicles. The first on the list was my mom’s old 1998 Chrysler Intrepid. The car held together well and ran for a good 17 years but in the winter of 2015 it bit the dust.
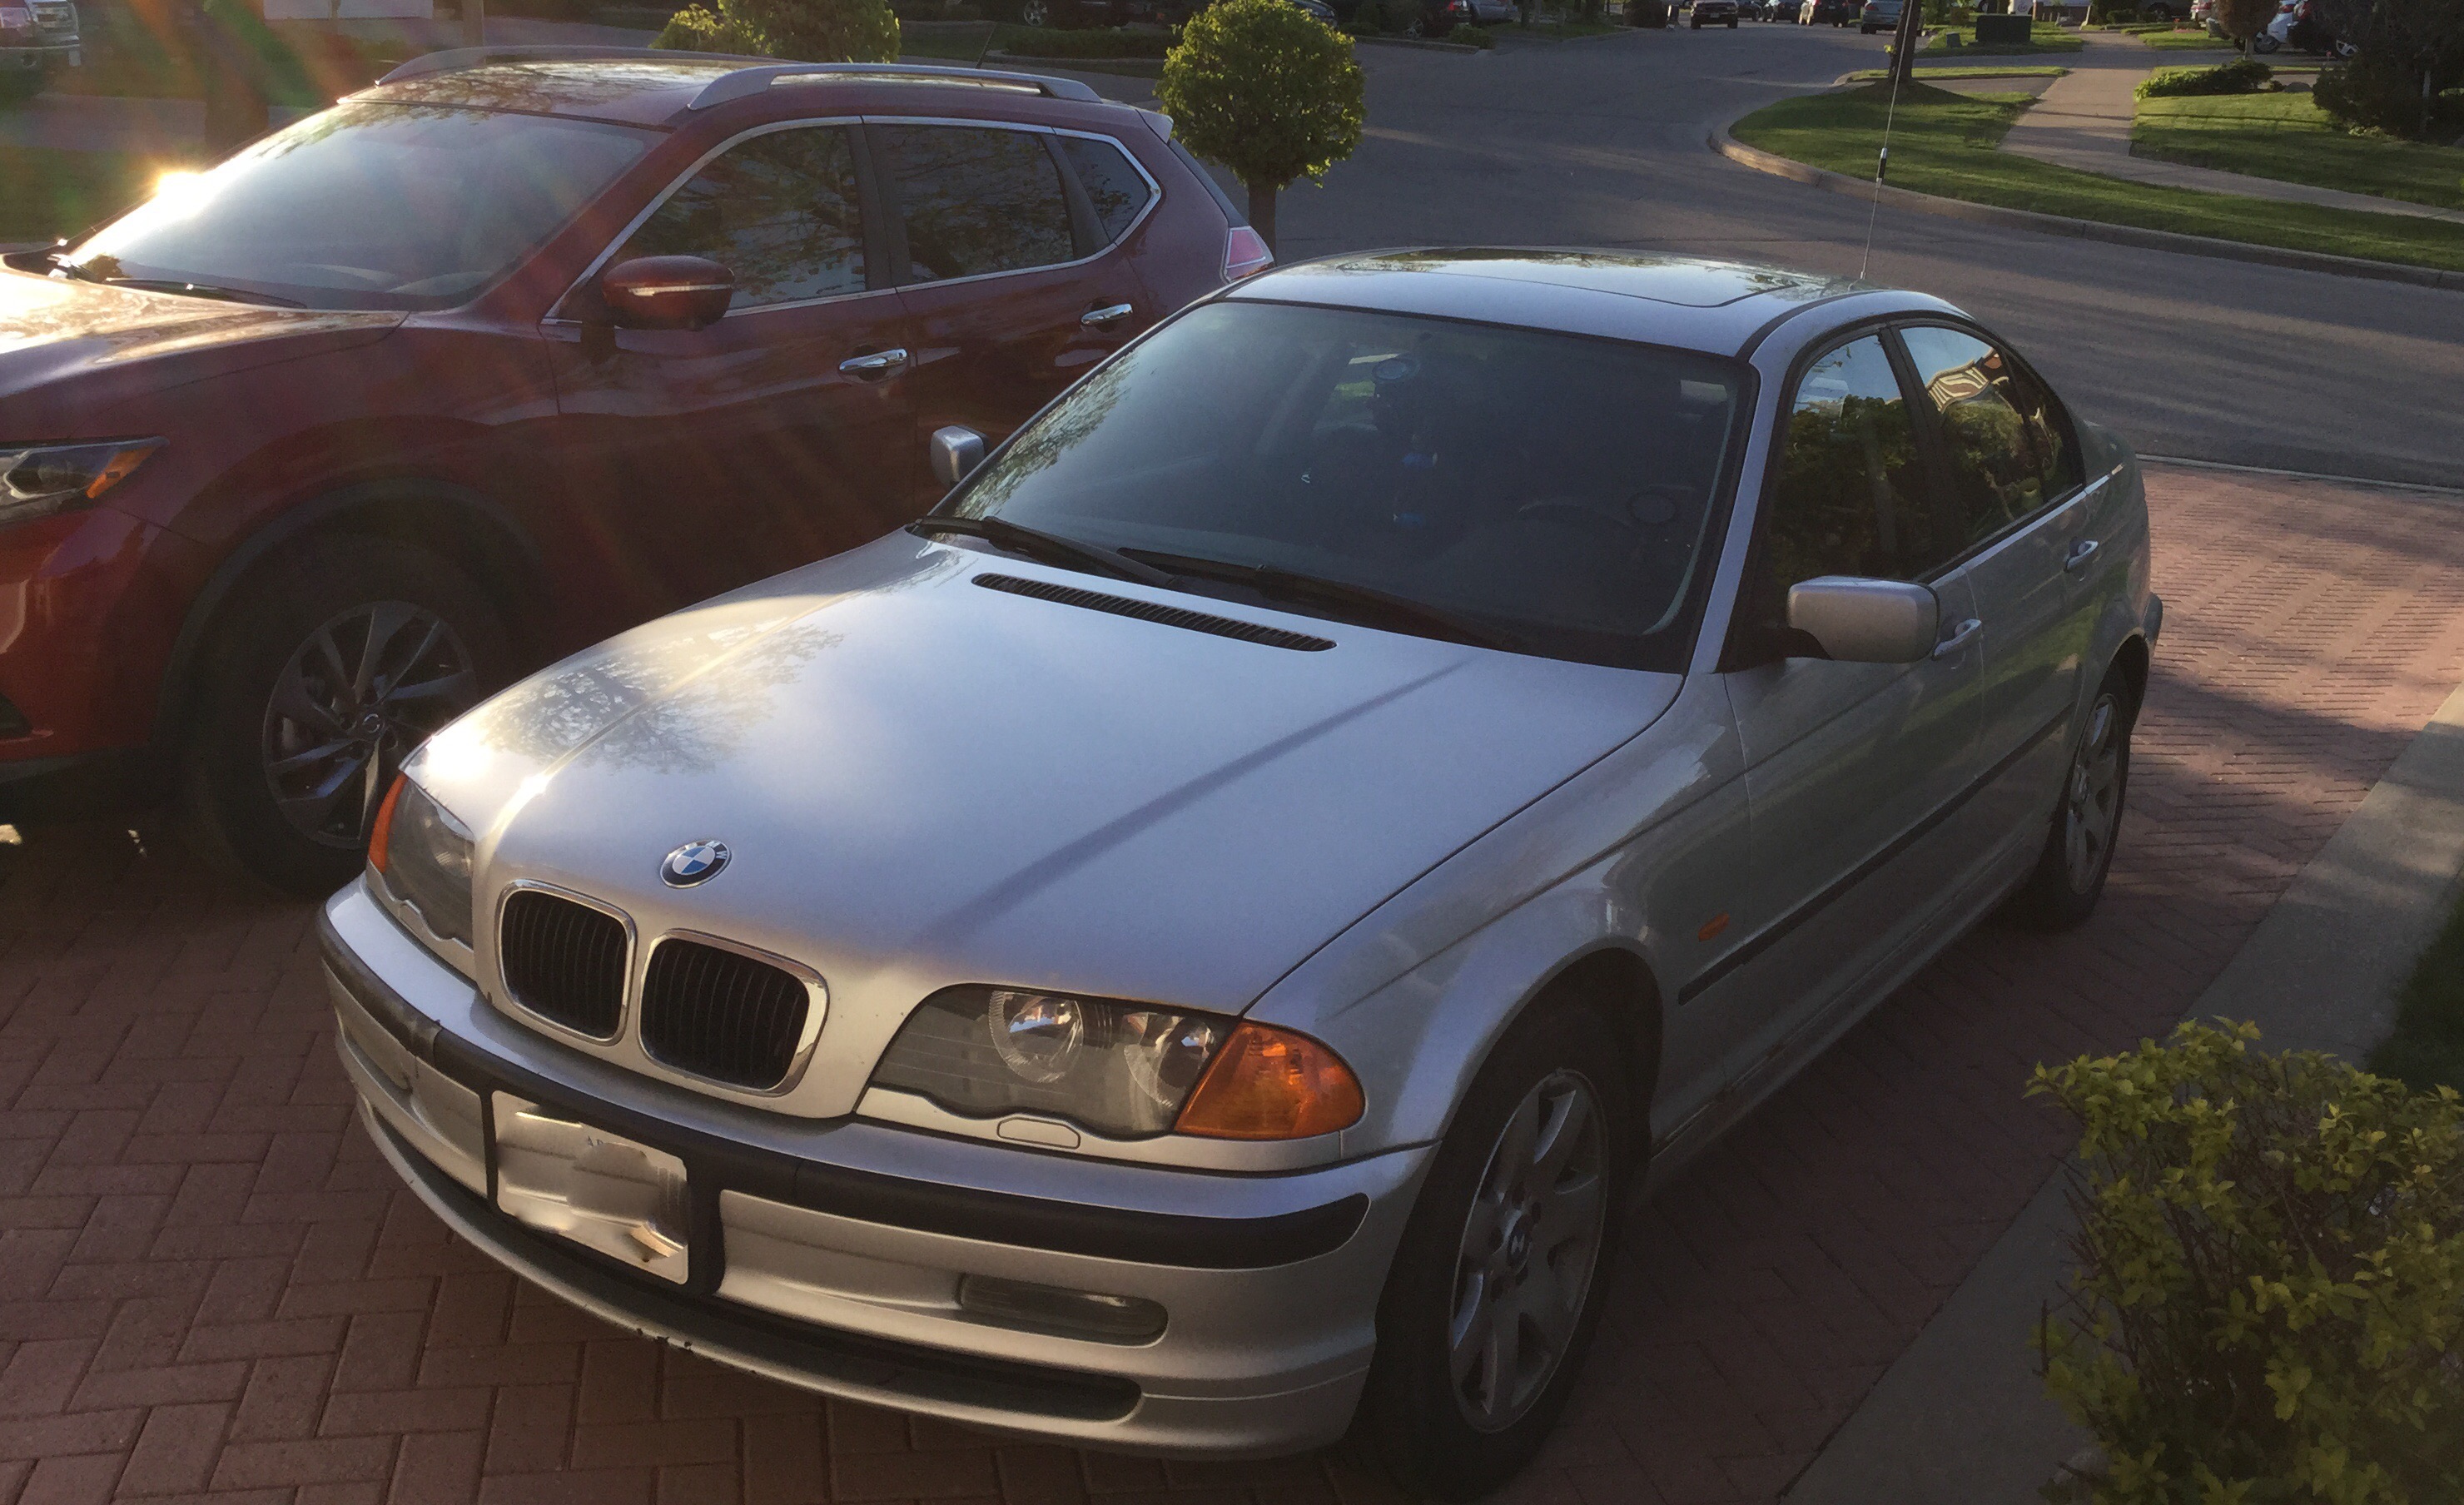
My 2000 323i BMW with a trunk mounted antenna
My personal vehicle, a 2000 BMW 323i is presently my Southern Ontario chase vehicle. It’s getting up there in age, wear and the body is starting to slowly go. I would never dream of taking this car down south into the central plains of the U.S as it would likely get “hurt” by the large hail stones that those storms can produce. Unlike the great plains, hail is a far lesser risk in Southern Ontario and it’s extremely difficult to find anything that can really start to threaten your vehicles body.
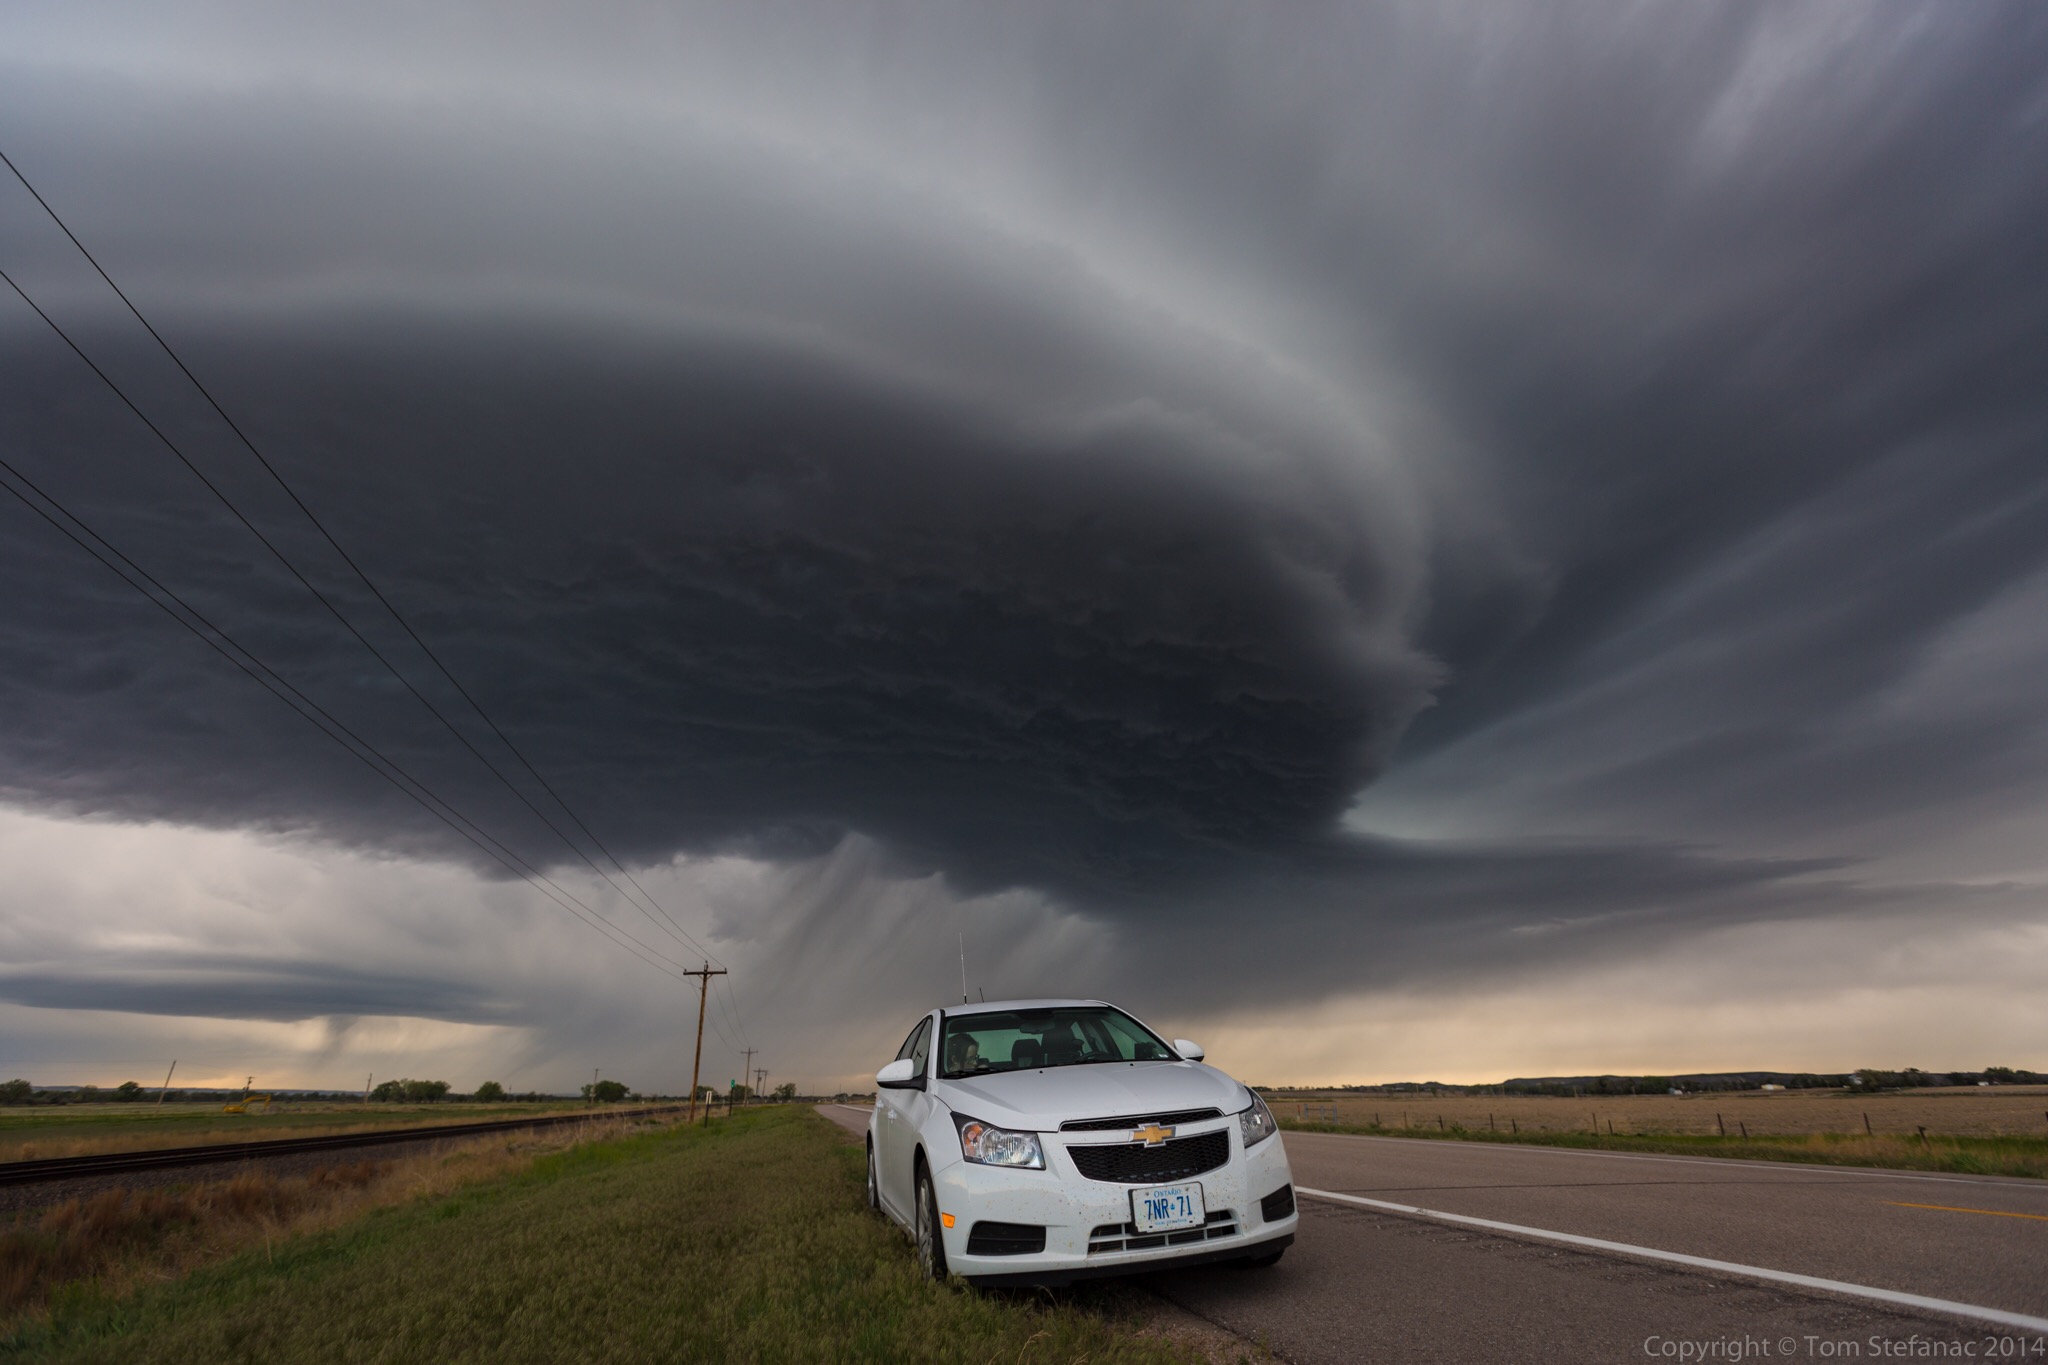
My 2014 Chevy Cruze in Nebraska as a low precipitation supercell bears down
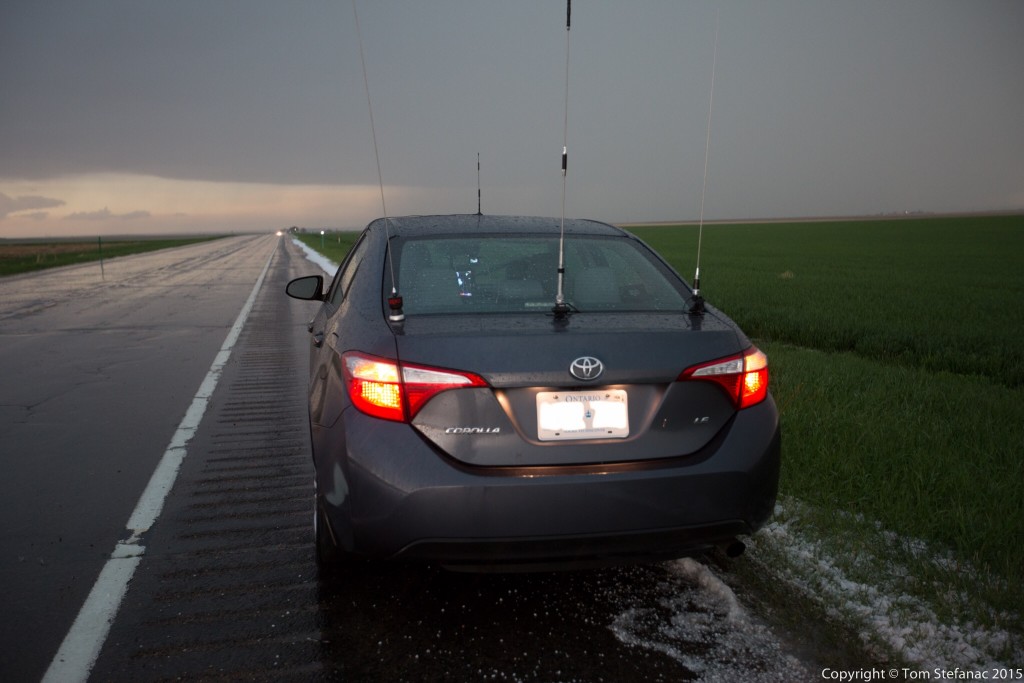
As far as rental vehicles go, I’ve used a 2010 Honda Civic, 2011 Chevy Impala, 2014 Chevy Cruze and more recently a 2014 Toyota Corolla. The “joy” with all these vehicles is that my installs need to be sturdy yet completely temporary without any trace once the car is returned. Whether it’s a rental car or not, I treat all vehicles as if they are my own and really take care of them.

My 2014 Toyota Corolla on a Colorado highway after flooding rain and small hail
No matter which vehicle I’m using, whether it’s my own or another there are a few basic items that always go.
The first thing is my HAM radio, I’ll always take my Icom V8000 with a 5/8th whip antenna that’s trunk lip mounted. If there’s space I’ll also take my quad band Yaesu FT-9800. I like the V8000 becuase it has a whopping 75 watts of power and when you couple that with a high gain whip antenna you can go the distance. It’s also very efficient for simplex transmissions maximizing the efficieny of low power transmissions. The FT-9800 gives me flexibility to use any repeaters that are in the area no matter what the frequency so I can always get into or listen in on any skywarn or canwarn nets.
The second item I always bring is my manfrotto magic arm / Sony CX700V combo. This ensures I always have a good working dashcam that I can pan/tilt/zoom. I’ve also recently become a big fan of just using my GoPro inside for super wide shots through the windshield. The GoPro is a Hero3 Black unit and shoots beautiful 2k video. Between the two cameras I can get a wide and tight shot of the same or different subject matter which is great. It also minimizes windshield clutter.
The third item or items I should say are my tablets/mobile computers. Currently I have a Nexus 7, iPad Air 2 and Dell Venue 8 running a full Windows 8 desktop environment. The Nexus 7 is great for PYKL3 while the iPad Air 2 hosts a cellular chipset and not only provides me with a mobile hotspot but runs Radar Scope beautifully. Lastly, the Dell Venue 8 can run windows native programs like GREarth, Level 3 and Level 2 Analyst without any issue in addition to a host of other programs such as Digital Atmsophere and Unidata IDV. These three devices I can power from two Anker chargers, and there’s very little draw on the vehicles electrical system plus the batteries last forever and they occupy very little space unlike a clunky laptop.
My essential non-optional items are my cell phone, camera gear, GPS and a road atlas. I also carry basic emergency gear with me at all times which includes some pylons, flares, a safety vest, first aid kit, bottled water, electric tire pump, automotive tool kit, full gas canister and jumper cables. In theory, I should be able to handle most any emergency with my basic emergency gear. The biggest threat all chasers or anyone doing a lengthy road trip in a relatively rural area faces is a flat tire. Depending on the severity of a flat, a canister of run-flat tire filler can prolong your drive when coupled with a good electrical tire pump. The other option is changing the tire then and there at the side of the road which is where the cones, tools, vest and even potentially flares come in handy. The gas canister is also a good idea. I’ve been in situations before where storms have knocked out power and suddenly I have to drive 200km on a quarter tank of gas. A 10 or 20 litre can will get you an additional 150 – 300 kilometers and more importantly gives you peace of mind that you’re okay.
The GPS is a no-brainer, when used correctly it does all the hard thinking for you or at least the majority of it. Plus, it keeps you on track, when your chasing and busy thinking about so many other things it’s easy to miss a turn but the GPS will at least remind you that your turn is coming up. Plus you can see all the roads around you and it’ll help with your judgement calls. There is one major problem though with anything electronic, and that’s the possibility of failure. As such, I always keep a road atlas with me, the atlas never fails, does not need batteries or a power cable and works in any weather. I also like to use the atlas to see rest stops, nearby towns, primary roads and it gives me a quick refrence of what’s around.
You might be wondering why I seem to choose smaller 4 door sedans over midsize vehicles? The answer is simple, for me, chasing does not have to be about having the biggest or baddest vehicle on the road. I choose my vehicles based on the volume of space I need. Smaller vehicles also have better gas milage and better overall range. Larger SUV’s are certainly more capable off road but I find choosing to go off road can be a disasterous idea at times, especially since these roads can have my uknowns such as obstancles, flooding and hazards like potholes. No matter what vehicle your in, attempting to cross a flooded roadway with an uknown water depth is dangerous, and no SUV can drive beyond a dead-end road in time to escape a tornado or hail core bearing down. So with these things in mind, I realise that I don’t really require the added benefits of all-wheel drive or higher wheel bases that suv’s provide. Instead I choose to stick to paved roads, or only venture short distances with plenty of escape time on unpaved roads.
Sony HDR-CX700V
The Sony HDR-CX700V is my permanent dash camera, it’s a small, versatile and highly controllable camcorder that records to SD cards in full HD using the AVCHD codec. The only problem I’ve run into with the setup is that the cameras get’s a bumping noise in the audio from components shaking, the only real way around this I’ve found is to use a shotgun mic to get above the camera. Seeing as audio is not absolutely critical, the Bower Electret Condenser Microphone was perfect and the price was right at $30 dollars. Despite looking like a shotgun microphone it’s really a wide-angle stereo system that just pretends to be a shotgun mic.
All my vehicle setups are temporary and removable. I do this for simplicity and theft deterrence. To mount the camera I use a Manfrotto Magic Arm with a suction cup mount. Manfrotto has long since updated and changed their design for both components but the system as a whole I acquired back in 2002 and it has been very reliable with no major problems.
The tripod head I’ve mounted to the magic arm is a Manfrotto three position photo head. Because the road is never level and often ditches have a considerable slant to them, this head allows me to quickly tilt the camera and regain level. It’s also compact and robust.


Canon 5D Mark III
The big kahuna in my camera arsenal is the Canon 5D Mark III packing 23 megapixels and 14 stops of range. It’s a beautiful pro camera that shoots to both SD and CF cards and sports advanced control functions and other features as well as superb noise handling into very high ISO ranges.
The other item that is almost always attached to the 5D Mark III when I don’t need a flash is my Canon GP-E2 GPS receiver. The GPS unit is very quick to acquire signal, establish a location down to within a couple meters, indicate shooting direction with the built in compass and automatically set the date and time in the camera so it is always precise.


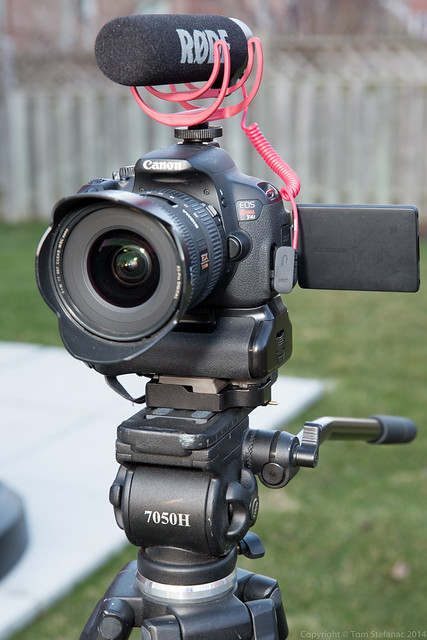
Canon XH-A1
The Canon XHA1 is the oldest professional or semi-professional gear that I own. The kit itself was built in early 2008 using the Rode NTG2 shotgun mic, Sennheiser EW100 ENG lavaliere and hand mic kit plus numerous lights / hot shoe kits, braces etc.
At the time this was a $7000 kit that I used extensively for freelance work. I could have saved $4000 and gone down the DV path but high definition was just coming into the mainstream markets and SD was going the way of the dinosaur.
My commercial Sony Betacam SX was a superior camera in terms of low light abilities and had better chroma depth but the XH-A1 blew it clean out of the water with resolution and detail. Anything shot in HD on the A1 which was down sampled to DV/480i killed any video shot in SD.
So at the time (circa 2008), it was well worth it to make the jump and this camera is still a wonderful tool!
Unfortunately, it remains a tape driven system predating mobile SD/CF SSD recording. The resulting tape driven HDV video is far less robust than DV and frame/video dropout is a real risk.
Since the Canon XH-A1 (first gen) remains a good versatile camera which I still use, breathing new life into the old tape driven system was a necessary function to avoid dropout and magnetic head wear.
The solution was to introduce a DTE firewire recorder. This solved the risk of tape dropout with blazing fast CF transfers, so no more real-time slow capturing or magnetic head wear.
The camera is now paired up with the Canon FS-CF Pro by Vitec for solid state recording and a Manfrotto MVH500A fluid head with the MVT502AM tripod body.


Demo video showing the system in use
Windows Tablet
Windows 8.1 – Dell Tablet
I’ve always been a big fan mobile computing, it just makes things easier! That’s of course not to say that I don’t like desktop systems, I do all my heavy editing and the bulk of my general work on my desktop. Heck, a couple years ago I even went all out and put together a top of the line gaming PC (now my desktop), not just because I like video games but because they’re the most capable systems. If it can handle the intense needs of video games, it can certainly edit video, process radar data and render weather models.
The problem with storm chasing is all the driving around and vehicles in general do not afford you the space you really need. In the past, storm chasers have built PC’s into they’re center consoles and mounted screens with the advent of affordable LCD flat panel technology (early 2000’s). While that works, and may save some space, you still have substantial power requirements and theft deterrence measure can be hard to implement.
For most storm chasers laptops were and still are the way to go. With a high-end laptop you can do everything your desktop can, albeit slower. The problem with laptops are that they trade-off space for usability with a big keyboard. Before the advent of tablets, my netbook was my go to tool, it could handle (albeit very slowly) various Windows applications and it worked in a small form factor.
Since those good old netbook days back in 2008/2009 modern tablet computers have come a long way. Between the advent of the iPad and later Android tablets, things have improved and evolved to the point where dedicated applications such as RadarScope and PYKL3 Radar have rivaled on a basic level Gibson Ridge products.
But let me stress, rivaled, not replaced. Nothing on a tablet of any kind can truly replace radar software in a desktop environment. What is nice about iPad and Android radar applications is how easy and natural they feel to use, plus you can control everything with one hand, no need for a mouse, touch pad or keyboard. I remember back in 2004, a Windows XP Tablet/Slate was around $11,000, heavy and did not support multi-touch input, only stylus and limited finger input. Not worth the price, trouble and limited computing power.
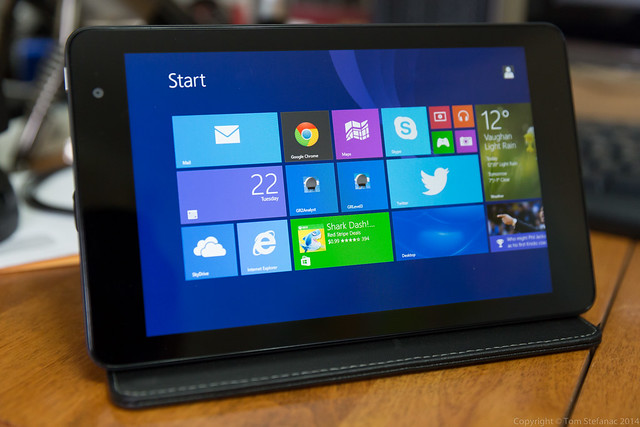
Now, fast forward to yesterday, April 21st 2014. In my hunt for a cheap shotgun style microphone for one of my camcorders I came across this Dell Tablet in Best Buy known as the Venue 8 Pro. What makes this significant is this is the first good Windows Tablet capable of running 32 bit programs in a native windows environment, and I mean full Windows, none of that RT/Metro garbage, but a full desktop for $300 after tax. To this point, everything else was $600 or more for the full 32/64 bit processing, and even the $400 tablets were often RT only.

Now I don’t plan on doing any word processing or actual production work despite having a full windows system at my disposal but rather, this is ideal for running applications like RAOB, GrLevel2AE/3, F5 Data and Bufkit. It also solves the Android/iPad problem of jumping between applications since you have full traditional multitasking within the task bar. That means you can use your web browser without leaving the radar application to hang.
Above all else, the form factor is perfect, it’s not tiny but it’s not a big 12 inch tablet either. It’s comfortable around 9 inches and perfect for the chase, enough processing power to run Gr2AE with natural touch controls and it only requires 5 volts at 2 amps for a draw of 10 watts, that’s a far cry from most laptops which at a bare bones minimum require 18 watts or more.
So there it is, the first real laptop substitute at an affordable price point which is perfect for storm chasing with all your favorite windows applications.
A couple other points to stress, firstly this tablet perfectly fits any Ram universal tablet mounting tray and secondly, it uses a standard micro-USB adapter so cables and charges are not proprietary and/or difficult to find. It also sports a micro-SD slot which can apparently handle up to 128 GB cards. That’s overkill if you ask me, all I need is 4 gigs for all my apps/storage but I’ll take whatever I can get, more is better!
Here are some more images for your viewing pleasure. Once the tablet is mounted, I’ll post those images too!


T4i Still Photo & Video Gear
Canon T4i/650D + Rode VideoMic GO & E-image EI-7050H / AT7402B Tripod Kit
The Canon T4i / 650D is a wonderful camera, it’s a cropped sensor DSLR but it’s the best cropped sensor camera in Canon’s lineup. The T5i is basically a carbon copy with an adjusted auto focus mechanism. I was given this camera as a gift by my girlfriend in December 2012. I decided to make this camera multi-use since it works well as both a photo camera and camcorder.
Canon T4i ready to shoot video
Most still photographer who jump into video sort of wander into it blindly. It’s easy to take great still photos once you master exposure, composition and depth-of-field. The same basic rules apply to video, except you need to think not just seconds, but sometimes minutes or hours into the future. You also require fluidity in motion and sound, two things that still photography does not require.
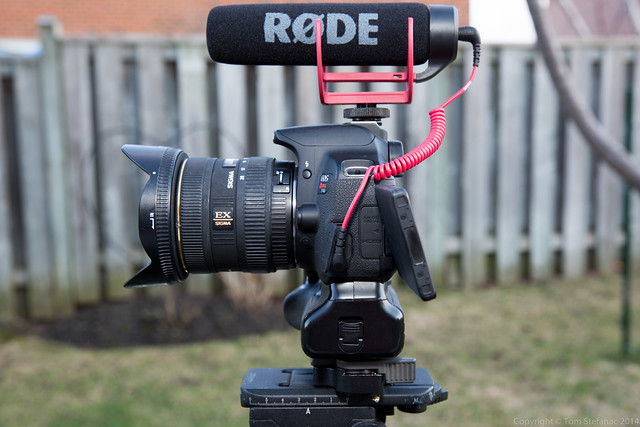
Left side profile of the Canon T4i with the Rode VideoMic GO and 3.5mm stereo mic jack connected.
In general, DSLR’s take great video, but they are terrible video cameras! To make a DSLR a video camera you need to spend money and you’ll probably spend just as much or more on accessories to turn it into a camcorder as you would spend to buy a high end camcorder that’s ready to go out of the box. In my case, I already had the camera and tripod. What I was lacking was a good microphone. Generally speaking Rode and Sennheiser produce some of the best microphones which are affordable. I’ve never had an issue with any of their products whether commercial grade gear or prosumer products.
Naturally I did not want to spend $250 on a good microphone, but I was able to find the Rode VideoMic GO for $99 after tax. This microphone is not only a great deal, but it’s a standard size so accessories such as fur covers are easy to come by. The mic itself also does not require power, most other units require phantom power of some sort whether external or internal.
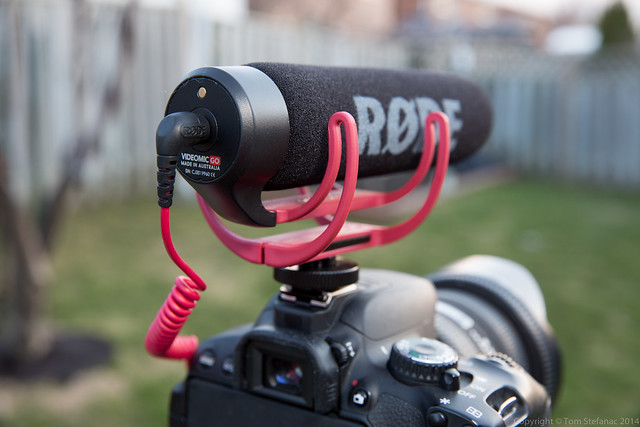
Rode VideoMic GO with its floating suspension system to prevent noise
My initial tests results are very positive, no strange noises, buzzing or popping from bad grounds and the microphone is sensitive with a range of -50dB to +15dB without distortion until after +12dB. So basically you could stand beside a jet engine and still get pretty good results. The unit comfortably sits in the cameras hotshoe and uses a male to male 3.5mm stereo microphone jack. Rode has also introduced new floating mic technology where the shotgun sort of floats. This is nice since with traditional grip/clasp mounts noise can be introduced through vibration.

E-image bowl mounted tripod head with quick set water level and pan locking screw.
Moving on, the tripod I chose to use was my E-Image EI-7050H / AT7402B Tripod Kit. Generally speaking, E-Image is a discount brand, they’re not great but they’re not terrible either. My only real criticism with this tripod is that the fluid head is not very smooth in vertical up and down tilting but it’s very smooth, just like silk in left-right panning. Now I did not buy this tripod recently, I’ve had it for a good 5 years and until now I’ve used it exclusively with my Canon XH-A1.
There are some big differences between video and photo tripods. First, the heaviest and most solid photo tripods are still light compared to video tripods which will resist wind buffeting and vibration far better. Photo tripods also lack smooth fluid heads, proper adjustable arms and often the ever so critical bowl mounted head. Bowl heads allow you to quickly set level so that when you pan left and right the horizon does not shift and go askew.
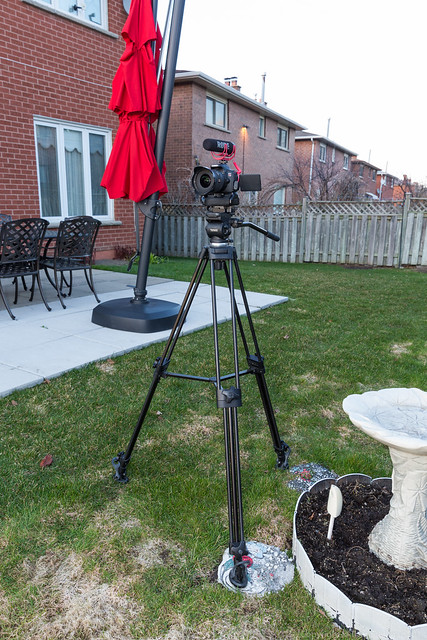
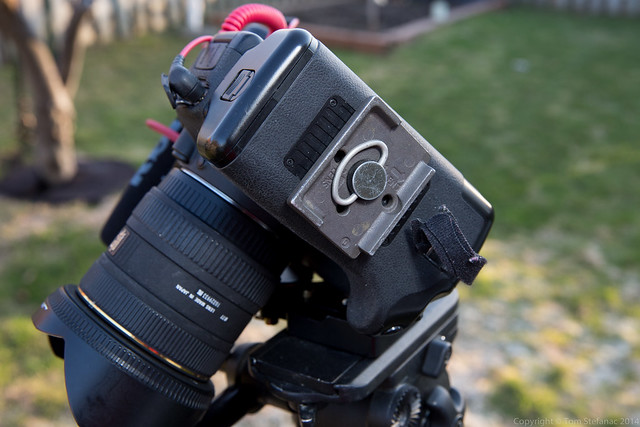
E-Image EI-7050H 75mm Fluid Head Plus E-Image AT7402B Video Tripod Body with Canon T4i & Rode VideoMic GO – Note the tripod is only 2/3rd extended, there is an additional column that can be raised.
Photo tripods can certainly be used for video but they’re best for locked off static shots. The moment you introduce panning of any kind you’ll get jitter and a crooked horizon! Video tripod heads also have far greater weight limits with most starting around 5 kilograms or more. The one disadvantage video tripods have is that they are less flexible than photo tripods. You just can’t twist, turn and bend video heads the same way you can with a good photo tripod head.
For my purposes however, this tripod provides the best of both worlds seamlessly allowing me to shoot video and take still photos when needed.
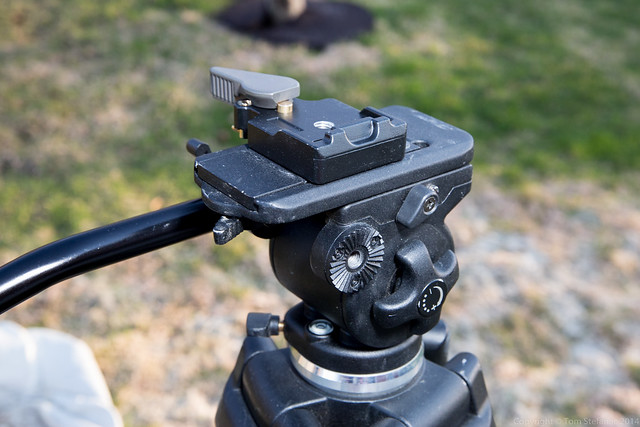
Manfrotto 323 quick change adapter connected to the proprietary E-image quick plate.
What was necessary with the E-Image tripod was adapting it to work with all my quick release plates. Basically every camera I have (except the Canon XH-A1) uses the same Manfrotto 200PL plate, whether it be a GoPro, point and shoot or DSLR . Unfortunately the E-Image tripod uses it’s own proprietary plate (which is still a good plate). So I had to drop a Manfrotto 323 Quick Change adapter on top to keep everything compatible.
Manfrotto 200PL quick release base plate connected to the base of the T4i
The main advantage turning a DSLR into a video camera brings is the interchangeable lens system. Even the best prosumer cameras are usually fixed lens systems limiting you to operate within those confines. Once you jump into a video system with removable lenses your easily into the 5 digit range for cost and still require lenses.
In my case I’m killing two birds with one stone. I have every full frame lens I could ever need, plus a 5DMKIII which is dedicated for still photos. This frees up my T4i to shoot video with an array of high quality lenses, especially wide angle lenses.
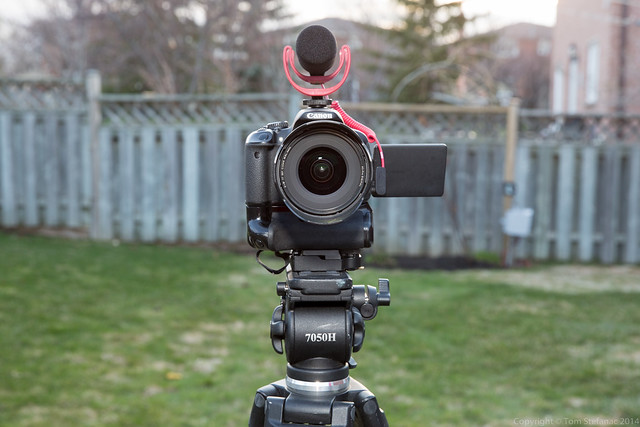
Canon T4i + Rode VideoMic GO with a Sigma 10-20mm lens
This is critical since it gives me flexibility, I can keep the T4i shooting wide while my Canon XH-A1 does all the heavy lifting when it comes to zooming in and getting those tight shots. Plus, all DSLR’s lack what’s called a back-focus. In television, the $30,000 lenses we use on $60,000 cameras need to hold focus when you zoom out (pull out and go wide). This is achieved by a little piece of glass near the rear of the lens that can be adjusted with a thumb screw since the CCD/CMOS sensors in professional camera bodies are not fixed distances. This also saves the shooter/operator from having to rack-to-focus or pull-focus. Most prosumer camcorders have some sort of basic back-focus system or hold focus well when you zoom out but all DSLR’s suck at this! They lose focus on a dime! So the last thing you want to do with a DSLR shooting video is a lot of zooming in and out without a tracking system.
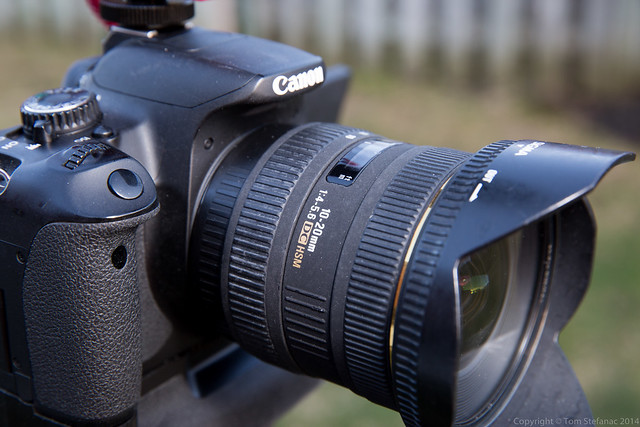
Sigma 10-20mm wide angle lens
The last thing I’ve done or added to the camera to make it a great multi-purpose tool is added Magic Lantern (short form ML). If your wondering, Magic Lantern, or ML, is a program that runs on your SD card. While it does not alter your camera, you tell your camera to pretend it is installing new firmware, this causes it to boot up ML and then presto all sorts of neat new tools and recording modes are possible. It basically supercharges your camera and it’s completely reversible/non-destructive.
Here’s a gallery with some more images of the setup you can explore.


